Description: War Thunder is a next generation military MMO game dedicated to...

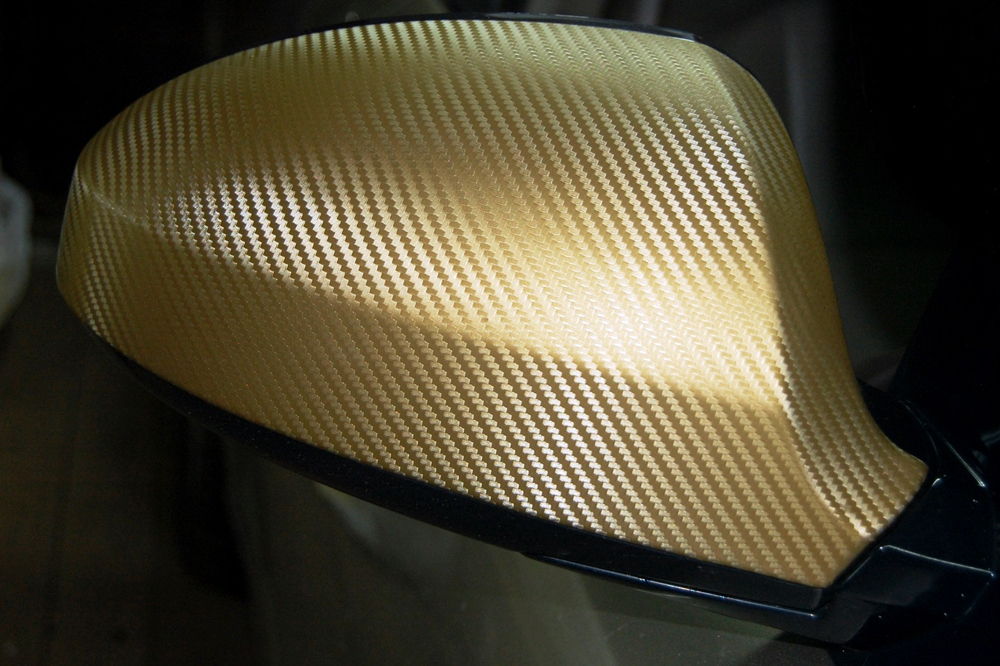
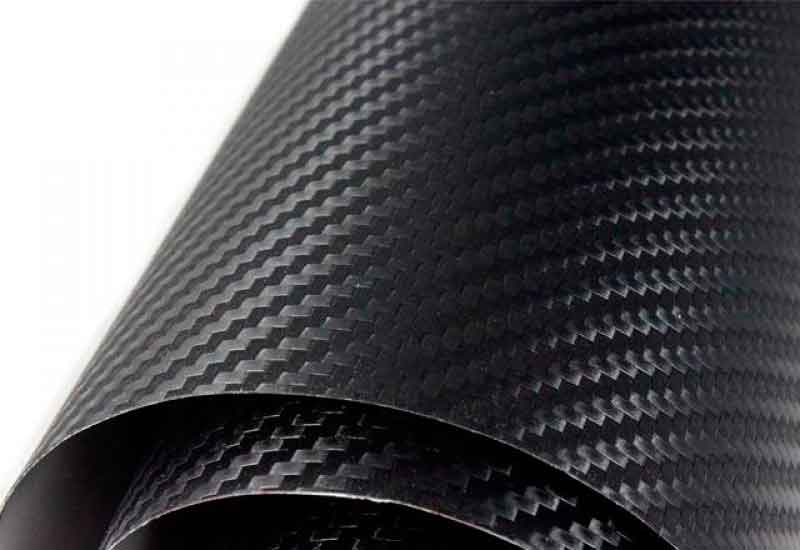
Fashion to wrap the car or just the hood vehicle carbon film is due to the successful texture of the budget material, which outwardly is almost indistinguishable from real expensive carbon. To date, it is not difficult to find a special carbon film, which is sold in almost any car shop. Successful optimization of the exterior through cheap carbon allows you to produce.
With the help of a carbon film, you can not only protect paintwork your iron horse, but also to convince others that your car is better than it actually is
The main advantage of an inexpensive material is its ability to increase the life of the car body, hiding it from all the harmful effects of the road environment. Under the carbon film, the car is not afraid of small stones and sand.
At the same time, the carbon coating is able to dampen the speed of flying particles, which, as usual, have a detrimental effect on the exterior of the vehicle, spoiling a smooth paintwork. After reading the material below, anyone can understand how to glue the hood with carbon.
Before discussing how to stick a carbon film on a car, you need to think about a lot of preparatory activities that will make the procedure as useful and successful as possible. Before gluing carbon, all elements of the vehicle that will take part in the processing must be washed and dried, there will be no superfluous procedure for degreasing surfaces with alcohol-containing substances (white spirit has excellent properties).
Prior to treatment, the vehicle must accept the temperature of the room, so that the car will not “sweat”. In order to understand how to glue a carbon film, you need to purchase the required footage of the material in advance, prepare the necessary tools and components.
Carbon fiber should be glued in advance, cutting it into separate modules that correspond to the dimensions of the surfaces to be glued. When separating a layer of material, one should remember the need to make laps that will go to the folds of the film on revolutions.
In order for the work on processing the hood and other parts of the vehicle to be done as accurately as possible, you must have the tools described below:
The self-adhesive carbon film will adhere best to the surface of the car if the temperature environment will not fall below +25 °C. At lower temperatures, even competent processing may not save from loose carbon fixation.
If the car owner upgrading his vehicle does not know how to glue the carbon film on the car in a "wet" way, he must take into account the need to prepare a special solution (soapy water), through which the individual parts of the vinyl can stick tightly to each other. It is worth noting that this method is best used by those who are dealing with vinyl material for the first time and do not have sufficient skills.
Before gluing parts, clean and degrease all surfaces of the machine that come into contact with the material. Then you need to take a sheet of carbon film and cut off the desired part. The next step is to apply a small amount of soapy water to the vinyl, separate the film from the paper base, and wet the inside of the adhesive.
When treating a hood or other part of a car with carbon fiber, you need to use a solution on the inside of the vinyl, which determines the retention time of the pasted material. It is worth noting that insufficient, as well as too excessive, the amount of solution affects the fragility of the procedure, in particular, carbon fiber may not last even a month.
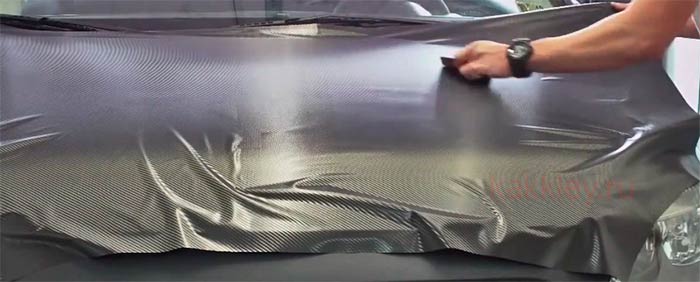
Then you need to take the prepared processed vinyl and carefully place it on the surface of the car. With a spatula, you can evenly “remove” excess water under the film. Careful movements are best done from the center of the vinyl to its edges. If there is no excess solution under the carbon, then top part material must be processed with an industrial (at least household) hair dryer. After that, the glued vinyl should be re-smoothed with a spatula. In the presence of visible curved areas, a primer must be used. The applied material must dry for at least 7 minutes.

When applying a carbon film to a car, at the end you should heat the vinyl with a hairdryer and carefully bend the edges to the primer. All excess hanging edges of the material must be cut off, after which you should not touch the car for about 12 hours, so that the car can dry completely.
If a motorist wants to understand how to glue carbon film without the use of a soapy solution, he must know the principles of processing parts using the second "dry" method. In fact, this method requires experience and knowledge, as it is considered more complex and time consuming. Qualified specialists do not recommend using this processing method to car owners who have never worked with vinyl and are not aware of the properties and characteristics of the material used. In order to glue the hood in a “dry” way, you must:
The main similarity between the two methods by which you can treat the hood of a car or other parts of it with carbon fiber is the need to clean and degrease the vehicle. Fundamentally important condition it is considered getting rid of the body from various flaws, in particular, scratches and rust. In order to glue the material, it should be separated from the cardboard lining. Then the carbon film should be gently applied top to the processed auto element. The next step is the need to smooth the carbon, pressing "strokes" should be done strictly from the center to the edges. When carbonizing a car, care must be taken to ensure that the vinyl is evenly pressed against the surface. It is advisable to use a spatula. In the presence of bubbles and wrinkles, part of the unevenly attached film must be lifted and re-adhered.
A car pasted over in a “dry” way must be dried with a production hair dryer, which will allow the material to be sufficiently warmed up. Thanks to this manipulation, the glue is activated, the carbon film will grab the car body faster. When carrying out work, the temperature of the heated vinyl should be taken into account, since it cannot be overheated too much.
After the carbon film has been applied to the car, the material should be smoothed again with a spatula. All excess and hanging parts of carbon should be cut off with a clerical knife. It will take about 6-7 hours to dry the car, while the car should be placed in a dry, warm room.
For those motorists who are interested in the principle of treating the surface of a vehicle with vinyl, it is enough to study the two methods described above, which are equally accessible to everyone. In fact, working with a carbon film is not difficult, it is important to understand the principle of its application, which optimizes the process and will do it. It is worth noting that tuning your car with carbon fiber, you can simultaneously tint the windows. Combining processes will improve the result and save time.
The best prices and conditions for the purchase of new cars
Credit 4.5% / Installment / Trade-in / 95% approval / Gifts in the salonMas Motors
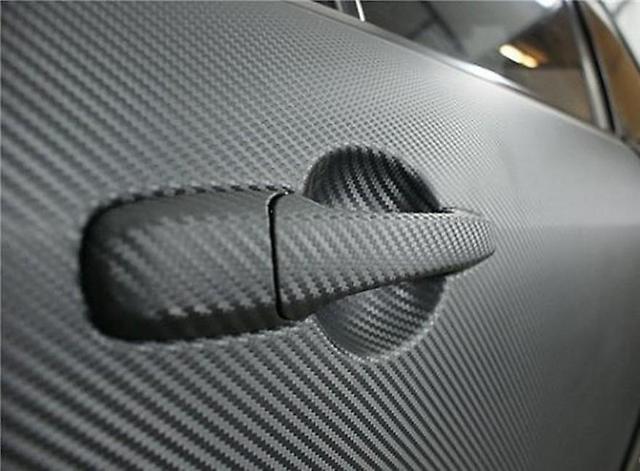
One of the most simple ways change appearance car, to hide minor scuffs and defects, is a film, including carbon fiber.
Motorists choose it for its unusual appearance, as well as for the ability to stick it on their own.
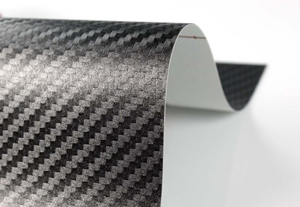
The carbon film itself is one of the varieties of the usual vinyl film. The difference is only in the pattern and colors.

On the this moment Three types of films are sold:
The choice of coating depends on the surface you wish to transform.
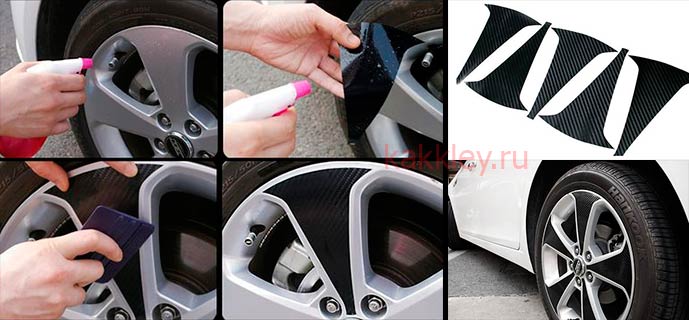
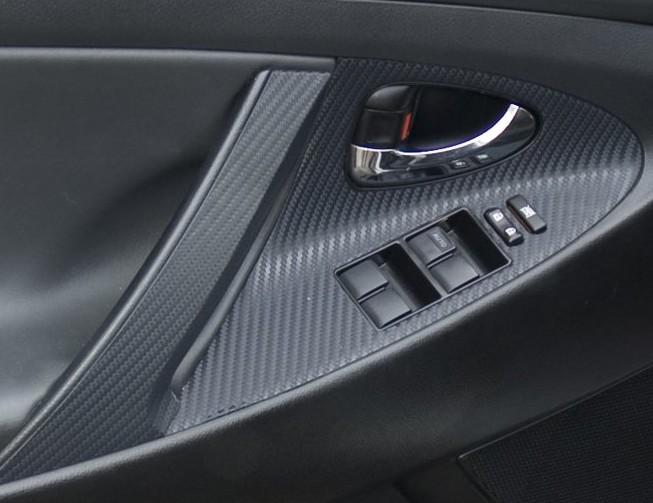
For small plastic parts inside the cabin, the simplest 2D film will suffice.
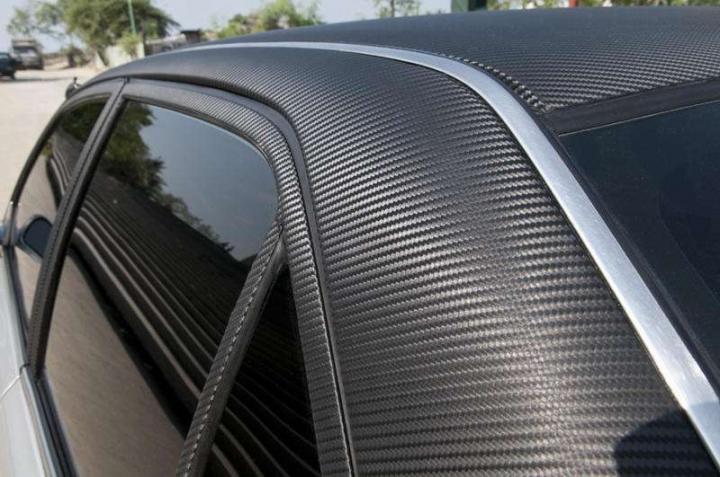
But if you need to paste over body parts, you should take a closer look at 3D. In addition to external advantages, such a film has a longer service life and more reliably protects the body from external influences.
To understand the technique carbon fiber wrapping, the first step is to purchase all necessary tools and only then start working.
Overview of required inventory
Works are carried out in a warm room with a constant temperature above 20 degrees Celsius.
![]()


Required inventory:


VIDEO INSTRUCTION
You can personalize the rear of the car yourself.
"Wet" method:
It is no more difficult to glue carbon fiber on plastic than on metal body elements. However, it is also impossible to call a simple task.
Small details have unusual shapes, lots of twists and turns.

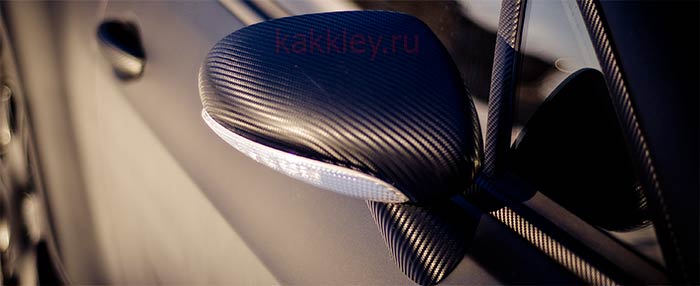
If you still want to decorate the plastic inside the cabin and side mirrors, use the following instructions:
VIDEO INSTRUCTION
In order for the work to go smoothly and the part not to be damaged, read the advice of experienced craftsmen.
Tricks and life experience that will help you in your work:
Now you know how to quickly and independently give your four-wheeled friend a spectacular appearance that makes him stand out in the general stream.
It remains only to arm yourself with everything you need and boldly get to work. You will succeed.
Carbon film is a durable technical material used for the protection and tuning of vehicles and is a combination of epoxy resin and carbon filaments. car carbon as a whole (or just some parts) allows you to emphasize the individuality of its owner. Such a car will always stand out from the general predictable and standard mass. In addition to providing attractiveness, the material performs many protective functions. First of all, with its help, the owner can easily “hide” minor damage mechanical nature, as well as rid your "iron horse" of negative impact from the side of the environment. With the presence of such a coating, the machine will not suffer from ultraviolet rays, multiple precipitation and stones flying out from under the wheels.
The main advantages of using carbon fiber to transform a car:
In order to avoid the occurrence of various problems in the process of pasting a car, it is necessary to determine the volume of the required film and the place of work. It is also required to provide suitable conditions, prepare primary materials and tools, and familiarize yourself with possible "pitfalls" in advance.
Depending on the type of carbon fiber and body type, the required amount of material is calculated. We should not forget about the personal characteristics of the carbon layer and its ability to stretch.
Taking into account these features, specialists calculated the approximate interval of the carbon film required in the work:
The carbon film, the width of which is 152 cm, will allow you to avoid excessive stretching, joints, shortages or overruns of material when pasting. It can cover any area of the vehicle. Wrapping a car with small dimensions can be done with sheets 137 cm wide.
The actual process of applying carbon should be carried out in a place protected from the influence of environmental conditions. Low temperatures, precipitation, dust, wind are unacceptable during work. The most suitable room is a garage.
When working with a hair dryer, excessive heating of the carbon fiber should be avoided, as this can lead to its melting.
Under no circumstances should the backing of the sticker get wet.
Before applying carbon, all moldings and plastic linings must be dismantled. You can return them to their place after the end of the procedure.
Must be pre-prepared and washed.
For high-quality performance of work, it is desirable to find one or more assistants.
Video about wrapping a car with a carbon film:
First of all, you need to thoroughly moisten the car with soapy water using a spray bottle.
At the first stage, you should cover a small radius area with a carbon film and smooth it well with a plastic card. This will help with further expansion of the working area to avoid the formation of wrinkles and compression of the material.
It is mandatory to exercise constant control over the uniform heating of carbon fiber. For this, a household or professional hair dryer is used. The heating temperature must not exceed 70 °C.
Separate ones should be pasted over with new full-fledged sheets of carbon. The area to be treated must be completely covered with the material. This will allow you to easily get rid of water and air accumulations.
When designing complex surface forms, it is important to exclude gluing of overhanging sections of the coating. The admission of such errors will lead to the formation of visible flaws.
![]()
During the whole process, it is important to constantly get rid of air accumulations and avoid excessive stretching of the carbon. Uncorrectable erroneous areas can be removed by pressing them with a wet cloth to the workpiece and treating with a stream of hot air. This will cause the carbon sheet to compress and the problem areas to disappear.
After wrapping, leave the car in the garage until the protective sheet is completely fixed and set. Usually ten days is enough for this.
Removing the vinyl film from the body or from any of its parts is usually not difficult. In order to remove the film, you must first warm it up with a hair dryer. Optimum temperature- 70°C. The coating is removed at an acute angle, gradually moving from the edge to the middle of the body. The entire area must be subjected to widespread heating. The work is carried out carefully and accurately. If all the described rules are followed, the paintwork of the car will remain intact. The residual adhesive layer is removed with white spirit.
Carbon film for cars is a convenient and affordable tool that will give any car a sporty and modern look. The process of applying such a coating is quite easy, and accordingly, anyone can use it to ennoble their "iron" friend. The rich color palette of this material will also please.
Every year more and more people want to buy a car. And no financial crises can affect this trend. In some cases, having your own car is dictated by the current situation in the labor market. This is facilitated by the rapid development of trade, where workers who own their own vehicle are in an advantageous position.
When it comes to the appearance of new cars, manufacturers offer limited color scheme their colorings. However, for some buyers it is enough. The number of car owners who seek to give their new car stylish and individual view is constantly growing.
Everyone approaches this issue differently. Today's possibilities allow it. For example, someone can afford expensive airbrushing, someone repaints a car in a new unusual color, while others use several different shades at once.
One of the affordable and quite popular ways to emphasize the individuality of the vehicle is the application of high-quality film materials. It's about about vinyl-based synthetic film, which has become quite firmly established in modern everyday life in many areas of human activity. In this article, we will look at how to properly glue the carbon film on the body of your car.
![]() By itself, carbon fiber is quite expensive and wrapping a car with such material will result in a decent amount. A film made with the texture of such a fiber does not visually differ from it, but is much cheaper in price. In principle, any car owner can afford such tuning, as a result of which the car will acquire a spectacular appearance, perfectly imitating expensive material.
By itself, carbon fiber is quite expensive and wrapping a car with such material will result in a decent amount. A film made with the texture of such a fiber does not visually differ from it, but is much cheaper in price. In principle, any car owner can afford such tuning, as a result of which the car will acquire a spectacular appearance, perfectly imitating expensive material.
An important advantage of carbon wrapping is the property of the material to protect the surface of the car from various external damage. The application of the film has many positive sides due to the following properties:
If desired, everyone will be able to wrap the car with a carbon film on their own. This does not require special skills, you just need to study the sequence of operations. Having chosen the required color, then carefully measure the surface to be glued and prepare a pattern. This stage should be approached responsibly, without making mistakes.
 Before starting work, it is best to try on the pattern to the pasted part of the car several times. For these purposes, it is convenient to use masking tape, with which the necessary marks are left on the surface. Be sure to take into account the existing irregularities and roughness, due to which the material may require more.
Pasting a car with a carbon film is quite common today, but the peak of its popularity has long passed. But there are still those who find it attractive and beautiful. Therefore, in this article I will tell you how the car is pasted with a film. Carbon is the most popular type of vinyl film. It has a relief surface and looks unusual.
Preparatory stage
Before proceeding with pasting, you must first prepare the surface of the car for this. So you will need polishing machine and polishing paste (ideally, of course, but you can do without polishing), degreaser (you can use ordinary white spirit or, in extreme cases, a solvent if you don’t feel sorry for the paintwork of your car), and also If you are aiming for a perfect result ( as in professional workshops), then it is necessary to wash the car, polish the surface of its body. If you are doing it yourself, you will need three types of polishing paste with different abrasives (from the coarsest to the finest grit). On a part, for example a hood, we apply a small amount of paste and “rub” it into the surface in a circular motion. Then remove the excess paste, repeat the procedure 2 more times. After the car is polished, it is necessary to finally get rid of the remnants of the abrasive paste, degrease the surface with alcohol and a napkin. Preparation is over. Next, you will need a warm indoor space, preferably clean and bright.
 Wrapping with carbon film
In order to start pasting, you must first prepare all the necessary tools. So, you will need:
So, pasting with a carbon film of the car begins.
Pasting process
 Wrapping with carbon film is not difficult if you apply it to the hood or roof. But when it comes to the bumper, you have to try. I will tell you about two different ways to apply the film quite briefly. If you are interested in this and there is a desire, you can read additional and more detailed literature.
Method one
It is called (understand correctly) wet, because the film is glued with a soap solution (to prepare it, you need ordinary water and which is diluted in water, mixed and applied to the work surface with a sprayer). After the preparatory activities, we proceed to the process itself. We treat the working surface of the car with a soapy solution, i.e. apply it to the part (the more, the better and easier it will be to work with the material), separate the substrate from the film, but try not to wet it, otherwise it will be problematic to remove it. After that, we apply a solution to the film itself, while keeping it in a vertical position so that excess debris does not stick to it. After treatment with a solution, we apply the film to the part and begin to “roll” it with a squeegee from the center to the edges gradually, with smooth movements. If this is a hood, then from the center of the hood to the edges. If there are convex body parts, then we heat these places with an industrial hair dryer and roll them with a squeegee. After the film is glued, it is necessary to dry the edges with a hairdryer, and then bend or cut off the excess. Ready.
Second way
Pasting with carbon film can be done in another way. It is suitable for those who are more advanced in this matter or for those who are not afraid to take risks. Let's take the hood as an example. We clean its surface, remove the substrate from the film and, without applying it completely, roll only the strip in the center. In this case, it is necessary that one person holds one edge of the film and does not allow it to lie completely on the part on one side, and the other person on the other side.  Next, with a felt squeegee, we gradually roll the film from the center to the edges, expelling all the air. We also heat the bulges with a hairdryer. However, the film must not be overheated, it may melt or tear. Excess also bend or cut with a knife.
You got a general idea of how to wrap a car with vinyl wrap.
Description: War Thunder is a next generation military MMO game dedicated to...

"Titan Siege" is a large-scale online game on the theme of Scandinavian and ancient Greek...

Being an avid lover of German tank looks, I spent a lot of time...