Description: War Thunder is a next generation military MMO game dedicated to...


For many reasons, the paintwork of a body element vehicle could deteriorate or even become unusable. Therefore, it may be necessary to re-paint car parts in order to restore its spectacular appearance and protect the car from the development of corrosive processes at the site of a chip or scratch.
different colors - different elements of the car
Quality painting carcan be performed by service station specialists, or you can do everything yourself. At the same time, it is necessary to adhere to the technology, work in a specially equipped room and use only paints and varnishes High Quality.
This process is quite simple, but you need to have some practical skills, be very careful and accurate. Painting one element of the car has a lot of advantages over full painting:
Painting one element of the car body can be performed using different technologies and methods. Their choice depends entirely on the nature of the defect, its area and depth. If the damage is not deep, it makes sense to use retouching technology.
To work, you will need to purchase a special pencil and solvent. Be sure to choose the color of the pencil is identical to the existing body paintwork. Retouching includes several stages:
Then you can polish the car to give the coating a shine.
For work, you will need to prepare in advance the tools necessary for work:
It is also necessary to carefully familiarize yourself with the technology of work. You can watch special videos on the Internet and see the whole process with your own eyes, so that the painting of the auto body element is done with high quality and without defects.
First, the surface is prepared for work, the part is thoroughly washed and, if necessary, dismantled. All dents on it are removed using a special tool, but if there are no dents, you can immediately proceed to the cleaning process.
Removing all the old paint is very important, its residues can cause the development of corrosive processes under the newly applied paintwork or the paint may lie unevenly and defects will appear on the surface of the part.
All irregularities are eliminated with a special grinder, work can be done using sandpaper. If rust has already appeared on the surface of the part, stripping must be carried out to the metal of the body.
The preparatory stage is very important and the final result depends on the quality of all the work. Then the surface is cleaned of dust residues and degreased.
The next step is putty. The choice of materials for work will depend on what damage there is on the auto body element. For small scratches, it is better to use liquid putty, which is usually available in special cans.
To remove deep defects, it is better to use putty of a thicker consistency, which is applied in an even layer, first across the defect, and then along it. So you can achieve the filling of the dent and the resulting surface will be perfectly flat.
Insufficiently dried material, applied too thick a layer, may begin to crack when exposed to vibrations during vehicle operation.
To additionally add surface strength, you can use putty with special additives that increase its resistance to external influences and add strength to the painted surface.
Then the prepared surface must be primed using acrylic primer, wait for it to dry and process with fine-grained sandpaper. Painting of a part of the element begins only after its additional degreasing.
How to paint a new car part? In this case, it is not necessary to perform the entire range of work, since there are no deep damages on the surface. It is enough just to treat it a little with sandpaper and you can apply paint with an airbrush.
You need to move evenly, from bottom to top, to avoid smudges of paint. What is a binder in car painting? This is one of the colorless components of the paint base. If the paint pigment is already mixed with the binder, you can immediately proceed to the staining procedure.
Most manufacturers produce ready-made three-component paint mixed with a binder. Then the part is varnished and polished. High-quality painting can be done only if the staining technology is observed.
During the operation of the car, scratches, chipped paint, and more serious damage are sure to occur on the outer parts of its body. Over time, they can lead to corrosion of the metal. To prevent the formation of rust, it is necessary to periodically carry out partial painting of the car. This is a fairly simple procedure, which, with proper theoretical and practical skills, can be carried out independently.
Partial painting of the car with your own hands is recommended to be carried out in the garage. This will prevent dust, midges, and unexpected rain or snow from getting on the painted surface. In addition, thanks to artificial lighting, work can be carried out at any time of the day.

When painting large removable body parts (doors, hood, fenders), sometimes they resort to dismantling them. This avoids the need to insulate those body parts that will not be painted. When painting small areas of the body or parts that are difficult to remove, the above procedure is not practical.
Before painting a car element, it is necessary to carry out preparatory work, which includes the following steps:
First, the element or section of the car body to be prepared must be thoroughly washed and dried. Then you can start cleaning up rust, as well as chipped paint and deep scratches. The work is carried out with fine-grained sanding paper, or with a grinder if it is necessary to clean a large area.
After removing rust and leveling paint chips, the cleaned surface must be cleaned of dust by blowing with air and degreased with acetone or a special white spirit liquid. Then it is recommended to wipe the degreased surface with a sticky dust-collecting cloth.
The surface of the metal, cleaned of paint, quickly undergoes re-corrosion. Therefore, after complete drying, the metal surface must be covered with a primer layer as soon as possible. It is necessary to spray the primer in a thin layer to avoid the formation of streaks. Before continuing the preparatory work, the soil must be dried for at least 20 minutes.
After removing large paint chips or deep rust, the surface of the part may become uneven. To level the surface, puttying is carried out. It can also be used to hide shallow dents before painting car parts.
Some putties do not require sanding the primed surface. Otherwise, it is necessary to carry out grinding and subsequent degreasing of the place where the putty is applied. The color of the putty can be chosen similar to the color of the enamel to facilitate the painting process.
The prepared putty should be applied with a spatula from top to bottom and to the sides. The applied layer should be minimal to ensure the strength of the coating. The result should be a smooth surface without bumps.
Surface leveling must be done as quickly as possible, since amateur putty ready for use dries in half an hour, and professional putty in 15 minutes. After that, it becomes unusable.
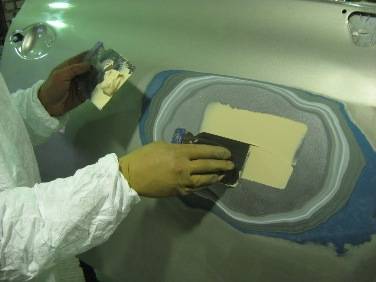
The next stage of preparation for partial painting of a car is polishing the puttied surface. You need to start with P80 sanding paper. Then gradually, as the surface is leveled, it is necessary to reduce the grain size. You can finish grinding with P280-320 paper. After grinding, no scratches should remain on the putty surface.
The surface with putty must not be wetted with water. Due to its porous nature, the putty is able to absorb water, which, reaching the surface of the metal, causes its corrosion. The dust formed during the grinding process is best removed by blowing or using a brush, soft brush.
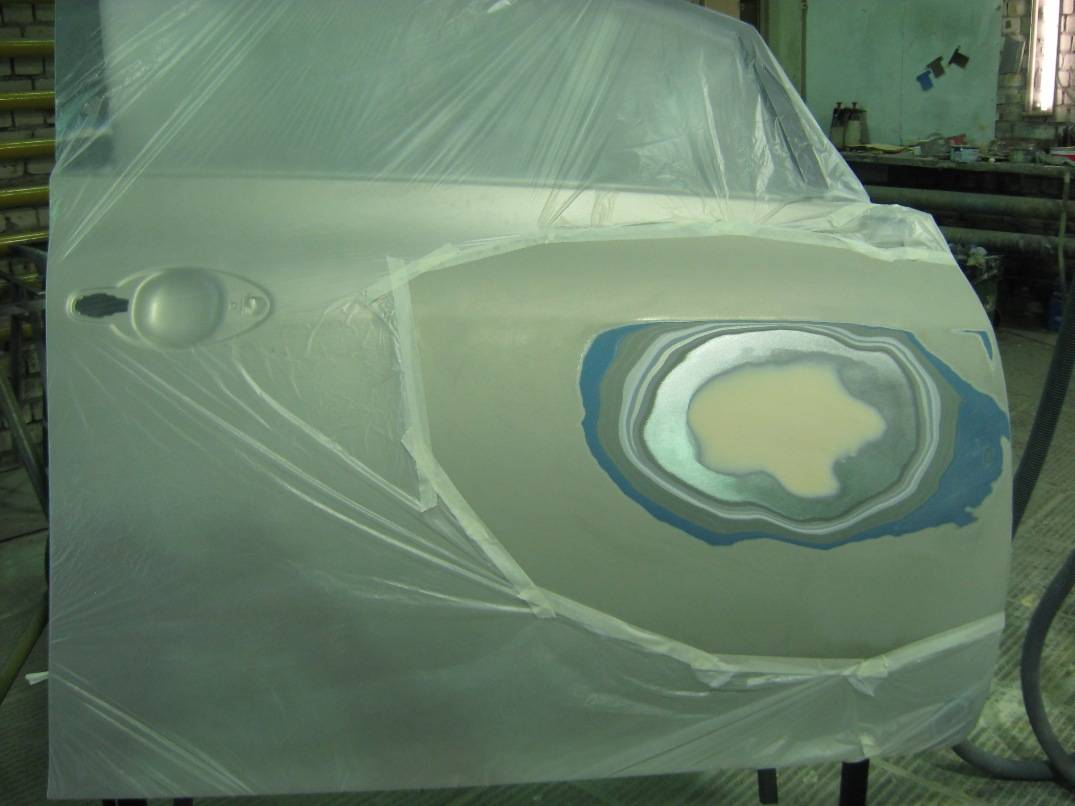
Before you start painting auto parts, you need to protect the body parts that will not be painted. To do this, some of them can be dismantled, and all the rest can be sealed with masking tape. An alternative to adhesive tape are special protective mixtures that are easily applied to any surface and are also easily removed after painting a car element.
To protect when painting small areas of the body, you can use a stencil made of thick paper or cardboard, in which a hole is cut that repeats the shape of the area to be painted. The size of the hole should be slightly larger than the primed area, so that the new paint will surely capture the entire area to be painted.
If the surface with intact enamel is to be painted, then it must also be sanded, as in the case of putty. A new coat of paint will not adhere to a glossy surface. Particular care must be taken when sanding border areas beyond which new paint will not be applied. This area should be as uniform as possible so that when painting there is no noticeable transition from new paint to old.
The next step is to prime the entire surface to be painted. When priming car parts, the following rules must be followed:
After the soil has dried, it must be cleaned with fine-grained sandpaper, blown off dust, degreased and walked with a special dust-collecting cloth. After that, you can start painting.
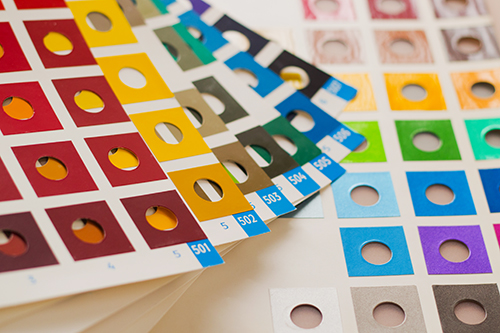
Highly important point in the partial painting of a car is the selection of the desired color. This issue must be resolved before the start of preparatory work. Unfortunately, we cannot do without the help of highly qualified specialists.
The selection of the required paint color is carried out using the original factory paint samples by mixing them in a certain proportion. The determination of this proportion is carried out on a computer using a special program. To select the required proportion, you need to know the car paint code. In addition, experts most often ask for some small painted element of the car. Due to the fact that the paint changes its brightness and saturation over time, a visual sample allows the specialist to more accurately select the desired color.
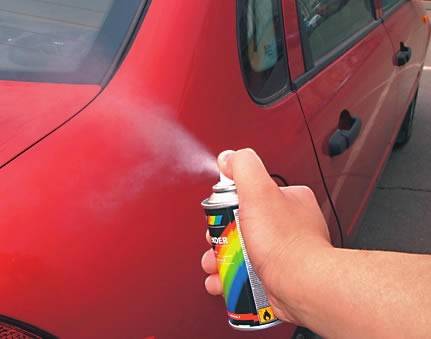
Partial painting of a car with your own hands is easiest to do with a spray can. As a rule, specialists themselves place the selected paint in spray cans of various sizes. When painting over small chips of paint, you can use a special stroke corrector with a brush and a capillary.
Painting of car parts is carried out with a spray can from a distance of 35-40 cm from the surface, applying enamel in parallel lines overlapping the previous one by 40-60 percent. It is necessary to ensure that the paint is applied to the surface strictly perpendicularly, otherwise the color may turn out to be uneven. The paint is applied in two layers. After the first layer, you need to let the paint dry for 5-10 minutes and start applying the second layer.
Often, when painting an element of a car, the transition points of the new paint to the old one are quite noticeable. This problem eliminated in several ways, depending on the type of paint.
When painting with metallic, a colorless base is used to obtain a smooth transition. It is applied with the first layer on the surface to be painted and immediately, without allowing it to dry, the first layer of base paint is applied. After the paint has dried, a colorless base layer is applied again, but slightly protruding beyond the boundaries of the first layer. Then the next layer of metallic is immediately applied.
When painting auto parts with acrylic paint, a different technology is used to obtain a smooth transition. She means preliminary training the surface of the part where the transition will be made. The lacquer surface immediately adjacent to the area to be painted is matted with gray or copper scotch-brite together with a matting paste. Then the dust is removed and the treated area is degreased.
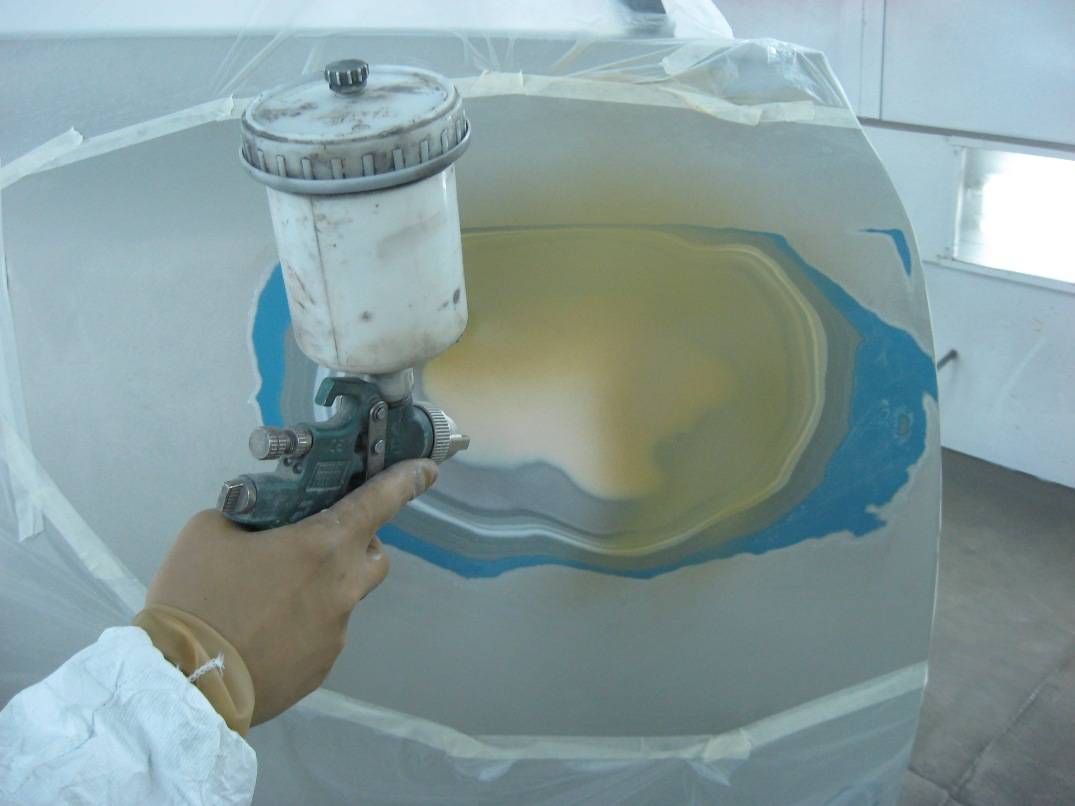
For subsequent painting, it is necessary to use an airbrush, as this will allow you to dilute the enamel during the painting process. The first layer is applied to the surface prepared for painting, slightly overlapping it. The second layer of paint, in turn, should overlap the first.
Then the enamel is diluted with a solvent to pass in the proportion of 1 part of enamel: 3 parts of the solvent. Only the area prepared for the transition is painted. Next, the transition solvent is added again in a ratio of 1:1. The resulting mixture is also applied only to the smooth transition zone.

After painting the car parts, the paint is allowed to dry completely. After that, carry out
polishing the painted area with a little bit of the old paint. This allows you to remove small bumps at the transition point of the new and old layers of paint.
Partial painting of a car with your own hands is a relatively simple procedure, but not without some subtle points. A careful study of the painting manual and preliminary training will result in a high-quality result of the work.
As a rule, painting the entire car is not required as often as repairing or repairing minor damage to the surface of the car body paintwork. At the same time, in most cases, motorists often do not know that the coloring of the entire car elements can be avoided!
Moreover, there are situations when body repair using traditional technology does more harm than good.
For example, when painting a non-removable part, when the whole car is driven into the spray booth due to a scratch or chip, it is dried for 2 hours, along with rubber bands - seals, interior leather, and plastic elements.
Obviously, painting car parts done in this way will not lead to anything good.
High-quality car painting, made according to our technology, allows you to eliminate coating defects without a trace, while the master will evaluate each car individually. With this approach, painting car parts allows you to eliminate even the smallest inaccuracies.
Repair technology ChipsAway and its technology local painting water-soluble paints AquaClear allow you to produce:
An ultra-precise selection of pigments is used without resorting to a full painting of body elements and bumpers, only a small repair area is limited directly around the damage.
Special materials and equipment included in the system make such repairs invisible and even more reliable than traditional body repairs with full painting of body elements.
Get various scratches and other local minor damage car body can in the most different situations- when parking, in an accident, in a huge variety of other situations. But be that as it may, such phenomena must be eliminated, since scratches and other damage to the paintwork layer are not only ugly, but also unsafe for the car, for its safety. Helps in this situation car element painting, price which turns out to be lower than the processing of the entire body, and in general terms, this approach creates fewer problems. It is only important to do this work competently and professionally to the details, otherwise your car will join the ranks of miserable “spotted” individuals, which immediately show that the owner was sorry to pay money for matching paint to match.
If your car has acquired small scratches, you can try to deal with the problem yourself - for example, today they often use a special pencil to remove scratches, to which you only need to add a solvent. You just need to treat the surface with a solvent, apply paint to match with a special brush, wait for it to dry, and apply a second layer. However, if the damage is more serious, then it is no longer possible to do without the procedure for painting the body element. It is more complex and specific.
Element painting is a specific task that requires a whole set of tools. Among those are an airbrush, a grinder, a dent remover, if any. For this reason, many motorists prefer to contact car services, because if you find out, how much does it cost to paint a car part then the amount will not be supernatural at all. Moreover, not only tools are needed, but also consumables, as well as experience and skill, otherwise the result will not be at all comforting.
To begin with, it is necessary to carry out preliminary surface preparation, then puttying, priming and painting, each of these stages has its own difficulties. As part of the preparation, dents are removed, if any, and grinding allows you to get rid of paint residue and other excess material. Puttying allows you to level the surface, the primer will protect against rust and allow the result to remain durable. Painting and varnishing will be the last steps that will allow you to see the car in its original form. If you are confident that you can do everything yourself, and are willing to spend time cleaning the garage so that dust does not stick to a fresh coat of paint - you can try to do it yourself, but the easiest and most natural method is to contact specialists.
Contact us, and all work will be done efficiently, quickly and with a 3-year warranty.
| Roof: | from 12.000 | up to 18.000 rub |
| Door: | from 11.000 | up to 18.000 rub |
| Hood: | from 10.000 | up to 22.000 rub |
| trunk lid: | from 8.000 | up to 16.000 rub |
| Threshold: | from 10.000 | up to 18.000 rub |
| Wing: | ||
| - front: | from 6.000 | up to 11.000 rub |
| - rear: | from 10.000 | up to 16.000 rub |
| Bumper: | ||
| - front: | from 7.000 | up to 16.000 rub |
| - rear: | from 7.000 | up to 15.000 rub |
| Side mirror: | from 2000 | up to 4000 rub |
| Moldings: | from 2000 rub | up to 6000 rub |
| Spoiler: | from 6.000 | up to 16.000 rub |
| Frame windshield: | from 12.000 | up to 25.000 rub |
| Hitch: | 5000 rub | |
| Door handles: | 2000 rub | |
| Wiper arm: | 2500 rubles per piece | |
| Rails: | 5000 rub | |
| Headlight cilia: | 2000 rub |
Description: War Thunder is a next generation military MMO game dedicated to...

"Titan Siege" is a large-scale online game on the theme of Scandinavian and ancient Greek...

Being an avid lover of German tank looks, I spent a lot of time...