Description: War Thunder is a next generation military MMO game dedicated to...

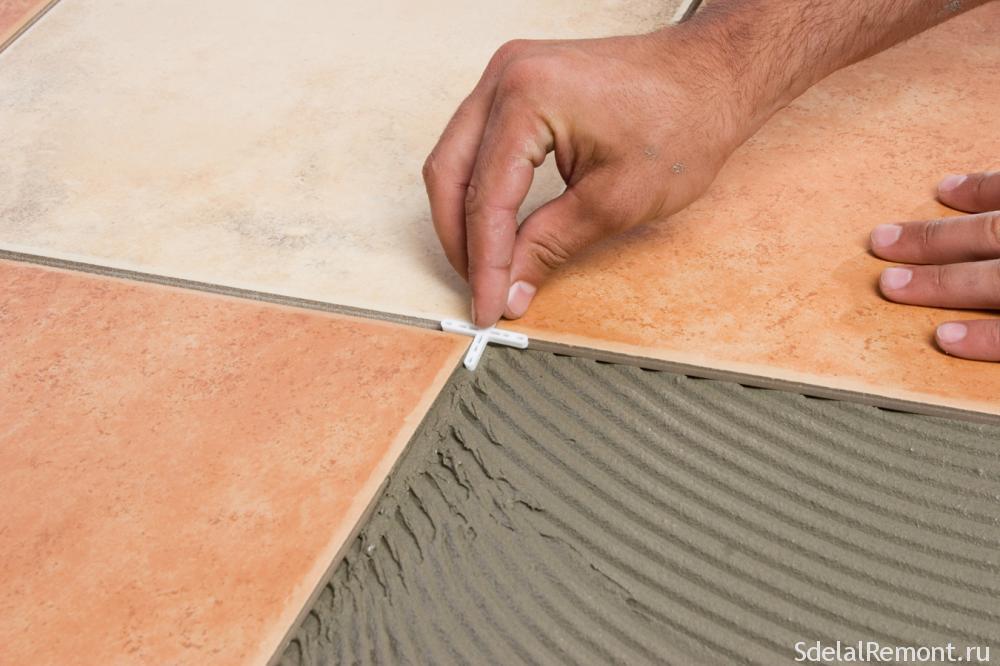
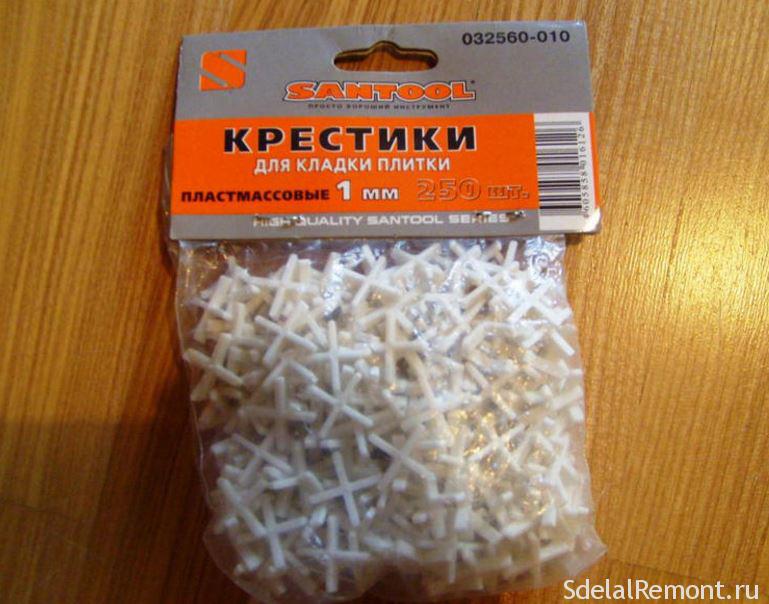
As everyone who has already encountered tile laying knows, it is impossible without the use of crosses or floor leveling systems. AT this case refers to additional devices that help create a seam of floor tiles.
For the most part, of course, tiled crosses are used, since this is a more economical way, especially for self-laying, and not professional.
The crosses themselves are small plastic devices that help to carry out such a creative process with high quality -.
Yes, this process is really creative, because it involves the transformation of a gray concrete floor (not necessarily concrete, it can be wooden or already covered with tiles, see how to lay tiles on tiles in a separate article), almost into a work of art. And the created seam of the floor tiles helps to make the surface really shiny (and we are not talking about its brilliance, but about beauty). It is thanks to them that the colors of the tiles successfully shimmer, complementing the surrounding atmosphere.
In the question of what seam between the tiles should be done, it will help to understand, first of all, its purpose. And it should be noted that the seams themselves perform a number of functions, respectively, certain requirements are put forward for them. Among these:
These are the minimum rules that must be followed in order not to end up disappointed in the poor quality of the coating. It is to help in this seemingly difficult task that crosses are needed.
Thanks to their use, it will be possible to make the seams perfect. Applying them correctly, you will get evenly laid tiles, and in addition, the same size seams parallel to each other (which is actually the main requirement). 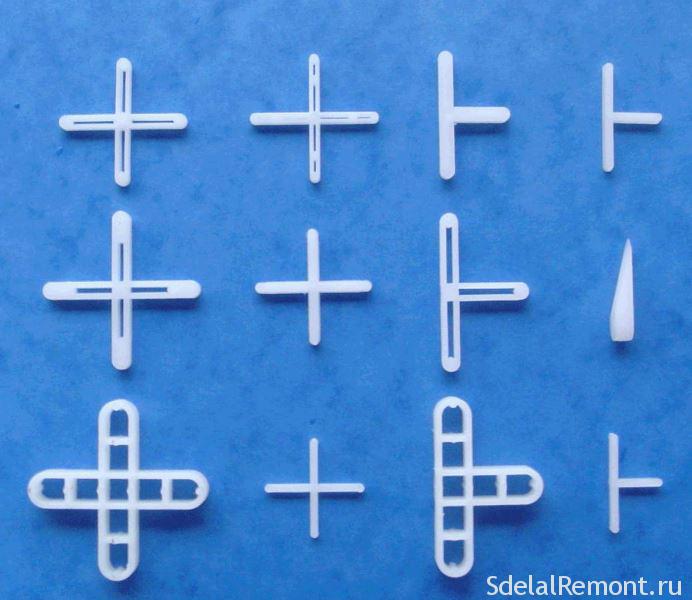
In most cases, the answer to the question of what kind of seam between tiles is needed becomes - the thinner the better. Quite often, this is exactly the case, since thin seams give the coating an elegance and make it more beautiful. But do not forget that it is also necessary to focus on the size of the tile itself.
Depending on where the tile is laid, its different sizes are used, respectively, different dimensions of the seams are also allowed. Thus, if we are talking about which seam for the tiles on the wall, there may be the following options:
It is not recommended to make a seam between the tiles on the wall more than 2 mm. Even with a tile size of 60 centimeters, it will not look good, and will simply ruin the appearance of the room.
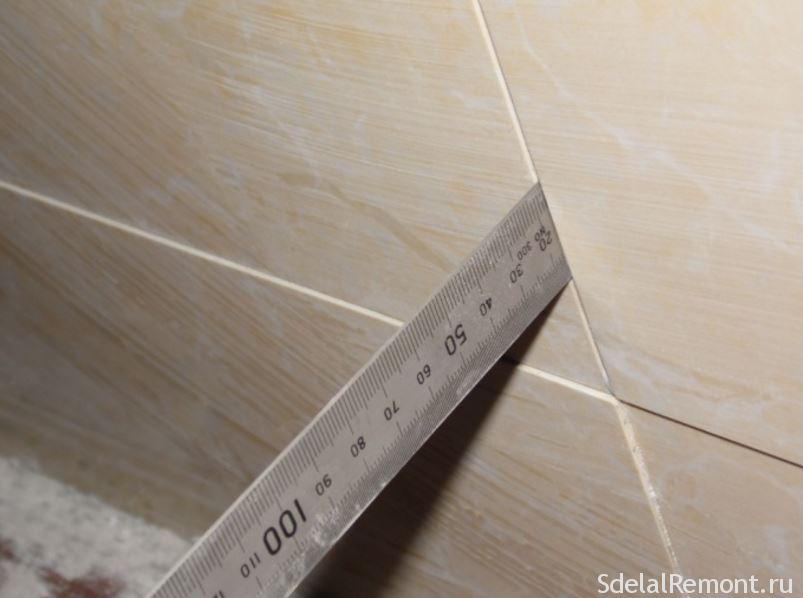
But in the case of a floor covering, here you can already look at a larger size. In this case, the following dimensions apply:
Also, in some cases, crosses up to 5 millimeters in size are used. But it is recommended to do this only in the case of working with porcelain stoneware or other large-sized tiles in public buildings.
But we note that even in this case, when it comes to laying tiles even with dimensions of 60 * 40 centimeters, experts do not expand the seams to such an extent. Thus, for floor tiles, the maximum joint size becomes 3 mm.
If the "specialist" you hired to lay the tiles claims that a joint larger than 3 millimeters is better, we advise you to find another, since only amateurs resort to this solution, unable to lay the tiles evenly around the entire perimeter with a normal joint.
This is due to the fact that a wider seam gives less styling irregularities, while with a small one they immediately catch the eye.
You can use this method of hiding defects only on your own, in the absence of experience with tiles. Thus, by expanding the distance between the material itself, you successfully mask the discrepancy.
Let's move a little away from the question of which seams between tiles are better, and return to our crosses. If you happen to have a couple lying around at home, take one in your hands and carefully examine it.
You may not see anything special at first glance. But look again, well, let's not wait too long and reveal the secret. Looking closely, you can see that the cross itself, or rather its sides in thickness, are made in the form of a trapezoid. Those. we can see that the top plane is slightly narrower than the bottom one.
This is done to make them easier to use. In addition, you can also notice the bevel on the side faces, which makes it easier to immerse the cross between the tiles.
In addition, such bevels suggest a difference in tile size, i.e. the tile itself has different sizes in the back and front. More specifically, it can be noted that the front part is a fraction of a millimeter narrower than the back, for which such bevels in the crosses are provided.
That is why, when working with such devices, pay attention to which side you insert them. In particular, to obtain a uniform coating, it is necessary to equip the narrower side inward. Otherwise, if you neglect this, the coverage will turn out to be far from ideal.
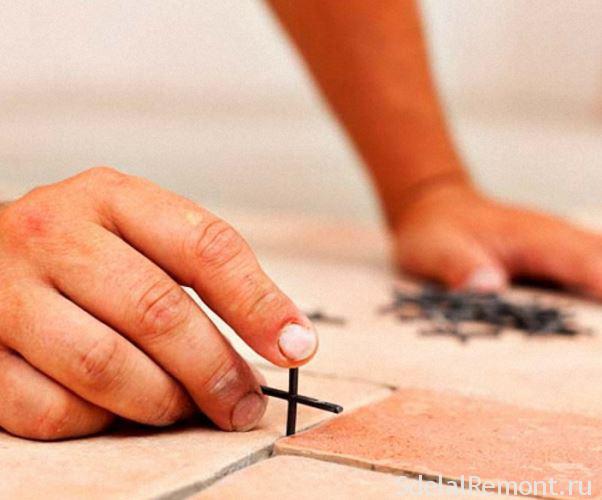
When wondering what the seams between the tiles should be, it is important to immediately calculate the amount of consumables to create the seams themselves. And it's pretty easy to calculate.
Depending on how you insert the crosses, their number will depend. Thus, equipping them at intersections, in the same plane with the tile itself, you will need about the same number of them as the tile itself (it is advisable to take a few dozen in reserve).
But in the event that it is planned to equip them perpendicular to the seam, then the number will increase four times, i.e. for each tile you will need 4 crosses (it is better to take four, since this leaves a small margin).
And we note that although for the first case the crosses themselves need a little less, it will be much more difficult to remove them. Thus, in order to prepare the tiles for grouting, you will need a special tool.
This is called a gaff. It is designed specifically for working with tiles and removing crosses after laying. Thus, after their removal, grouting will be carried out.
On this question, what should be the seams between the tiles can be considered closed. Along with this, since there was interest in the distance between the tiles themselves, it is planned to lay them, so we advise you to read our other articles, in particular on, as well. Also on the site you will find a lot of interesting and useful material.
P.S. As always, in conclusion, a few videos about tile seams. We hope the information was useful to you. If you have any questions, we are waiting for them in the comments.
Video: Minimum seam between tiles.
Video: How to choose the size of crosses for tiles
Experienced craftsmen know how to make the junction of tiles and tiles invisible. Of course, if it comes to a straight surface (floor or wall), then there are no problems with joining tiles and tiles. Between them, plastic crosses are usually installed, which determine the width of the seam. After the adhesive has dried, the crosses are removed, and the seam is filled with a fugue. Everything is very simple. The most difficult thing is to join the tiles in the corners.
There are several technologies for joining tiles in corners where different devices are used. The simplest option is to install a special tile, which is a corner. True, this element can close the outer corner, for example, the ledge of a column or step.
The process of laying corner tiles is no different from a straight line. It is also planted on an adhesive solution, which is applied to two adjacent planes adjacent to one corner of the room. The adhesive composition is leveled with a notched trowel, the tile is laid in place and leveled. Even a novice master can handle this process. It is important here - to accurately set the cladding in planes by placing crosses between the elements.
The most popular option for finishing corners is the use of trims. These are special profile inserts that are made of plastic. For external corners, trims are L-shaped profiles, for internal corners, this is a profile in the form of a concave arc. Before proceeding to the cladding, it is necessary to glue the profile itself. To do this, you can use liquid nails, sealants or the tile adhesive itself.
It should be noted that the installation of trims is not only an even joint between the tiles, it is a kind of design approach to solving the issue of decorating a room. A good trim, exactly matched to the color of the tile, is an excellent protection for the junction of the cladding elements, it is also a decorative element in the interior.
This is probably the most difficult option for exterior decoration of the corners of the room. The thing is that the ends of the two joined tiles are cut at an angle of 45 °. This is not at all easy to do, especially if we are talking about pruning with our own hands.

For this procedure, you can use a grinder, an electric tile cutter. The most effective is a tile cutter if its design has an inclined bed. That is, the ceramic material is brought under the cutter at an angle that can be set with the help of inclined stops. It is very difficult to make a cut with a grinder. Here it is necessary firm hand and a sharp eye. But even after that, you will have to work the butt with sandpaper, bring it to maximum accuracy.
The very process of gluing tiles with an undercut is no different from a standard operation. Glue is also applied on which the tile is installed. The main requirement is to precisely join the tiles together so that they create a single whole covering that closes the corner of the room.
Now, as for the inner corners. Everything is clear with trims, special profiles are used here. With an undercut at 45 °, docking can also be done. True, you will have to trim in the opposite direction, that is, from the outside to the back. It is very important not to spoil the front side of the cladding, which can lead to the impossibility of installing tiles.
There is an old way that masters have always used. To do this, the tiles were joined together so that one of them went under the end of the other. It was not always beautiful, especially if the quality and dimensions of the lining itself left much to be desired. Therefore, such a connection necessarily had to be sealed with grout or sealing was carried out using various kinds of materials.

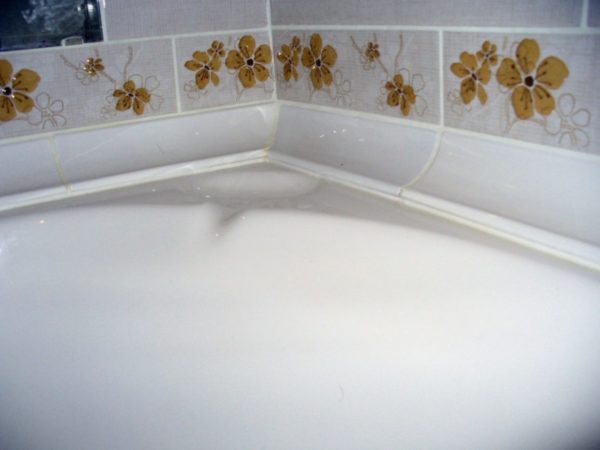
Attention! If the tiles are joined at the corner between the wall and the floor, then the overlay of one element on the other will depend on the purpose of the room itself. So in the bathroom, ceramic floor tiles should go beyond the wall. This is done with one sole purpose - to prevent the condensate that flows down the walls from penetrating under the floor elements.
All of the above options for joining tiles to each other are not always the quality of the final result. Especially if a beginner is engaged in finishing. Therefore, there are various materials with which you can hide the defects of the cladding. And then the question arises, what is the best way to close the joint? In principle, there are two standard options: grout and decorative profile. The second one is better because it completely hides the corner, and hence the defects. At the same time, it is already installed on the finished lining, gluing it either with liquid nails or with a sealant (preferably silicone).
We must pay tribute to manufacturers who are trying to find ways to protect the junction of tiles and baths from leaks. In fact, this is the most dangerous area through which water can penetrate under the plumbing fixture, where it will collect and become a source of mold and fungi. And getting rid of them will be trumpet.
Options to close this joint.
Attention! For these purposes, it is better to use the so-called sanitary sealant. It will not form colonies of microorganisms (mold and fungi).
It should be noted that the sealant is very sensitive to unclean surfaces, it does not adhere well to them. Therefore, before applying it, the surface of the tile and bathtub must be cleaned. detergent and then degrease with solvent or alcohol. At the same time, so that the sealant itself does not leave its mark on the ceramic surfaces, which cannot be removed by anything, it is recommended to glue adhesive tape to the joint, the middle of which must be cut along the joint. And that is where the sealing material should be directed. After that, the adhesive tape is removed, and the joint surface is smoothed with a brush dipped in soapy water. A tiled joint sealed in this way is reliable in terms of complete tightness.
In this article, we want to touch on a topic that is very rarely described or discussed anywhere, namely, the junction between two types of tiles. It would seem that there is nothing to discuss here, this is a tile, so you just need to cut it off correctly, then lay it evenly and process the joints with grout in a quality manner, but this is not the only one possible variant in this case. Since the topic of the joint is most often discussed due to the fact that it is necessary to connect the laminate and another coating, we will not talk about other types of materials.
The floor covering can be made of very different materials which have different properties and features. Most types of tiles are very similar to each other, their properties can differ only because of the materials from which they are made. It is necessary to connect two types of tiles if you need to do original design or the properties of one tile are needed in a certain place in the room, and another tile is used in the same room. There are several ways to connect, which are selected according to the preferences of the owner of the apartment or house and what needs to be obtained as a result in the room.
What is this article about
Since the floor or wall covering is far from always homogeneous, the materials must be organically combined with each other. For example, a large tile can be joined with a small one to make an original accent in the interior of the room. Everything will be quite simple until such a moment as the tile elements are made of similar materials and approximately the same size, height level. If you need to connect two tiles, one of which is made of natural stone and the other of plastic, then there may already be problems with transitions, since it will be impossible to do everything smoothly. It is better not to combine such different materials on the same surface at all, since practically nothing beautiful and expedient can be obtained from this.
If you need to connect porcelain stoneware tiles, for example, a larger one, and a simple ceramic coating on one base, then there will be nothing difficult, if, of course, they are of the same height. Docking different types of coatings is most often used in the bathroom or kitchen, since there you need to make an apron that will withstand temperature extremes and high humidity and easy to clean up dirt. In the bathroom, it is necessary to protect other rooms from getting into them the water that is in the bathroom.
Remember that tiles and tiles are docked where you need to use tiles to create a coating, but with different properties, from different materials and for slightly different purposes. You can create an apron of the same kitchen from moisture-resistant tiles using special glue, and dock the rest of the area with it using the methods that we will describe below. Let's make a reservation right away that joining tiles is not very difficult, since this is a coating that is most often made of very similar materials and has similar properties and sizes. But if you use very different types tiles, it is unlikely that they will be able to beautifully connect them, so you will have to consider other design solutions.
These types include standard coatings made of ceramics, plastic, glass and even metal. Stone tiles most often connect very poorly with other coatings, so in this case it is better not to use them at all if it is not possible to mark them on the surface without creating a joint with other types of tiles.
Most often, a joint is created in the following situations:
As a result, we can conclude that such a design solution is used quite rarely, but still it sometimes becomes necessary to carry it out. And already in this case, you need to find out the methods by which this very joint is created. They are not much different from those that create a joint between tiles and laminate. But in this case, there is still a slight difference. You can also use thresholds, expansion joints and moldings to create a connection, but tiles, if their dimensions and all conditions allow, can be joined simply by precise fitting and the use of sealant. It’s another matter if you need to highlight this joint with something bright, in this case you will already need to use a threshold.
You can take for this in the hardware store a special threshold, which is made from different materials. A wooden threshold is used quite often, as it is considered with many coating materials. A metal threshold - molding is not used so often. It does not have the most versatile look, so its use is somewhat limited. It also does not bend well, so it can only be used for straight joints. But in the bathroom, it is the metal molding that will look especially good and effective, since it will not be exposed to its harmful effects.
You can also highlight quite popular plastic sills that can bend in any direction, so you can use them to make a joint of absolutely any shape. Also, the thresholds differ in the place of application, they can equalize the height, make it the necessary transition, they can mask the joint. Which one you need, you will determine for yourself, based on your preferences and the characteristics of the room, the current situation. The most important thing to understand is that you need to use the nut to make the transition accentuated, to attract attention, as the nut is made in a wide variety of colors and designs.
If you need to make the transition less noticeable and accentuated, then use the following method, which is quite rarely used, but it is quite stupid, as it is very effective with almost any coating. It's also pretty versatile.

Butt tiles can simply be inserted with an expansion joint, which can be adjusted in height and length. In addition, it can be bent as you like and need to fit the shape of the tile joint. The advantage of using a compensator is that it is able to withstand changes in temperature and climate in the room, since the glue almost always expands and contracts. The compensator is also able to compress, due to which it will leave the entire coating intact, without blisters and rises. It will play the role of a deformation seam, only very inconspicuous. The compensator is made of cork wood or other materials.

This method will be appropriate in cases where the connected tiles are quite similar in size, texture and material of manufacture. If you decide to join the tiles in this way, then keep in mind that you will have to adjust their size very accurately and accurately, since you will need to make an even seam along its entire length. Sealants or grout will need to fill the joint completely. If you want to create a bright transition, highlight it, then you can choose a sealant bright color. But most often they will change this method if you need to make the transition generally invisible and smooth.
You just have to choose from these options the one that suits all the parameters. Easy work and quality results!
The cost of high-quality laying of one square of tiles approaches the price of the finishing material itself. Consequently, many people are interested in how to lay tiles on the floor and walls on their own.
Having completed the renovation in the bathroom, a person is sincerely happy, because everything in the room is now new. Over time, he begins to notice that the sink is covered with rust and limescale, the shower is leaking, and the tiles are discolored, cracked or fallen off. As a result, there are thoughts about updating the repair.
Trying to reduce the cost of repairs in the bathroom, they want to learn the secrets and subtleties of laying tiles. Anyone can master the art of tiling. When in doubt, read the article in which you will find general information for laying tiles.
Facing with a tile organizes a durable and beautiful decorative coating. Upon completion of the finishing work, an ideal surface will be obtained.
When laying tiles, be sure to observe the plane, horizon and level.
Video tips
If the bathroom walls are uneven, pay attention to leveling.
There is an opinion that hand-laying tiles on the floor is a time-consuming and complicated procedure. People who hold this opinion are very wrong.
After completion of laying, the surface must be washed. If the tile is laid on cement, it is allowed to use the room after a week. In the case of glue - after 48 hours.
It is recommended to finish the walls in rooms with high humidity with ceramic tiles. This creates an excellent waterproof coating that will last for many years. The surface of the material is not susceptible to chemical attack, so a variety of cleaning agents are used for cleaning.
A step-by-step plan for laying tiles on walls will help you avoid common mistakes and unnecessary costs.
Instructional video
Having carefully read the information, proceed to laying the tile. If the result of labor turns out to be far from ideal, do not be discouraged, because the savings and precious experience are worth it.
In rooms with high dampness and temperature changes, drywall is used to level the walls. This building material is used to level the wall, it is used to construct structures that cover wiring, sewers and water pipes.
Special rules have been developed for surface preparation and laying tiles on a wall made of drywall.
If it seemed that laying tiles on drywall is a difficult undertaking, believe me, this is not so. Be confident and patient and get to work. After a few hours of practice, your actions will become more confident. Most importantly, don't rush.

Many companies offer a turnkey bathroom service. The service deserves attention, but it is also expensive. It is more profitable to learn how to lay tiles yourself at home.
Before starting the main work, work with a pencil and a ruler. Based on the measurements obtained, create a surface plan and determine the location of the tile. Be sure to mark the location of the friezes, borders and other decorative elements.
Strive to avoid narrow stripes of tiles in the corners of the room, as this looks ugly. Also decide on the styling option and size. After completing the calculations and calculations, get to work.
If you are renovating a bathroom without help, do not be afraid, be patient and move forward. Remember, all the great masters in the past started the same way. With a little practice, you will get your hand and improve your skill level.
Everyone has to renovate the kitchen. best material ceramic tiles are used for facing kitchen surfaces. Its service life is calculated in decades, and after cooking pork and beef, washing the kitchen is much easier.
True, almost always a person finds himself at a crossroads. One way involves the involvement of a master, and the second - independent work. Since the second option is cheaper, most prefer it.
You can't solve the problem without tools. To lay the tiles, you will need a drill, a mixer nozzle, two spatulas, crosses, a milling cutter and a flexible spatula, a sponge. The list of materials is represented by tiles, glue and grout.
On the reverse side tiles from the factory are applied with an arrow or a special icon. Stack so that the arrows or icons look in the same direction. As a result, the discrepancy will be insignificant.
Holes for switches and sockets are cut with a drill and cutter. There is no need to rush to solve the problem.
After finishing laying the tiles, wait a day. Then boldly seal the seams with grout. Now it remains to lay the tiles on the floor.
Concluding the topic of the article, consider the popular ways of laying tiles at home. Some of them will help to visually raise the ceiling, others - to expand the room or hide defects.
Speaking about ceramic tiles, they discuss its design, layout, technology of gluing to walls or floors. Grouting is less often mentioned, perhaps because its turn comes when the main difficulties are behind, and the work is nearing completion. However, so that the final touch does not spoil the whole picture, let's try to figure out what role tile joints play in creating a beautiful and durable ceramic coating.
Are they needed at all?
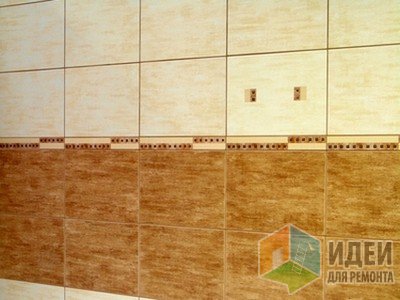
Previously, the question of the width of the seam was solved simply: thin seams on the wall, thick seams on the floor. This was due to the fact that for a long time floor tiles were inferior to wall tiles in quality. Conditions have changed, but the habit remains. In addition, floors are more susceptible to changes in temperature, pressure and humidity than walls, and thick joints compensate for this phenomenon. If joints with a maximum width of 2–2.5 mm were used on the walls, then joints of 3–4 mm were considered quite acceptable on the floor. Accordingly, grouts were created that could withstand greater stress - they were distinguished by their composition and a larger fraction.
The maximum width of the joint is still indicated on the packaging with the grout - if the design requires it, it can reach 8-10 mm. However, when a tile with an almost perfect geometry appeared (rectified tile), it became possible to lay it “joint-to-joint”, imitating marble. In the manufacture of such tiles, finishing calibration and trimming are used, so its edges, which are tightly adjacent to each other, form a coating that looks like a smooth natural stone.
Laying tiles without seams is quite a trendy trend these days. And yet, it should be remembered that with large temperature differences and other adverse effects, the effect of “sailing swelling” may occur - unable to withstand the stress, the tile in some places will begin to break away from the substrate. Therefore, the so-called "seamless" laying still implies the presence of a minimum seam (approximately 0.5 mm), although the effect of an integral coating is visually created.
" target="_blank"> Viktor Pshenitsin:
“If I'm asked to lay tiles without seams, I always fold a piece of masking tape in half and make a thin paper plate out of it, which I insert between the tiles, otherwise I just don't take the job. So I always have seams. We have a climate with significant fluctuations in temperature and humidity. This leads to the fact that the surface to which we glue the tile breathes, and if you do not leave at least a tiny gap, the tile can move away.
It does not make sense to lay tiles with a rolled edge without a seam - its geometry does not favor this, and the junctions of the tiles will in any case be noticeable.
Not just justified, but a gap is necessary when laying tiles at the junction of the wall and the bath (especially cast iron or steel). The metal has a fairly high coefficient of expansion, and if some distance is not left between the edge of the bathtub and the tile, over time, cracks begin to diverge along the tile due to the constant pressure exerted on it.

Preferring ceramics over others finishing materials, it is necessary to accept the fact that the tile itself will last a long time, but the grout in the seams sooner or later wears out under the influence of water, grease, dirt, etc. You cannot stop this process, but you can slow it down, and there are various ways to do this.
It is best to approach the protection of seams and grout in a complex manner.
Before laying the tiles, it is a good idea to treat the walls with an anti-fungal coating to reduce the chance of mold, a problem common to both new and old homes.
Antibacterial, antifungal additives are now present in many building mixtures. Modern grouts may also have properties such as resistance to chemical attack, low temperatures, water resistance. The latter type of grout is well suited for rooms with high humidity.
However, even if you use grouts that use an antibacterial, antifungal, water-repellent system, you should not refuse to treat the joints with protective compounds.
" target="_blank"> Viktor Pshenitsin:
“The protection of the seams is carried out in 2 or 3 stages: since the seams absorb liquid during the first application, it must be applied a second time, and often a third time, and applied liberally. Then the tile should be wiped so that no traces of mortar remain on it - after drying, this will be much more difficult to do. In work, it is better to use a brush so that as little as possible of the substance falls over the edge of the grout.
It should be said that for quite a long time there have been materials on the market for caring for seams, cleaning them, compounds that contribute to hardening, giving additional elasticity, which are added during work or after the seams have solidified; there are also funds for additional internal reinforcement of grouts.
Cleaning filters in the plumbing system, it would seem, have nothing to do with laying tiles, however, if the water is saturated with iron or salts, plaque will form where it hits the tile, which is especially difficult to remove from tile joints. If you want to extend the life of tiles and grout, install water filters.
On curved surfaces, for example, with the outer lining of steam rooms (steam rooms), where a temperature difference is inevitable, or at the junction of a gypsum and masonry surface that have different expansion coefficients, the grout does not hold well - under the influence of constant fluctuations, it begins to crumble. Therefore, it is more practical to replace it with a sealant.
Old to new
When the grout is dirty and cracked, the best way out is to renew the seams.
The old grout is completely removed from the space between the tiles. This operation can be performed with an ordinary construction knife with replaceable blades, although there are also special “openers” with hard alloy tips that are sold in hardware stores. The choice of tool depends on the preferences of the master, the main thing is that the metal blade does not slip off and does not scratch the “face” of the tile.
When the joints are cleaned, they are filled with new grout and covered with a protective compound, exactly as when laying.
The procedure for replacing grout (as well as sealant) is recommended to be carried out every 3-5 years. Of course, this will require some effort, but the lined surface will look neat and elegant for a long time.
The grout is removed from the joints in another case - when its color does not match well with the color of the tile.
Since replacement is usually done while the grout is still fresh, this procedure does not require much effort. Although there are exceptions to every rule - some types of grout seize quickly and in a matter of hours turn into a mass as hard as a stone.
However, it is strongly discouraged to apply new grout directly on top of the old one. First of all, this method is unreliable: to create a strong seam, the grout must fill the space between the tiles, resting on their edges. In addition, the surface of the seam will turn out to be uneven, and the colored layers will look through one another.
If the amount of work is large, and the grout has hardened, you can try to repaint the seams: bottles with special paint and a brush are sold in some stores. However, a guaranteed result can be achieved only by completely replacing the grout.
There is an opinion that light and especially white grout quickly becomes dirty and deteriorates. In fact, this happens with all grouts, it's just that the changes are more noticeable on a white background. The tiled surface will retain its aesthetic appearance only on condition that the laying of tiles and grouting were carried out in compliance with the technology, and in the future they were properly cared for.
However, manufacturers are developing new methods for protecting tile joints. One of them is two-component grouts: they usually come in the form of an epoxy resin with various additives, which is mixed with a hardener before use. Compared to traditional cement-based grouts, they are more resistant to temperature and humidity changes, provide reliable protection of the joint from mold and mildew, etc. Such a grout will last much longer without restoration, especially if it is washed regularly, preventing the accumulation of dirt on the surface of the joints. Gradually the new kind materials is gaining popularity, although its use requires certain skills, and the price is still quite high.
Thank you for your help in preparing the article.
Description: War Thunder is a next generation military MMO game dedicated to...

"Titan Siege" is a large-scale online game on the theme of Scandinavian and ancient Greek...

Being an avid lover of German tank looks, I spent a lot of time...