Description: War Thunder is a next generation military MMO game dedicated to...

Suspended plasterboard ceilings in the interior of residential premises are no longer an innovation, they are deservedly popular so far. There are many different ideas design decoration ceilings with plasterboard sheets.
Plasterboard ceiling sheathing has the following advantages:
The main types of drywall:

We work in the following sequence:
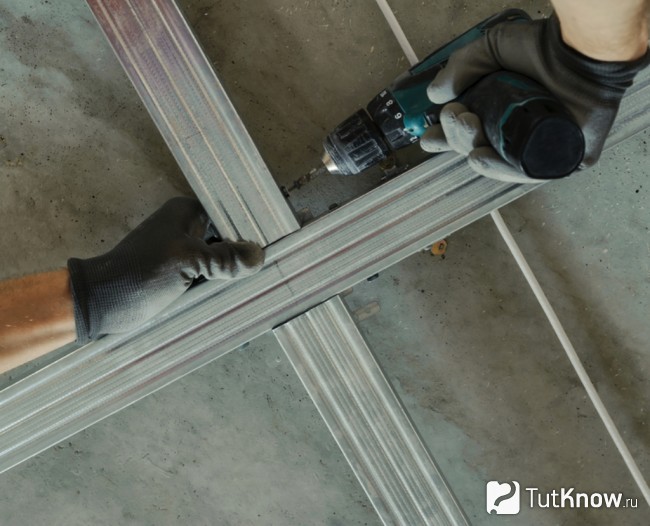
Please note that when drilling holes for fasteners, you will need goggles and a respirator, because dust is usually generated.
In the process, we adhere to the following instructions:
Please note that when building a ceiling profile, the joints of a number of fixed parts should be in a different plane and located near the hangers.
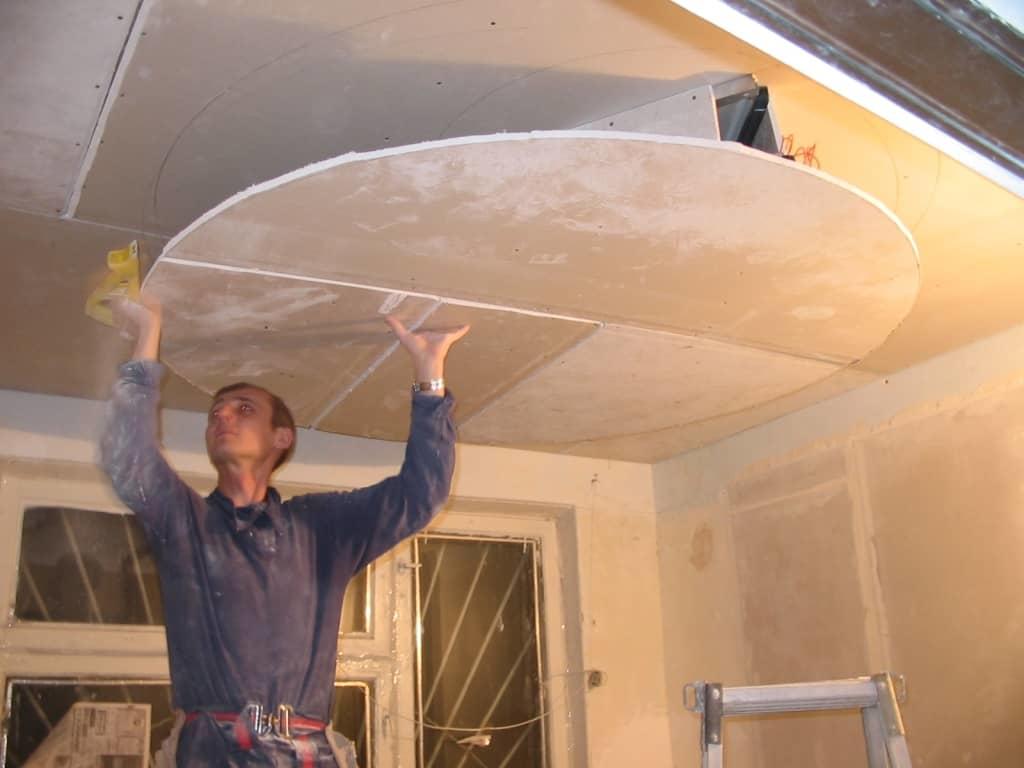
Installation work is carried out as follows:
Please note that the joining of the sheets should be carried out at a distance of 10 cm from the outer corners, if there are any in the room. Otherwise, a crack will form at the junction.
It is carried out according to the following instructions:
Often in the design of suspended structures, several light sources are used. To understand the question of how to make a backlit plasterboard ceiling, you must first understand the principles and specifics of installing a conventional structure (mounting methods, marking rules, material selection features). On this basis, it is already easier to organize original lighting, emphasizing the uniqueness and solidity of the interior.
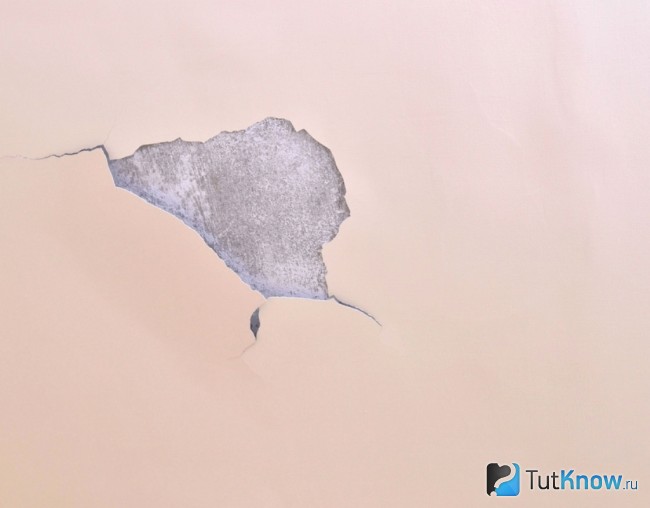
Drywall is one of the main and most popular materials used in repair and construction. If you decide to make plasterboard ceilings, then you need to familiarize yourself with their advantages and disadvantages.
Consider the benefits plasterboard ceiling
Therefore, if you intend to produce drywall laying, then you must first analyze all the advantages that are more significant and more of them, and the disadvantages, and only then get to work.
To understand what drywall to make a ceiling from, you need to know what types it is. There are several types of drywall, which are obtained by adding some modifiers.
If a person knows how a plasterboard ceiling is made, then it is clear to him that this work begins with marking. First you need to find out where the lowest corner in the room is, and draw a mark, retreating 5 cm from the ceiling, and after that, with a hydraulic level, mark the same level in the remaining three corners.
Note!
In order to connect the points marked in the corners with a straight line, you need to draw a line.
It can be made with a special masking cord, which must be stretched between the cut-offs, and then abruptly released. As a result of this, the cord will hit the wall and leave a mark on which we will put the profile.
The profile is applied with the lower edge to the line and a mark is made through the hole. Be sure to make holes 10 cm from the edge, if there are none, and also mark these places. After we fix the sealing tape on the profile, install it, using three dowels, to the wall.
Then we will make the markup in increments of 40 cm, and we will put the suspensions at a distance of 50 cm from each other. We will make an exception for the first row of suspensions and set the initial one at a distance of 25 cm from the edge. When marking the location of the suspensions, it is enough to make two points.
Drywall installation
If we have already figured out how to make a plasterboard ceiling, then we can proceed to mount the frame.
frame
If you decide to install drywall with your own hands, then you need to follow a certain order. It is necessary to take into account the following: drywall should rest in a horizontal position for two days.
Before you start laying drywall, you need to cut the chamfers. The cutting should be at an angle so that when the putty is laid down, it penetrates well enough into the holes. In general, sheet fastening should be started from the corners of the room. Self-tapping screws must be installed every 20 cm, and retreat 1.5 cm from the edges.
When fixing drywall with self-tapping screws, you need to remember that its cap should not stick out of the sheet, it should be, as it were, pressed into it. In adjacent sheets of drywall, self-tapping screws must be screwed in a run-up relative to each other. The sheets do not need to be connected to each other as tightly as possible, it is desirable that there is a gap of 1.5-2 mm between them.
If you are going to make noise insulation, then for these it is best to use mineral wool, which is an excellent sound insulator. During installation, it is cut into pieces and it must be fastened to the suspensions. When laying the sound insulator, it is advisable to use a mask.

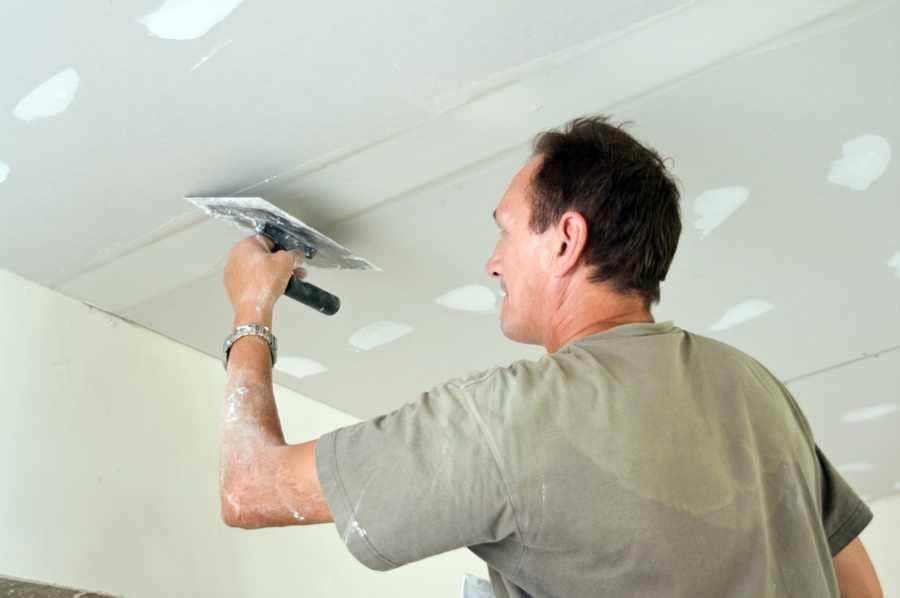
Drywall needs to be plastered
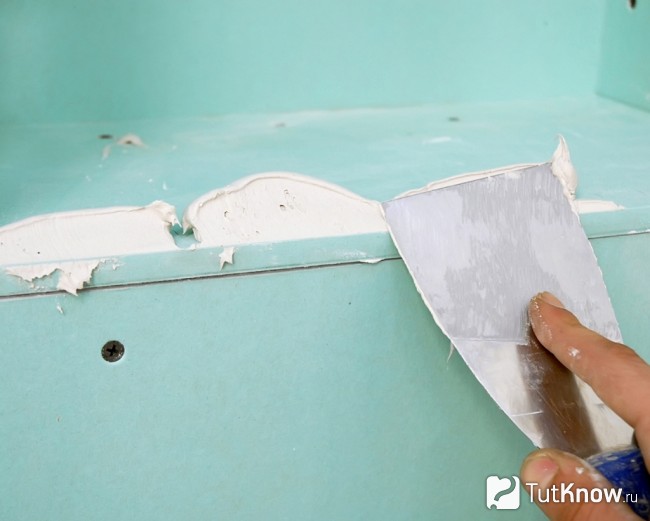
At the final stage of work, you need to properly putty and lay the seams. First, you need to tear off the cardboard and process the seams with a primer. After their final drying, we seal the seams with putty. For durability, it is desirable to use its hardened look. It is necessary to dilute the putty strictly according to the instructions, because even a slight deviation can affect the strength of the joint.
We start the termination from the wall, after which we proceed to the joints of the sheets and the caps of the screws. Then you need to wait for the seams to dry and then stick a special tape on them, which overlaps at the intersection of the seams.
Note!
After completion of this work, another layer of putty is laid on the tape, and the remaining minor defects and irregularities are also repaired.
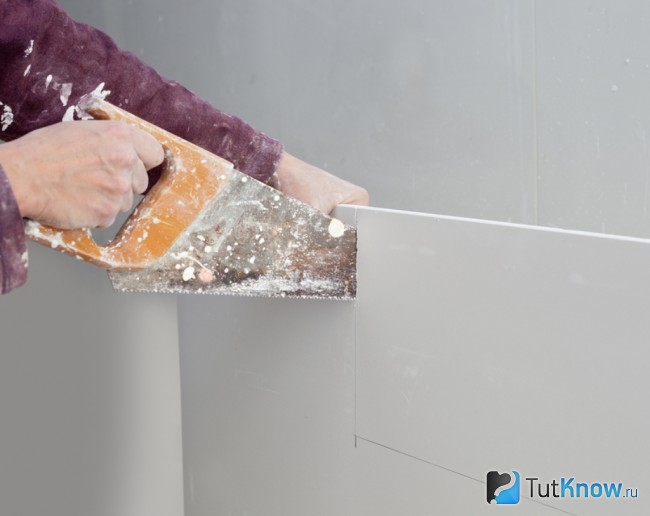
Puttying in the corners is best done with a triangular trowel. If you follow these recommendations for grouting, they will last as long as possible without cracking. After the sealing of the joints, you can begin to putty the entire ceiling, which will finally hide all the remaining minor defects.
The reason for such a high popularity of drywall lies on the surface, because this material is very convenient and solves many problems that cause serious difficulties when using ordinary plaster.
Among the main advantages are:
One of the main advantages is the possibility of additional wall insulation, as well as masking various communications from prying eyes.
Available options for ceilings and plasterboard ceiling structures:
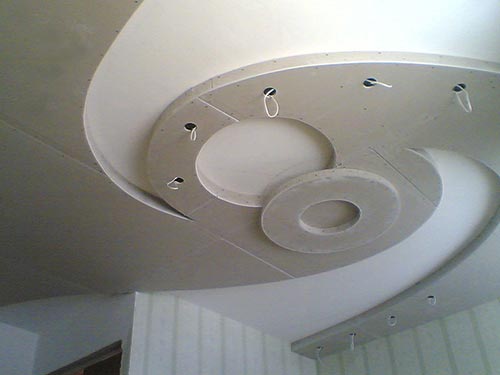
Also noteworthy is various designs on which additional decorative elements are mounted.
The above information is not the only classification of structures, quite often you can find a grouping according to integrated lighting (the presence of spotlights) or the presence of various LED elements, the installation of which is prematurely provided for by the design.
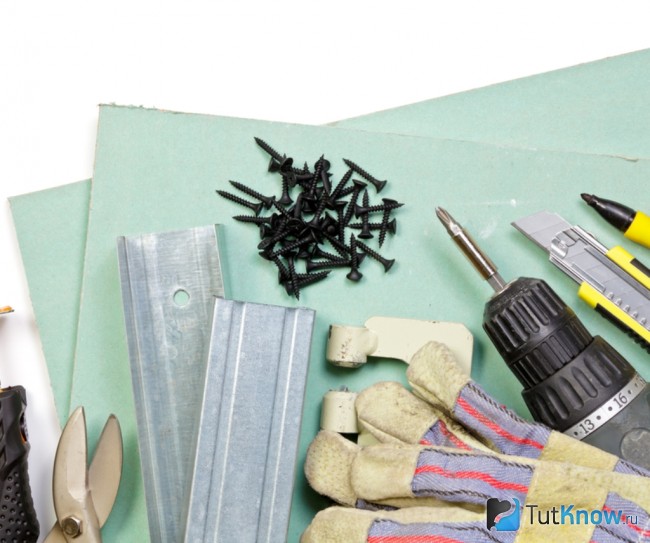
If you are interested in how to make a false ceiling from drywall yourself, then let's figure out a set of tools that will be required during the work.
Ceiling plasterboard sheets (when buying, you should calculate with a margin, with all cutting records).
This is just a basic set of what you need, depending on the additional tasks, it can expand. It should be noted that if there is excessive humidity in the room, then it is better to purchase moisture-resistant sheets.
Before proceeding with any ceiling work, be sure to complete all operations on the walls (if any are planned) and allow them to dry well
The first step is markup. How flat the plane of the ceiling will be and how the overall picture will look depends on how correctly and efficiently you follow the instructions in this paragraph.
Find the lowest point of the ceiling, the level of the ceiling will be adjusted according to it, so the more drops, the more it will drop. To determine, measure the height from the floor at several points (the floor must be flat). Now you need to mark the entire perimeter at the same height, the water level will help us with this. We make marks in each corner and with the help of a paint cord or any long and even object.
As soon as the markup is completely completed, you can proceed with the installation of the frame. We attach the guides to our lines, fasten them to the sealing tape and securely fasten them to the wall. Now you should fix the ceiling profile, but before that you need to mark the places where they will be located.
A sheet of drywall has a width of 120 cm, each sheet should have n-th number of profiles, most often there are 3 of them, while the step is 40 cm.
If you additionally put marks on the walls, then you will not have problems finding a profile, when fixing sheets
Next, you can proceed to the embedding of the transverse profiles, here you need to be extremely careful not to get the borders of the profile to the attachment points of the suspensions. With this arrangement of longitudinal profiles, it is enough to fix the transverse ones only at the joints of the sheets. The optimal suspension pitch is 0.5 m.
The settlement work is over, now we take the suspensions and with the help of anchor wedges we begin their installation, do not forget to use the sealing tape.
At this stage, everything is ready for fastening the longitudinal profiles. Their length is mainly from 3 to 6 meters. Therefore, depending on the size of the room, we cut or connect them to the desired length.
Fasteners should start from the corners of the room, it is better to do it with an assistant. Which should attach the rule to the corner, to the guides, thereby supporting the profile, at this time you must fix it on hangers. With each established profile, the procedure becomes easier.
Installation of transverse profiles is carried out using special crabs. For additional rigidity of the structure, additional fasteners can be used, for example, profile trimmings can be used to fasten the transverse elements to the ceiling.
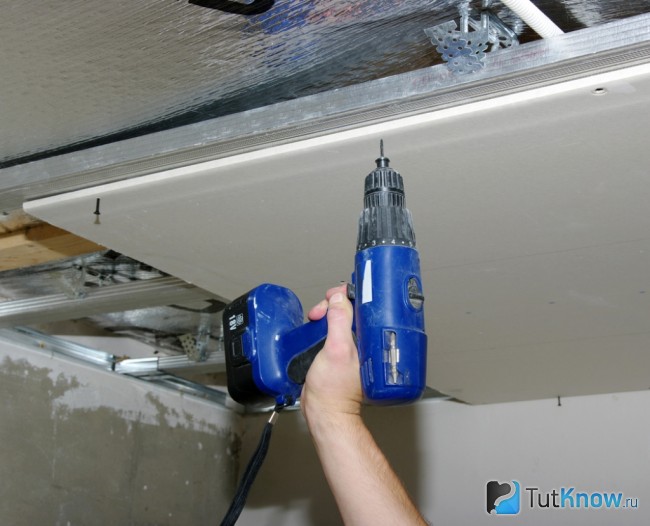
Here we come to the final stage. Treat the sheets well with a primer. It is best to start fastening from the wall, it is better to leave small indents in case the walls play a little. Fasten the sheets to the profiles with self-tapping screws in increments of approximately 20 cm.
![]()
In this article, you learned how to quickly make a high-quality plasterboard suspended ceiling yourself. At this point, the work can be considered finished, it remains only to cover up the seams and putty the entire ceiling.
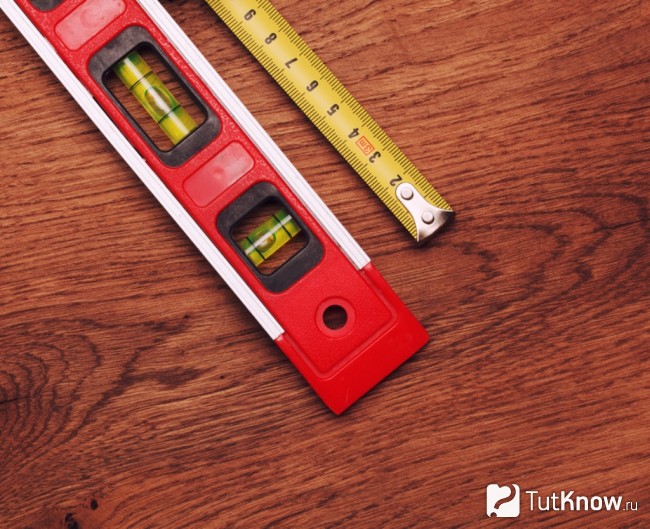
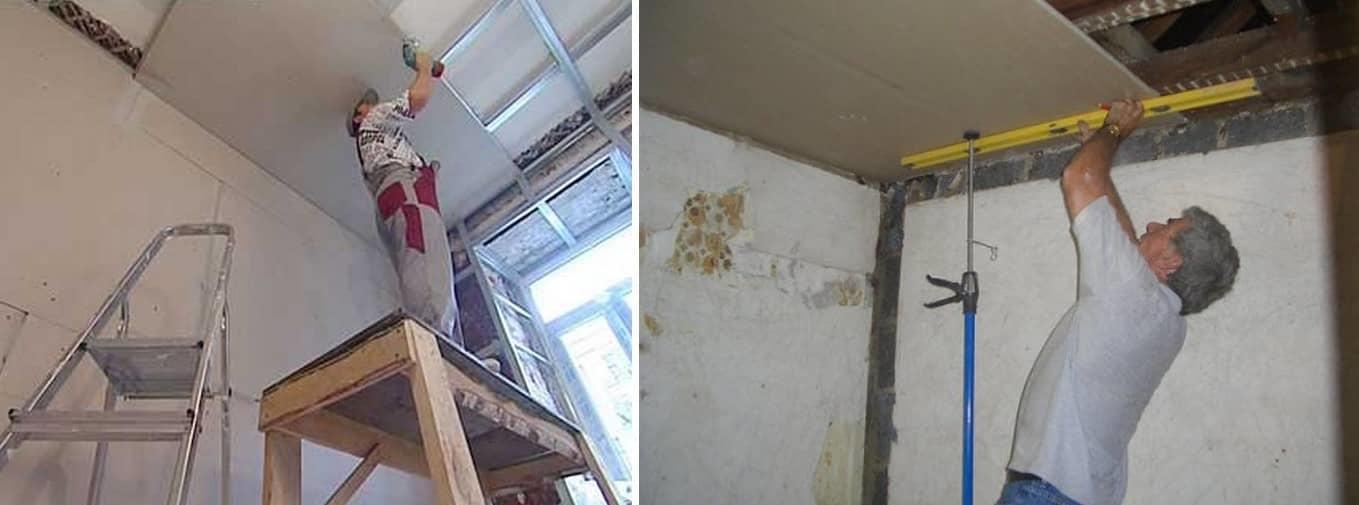
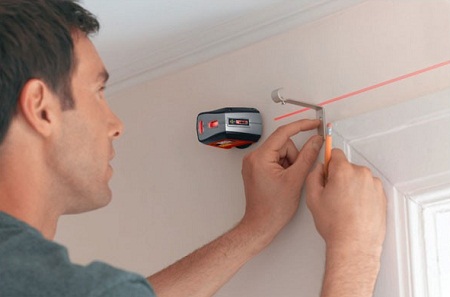
Of course, installation does not tolerate approximation, and even in a small room you should not do something by eye. Usually in this case a long level is used - it helps to find out which place protrudes above the surface.
If you have a chance to use a laser level, be sure to use it. In this case, you simply walk along the surface of the ceiling with a tape measure, fixing the place where the distance to the ceiling from the laser line will be smaller. This is done if the ceiling needs to be raised high.
First of all, you prepare the necessary materials and tools.
An example list would be:
This list is exemplary, but usually it is with these materials that they undertake to mount the ceiling.
So, the process scheme will be as follows: marking the ceiling - directly mounting the frame - fixing the plasterboard to the frame - final finishing.
The order of work is as follows:
Installation of suspensions on the ceiling goes to the marked points with dowels or self-tapping screws. Then you need to fix the carrier profiles. Their length should be equal to the starting frame, the one that is placed around the perimeter of the room.
Measure the width of the room, subtract 10 mm from this value - this is the length of the profiles.
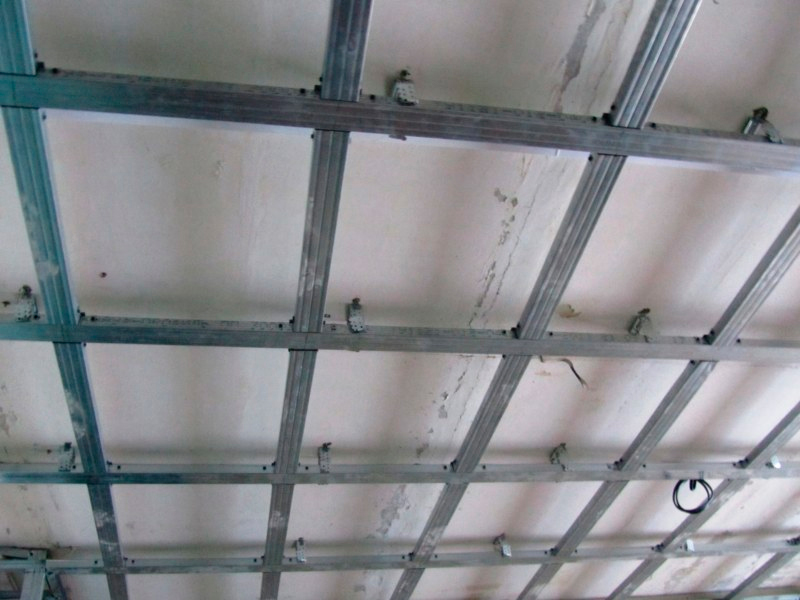
The bearing profiles are inserted into the suspensions, fixed one by one with self-tapping screws. Horizontal profiles - very important point, use the level.
For the strength of the frame, there are few transverse profiles; it must be strengthened with longitudinal elements. To do this, cut the material into pieces of 400 mm. Fasten these pieces to galvanized crossbars, step - 500 mm, crabs are used as fasteners.
After the frame is ready, you need to sheathe it:
Drywall is a natural material, the name speaks for itself - gypsum + cardboard, it is safer and more environmentally friendly than plastic structures. It is always appropriate and reasonable; such repairs are available for ordinary apartments.
There are several universal tips that are not of the last importance. Take metal, not plastic dowels.
Electric wires will be laid according to the scheme, which is drawn in advance. They are isolated in a special corrugated pipe.
Always check the correct operation of electrical communications before sheathing the frame. Connect sockets and lamps, check their operation.
If the ceiling is lowered no more than 20 cm, use standard hangers. If the distance is greater, use segments of the guide profile together.
It doesn’t matter if your home is located in a point, for example, Ilyichevsk, a metropolis or a small village - today drywall is a democratic finishing material. It serves for a long time, it is not difficult to work with it, it is safe for human health.
If suddenly you decide to do the dismantling of plasterboard ceilings, then you can deal with this alone.
Attention, only TODAY!
GCR sheets are a universal material that combines a range of consumer, aesthetic, quality and performance characteristics. Affordable cost environmentally pure material, perfectly flat ceiling surface with proper installation, no additional costs for leveling the surface in the traditional way (plaster, putty, primer) and unlimited design possibilities - the main arguments "for" mastering the instructions on how to make a plasterboard ceiling with your own hands and give the room a beautiful appearance.
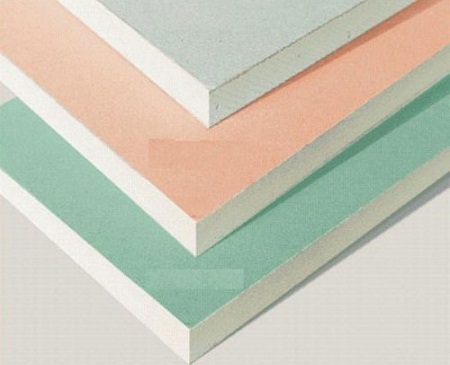
The modern range of GKL sheets will allow you to implement any repair and construction tasks on the base surface of the ceiling. In order to perform the installation of drywall on the ceiling with your own hands with high quality, you need to choose the right plasterboard sheets. Depending on the additives used, all drywall sheets are classified into 3 types:
GKLO are used mainly in bank safes or boiler rooms, and for residential premises GKLV is used - for the bathroom and kitchen, as well as GKL - for any dry rooms, including the bedroom. In addition to the type of plasterboard sheets, before attaching drywall to the ceiling on your own, you must choose the right sheet thickness. For decorative elements, the optimal thickness is 6 mm, for the ceiling - the range is 9.0-9.5 mm.
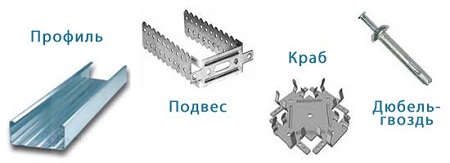
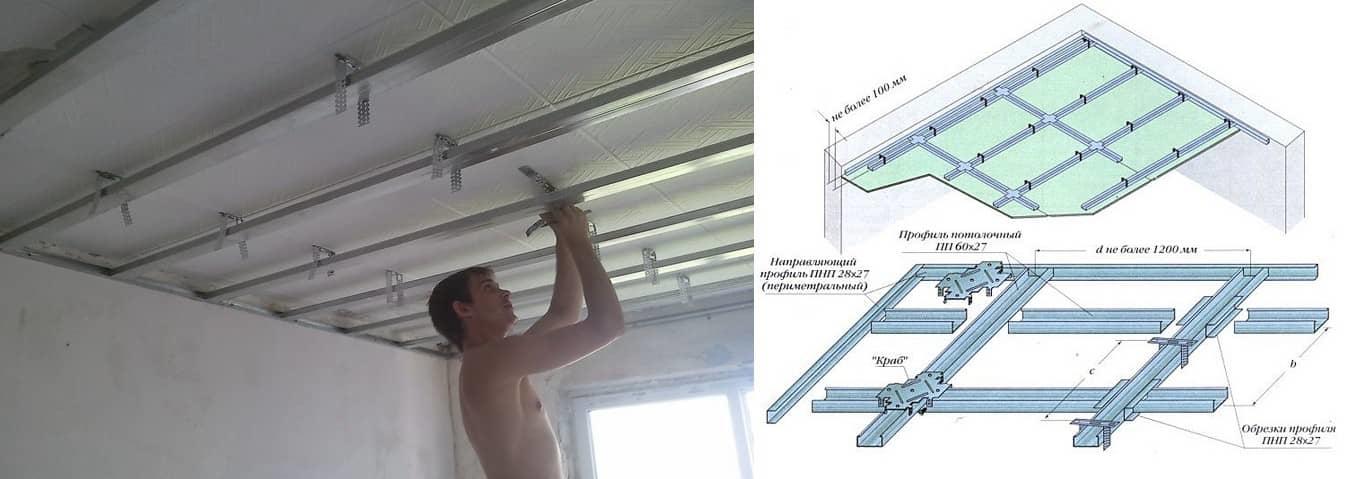
Traditional installation technologies - Giprok, Knauf - imply the installation of a plasterboard ceiling using special mounting profiles: wide ceiling CD60 and narrow guides UD17 (27). In addition, fasteners will be required to fasten the sheets to the ceiling:
With a distance between the profile and the ceiling of up to 13 centimeters, mounting plates are used, if less, suspension spokes. To fasten the profile perpendicularly, it is necessary to use crabs, GKL sheets - with 20-30 mm screws. An important parameter when choosing fasteners is the material of the structure to which the frame is attached. If the plasterboard ceiling frame is attached to a stone surface (brick, concrete), then it is recommended to use dowels with a diameter of 6 mm, a length of 40 mm, self-tapping screws are sufficient for wood or clay with wood.

Mounting on a surface made of loose materials (silicate blocks, etc.) is carried out using dowels 80 mm long, 8 mm in diameter.

For right choice type of GKL sheets, it is imperative to examine the surface: for rooms with high humidity and basements, moisture-resistant drywall is recommended, for arches - special arched, for residential - standard sheets. To prepare the surface and fix the ceiling, it is necessary to prepare the tools:
When working in an equipped room, it is necessary to take out interior items or protect the surface from dust with a film. Since working with GKL sheets is associated with a significant amount of dust, it is recommended to protect Decoration Materials from pollution: cover textured wallpaper with a cloth or film using masking tape to fix the material, flooring cover with foil.
The most crucial stage of work is the determination of the horizontal level, since in practice the floor slabs of typical houses “from builders” are rarely perfectly horizontal. Most often, after measuring the parameters, it turns out that the floors are laid with an inclination. In this case, finishing the ceiling with drywall begins with determining the lowest corner of the ceiling: first you need to measure the ceiling-floor distance of each corner and determine the lowest point. Be sure to apply marks both in the corners and in places of visual "bumps" and check the horizontal level with a cord stretched diagonally. After determining the starting point for lowering the ceiling, it is necessary to mark the profile fastening in accordance with the drawing:
Further, the marking for the mounting profile is repeated from the first line while maintaining the checkerboard pattern. At the preparatory stage, the marking of the places for mounting lighting fixtures and the chasing of the ceiling (walls) for wiring is carried out.
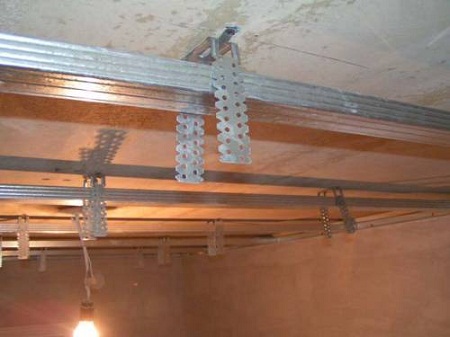
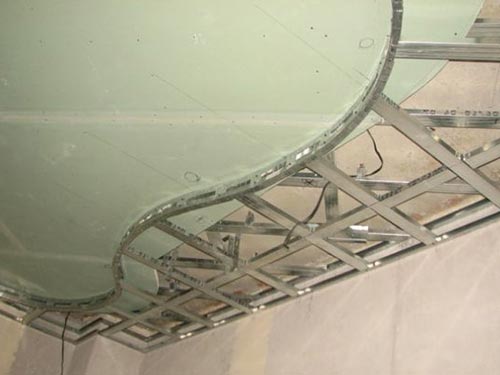
All hangers must be fixed on the base surface in accordance with the markings: mounting hangers, knitting needles with an eye and a swivel hanger. When preparing the CD profile for installation, it must be taken into account that the length of the product must be approximately 10 mm shorter than the length of the marking line. The UD profile is installed around the perimeter, then it is necessary to insert CD profiles into it, orienting inside the mounting hangers.
It is imperative at all stages of fastening to control the exact horizontal position of the products with the help of a level, the extra edges of the suspension can be bent. To strengthen the base, you can connect the CD profiles with specially cut pieces 40 cm long and crab fasteners. The "folk" method of strengthening the frame, which is used by the craftsmen, is to use "shoes" from profiles bent with the letter "G".
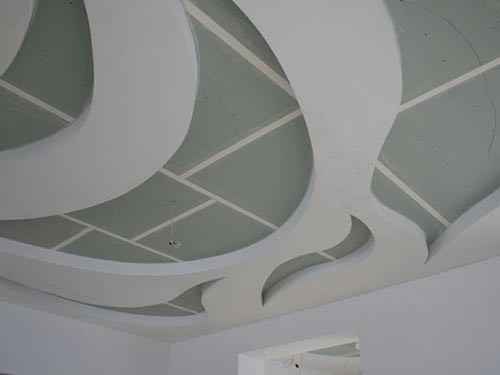
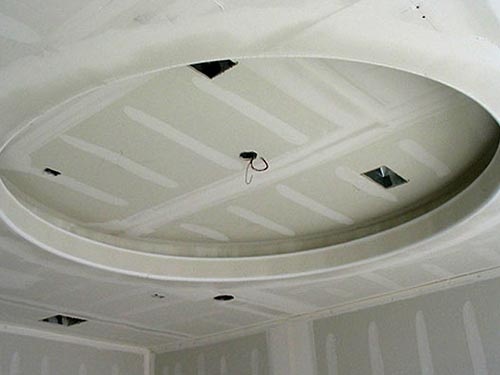
To fix the ceiling structure according to complex curly drawings, it is recommended to prepare the profile in advance: make cuts with metal scissors step 6-8 mm opposite each other.
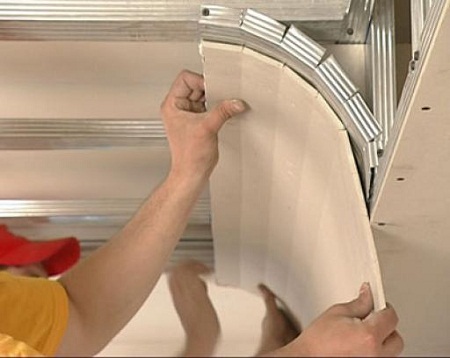
Thanks to this technology, the profile will be easy to bend to give complex ceiling shapes and create multi-level structures.
The frequency of making cuts is adjusted individually: the more complex the design of the plasterboard ceiling according to the drawing (project), the more often the recommended distance (step) between the cuts. After fastening the profiles, wiring and electrical work are carried out. In addition, to improve the heat-insulating and sound-proofing properties of the ceiling, glass wool can be laid.
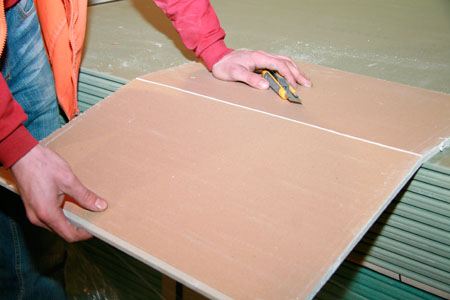
GKL sheets must first be prepared: 1) mark the sheet; 2) cut standard sizes products in accordance with the drawings using a construction knife; 3) gently hit the notch on the other side of the sheet. Subject to the sequence of preparation, the GKL sheet will burst along the notch, and a special planer is used for high-quality processing of the cut.
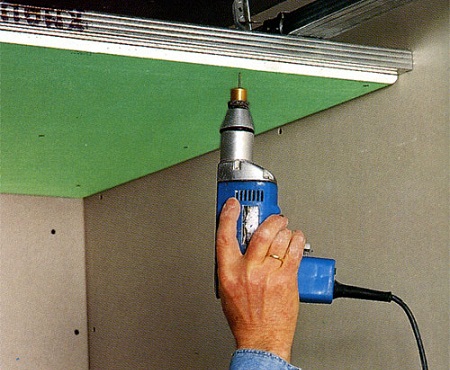
The main condition for high-quality fastening of the material is to provide for the entry of all edges of the material into the profile at the stage of preparing the GKL sheets. Therefore, it is recommended to check the parameters of the frame beforehand at the stage of preparing the GKL sheets for installation. When fastening GKL sheets, it is recommended to observe a gap of 2-3 mm and use a screwdriver with a limiter to properly screw in the self-tapping screws. GKL sheets are fastened to the profile with self-tapping screws with a pitch of 25 cm.
When doing work on your own, you must follow the basic rule of how to make a plasterboard ceiling with high quality: it is ideal to screw in self-tapping screws. Proper fastening of self-tapping screws is the optimal location of the cap: do not dig deep into the GKL sheet, but do not protrude on the surface either.
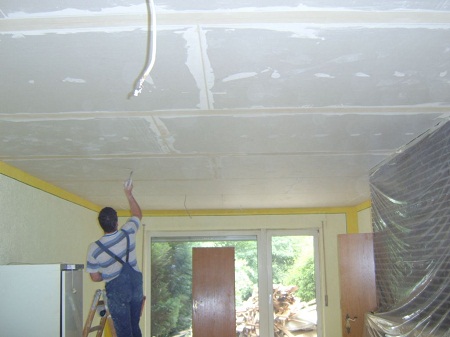
At the last stage of work, puttying is performed with special compounds using a serrated film. Be sure to putty the screw heads, it is recommended to use special mixtures for sealing joints, and after sealing, you can putty the entire surface. Depending on the design intent, after the putty has dried, you can apply a layer of paint, glue wallpaper or tile the surface.
Description: War Thunder is a next generation military MMO game dedicated to...

"Titan Siege" is a large-scale online game on the theme of Scandinavian and ancient Greek...

Being an avid lover of German tank looks, I spent a lot of time...