Description: War Thunder is a next generation military MMO game dedicated to...


Drywall is a very convenient material. It is widely used for decoration of walls and partitions, doorways, ceilings and other tasks. An additional advantage of drywall is that structures from it can be erected without the use of complex tools. Enough drill and screwdriver. Despite its ease of use, the material allows you to create almost any plasterboard ceiling that fully meets the needs of the owner. With a strong desire, you can make a plasterboard ceiling with your own hands. The device of the system does not require special experience. You just need to follow the instructions in everything and perform the installation step by step.
Any type of plasterboard construction must be carried out in dry and warm conditions. This must be done before the final floor is installed. Before proceeding with the installation of the structure, it is better to prepare a sketch and think over in detail the options for arranging furniture and lighting so that electricity is used as rationally as possible.
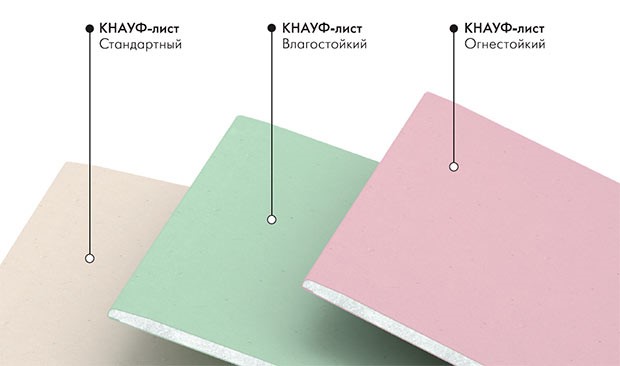
Think about what kind of drywall the structure will be made of. So, you can from waterproof and ordinary drywall. If the neighbors from above flood you, the moisture-resistant material will only need to be restored a little. The usual one will have to be completely changed. This point is relevant for people living in apartment buildings. If you are making repairs in a private house where there is no threat of flooding of neighbors, you can use ordinary sheets for mounting the structure. They are noticeably cheaper than their moisture-resistant counterparts.
Simple material allows you to hide even the most noticeable defects. In addition to this, it is inexpensive, which makes it an excellent option for both city apartments and private cottages, as well as for country houses.
Thus, a plasterboard ceiling has many advantages:
Back to index
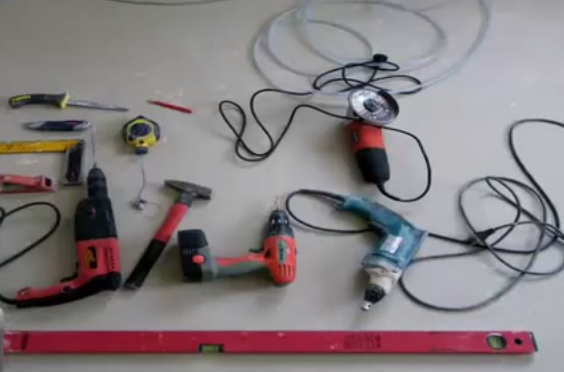
To make the work as comfortable, fast and high-quality as possible, prepare everything in advance necessary tools. At this stage, you need to take into account 2 main indicators: the amount of work performed and the available budget. For a simple home repair that takes place every few years, it's pointless to buy expensive professional-grade tools. So in this moment focus solely on your needs and requirements. And you will need the following:

Cutting sheets of material and processing edges will be performed using the following tools:
Direct installation of profiles and sheets will be carried out using the following tools:
In addition, you will need the following:
Back to index
In order for the plasterboard ceiling to be perfectly even, the correct markup should be made before work. Better to compose first detailed plan on paper, and then transfer the finished scheme to . On the diagram, be sure to note what distance will be between the draft ceiling and the plasterboard ceiling.
The main purpose for which preliminary marking is performed is to determine the horizontal and then apply a beating on the walls of the room along its entire perimeter. The draft ceiling is often uneven. So that the finished drywall construction does not have distortions, you need to make all the marks on the same level. Due to the unevenness of the draft ceiling, they will be at different distances from it.
If the area of the room does not exceed 30 m², a simple building level can be used to beat the horizontal. You apply it to the wall at the height of the future structure and align it so that the bubble is located between the marks of the flask. After that, you will only need to draw a marking line on the wall of the room along the level. Next, the level moves along the wall, and the horizontal continues until all the walls are marked. The end point must match the start point.
For greater accuracy, use a hydraulic level. Its design is extremely simple: 2 connected vessels, each of which has a scale. It is necessary to attach these vessels at the required height in different corners of the room and ensure that the water level in the communicating vessels is the same. There is also a mark on the wall. According to this scheme, the entire perimeter is marked.

To connect the marks, use a long ruler or suitable tools (for example, a piece of profile).
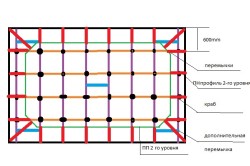
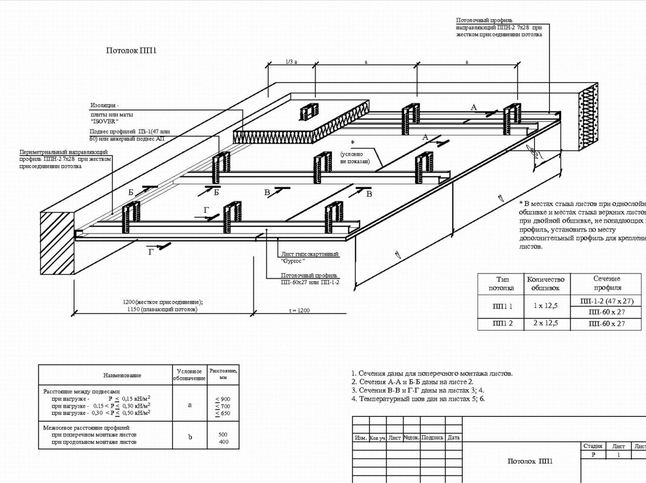
Another important task of this stage is to apply parallel marking lines along the length and width of the ceiling before installation. The lines will show the installation locations of the CD-profile and hangers. Due to the fact that in most cases drywall sheets have a width of 120 cm, parallel lines must be done in increments of 40 cm or 60 cm. Due to this, the joints of the sheets will be on the profile, which will ensure their secure fastening.
Back to index
The frame is assembled using the following materials:
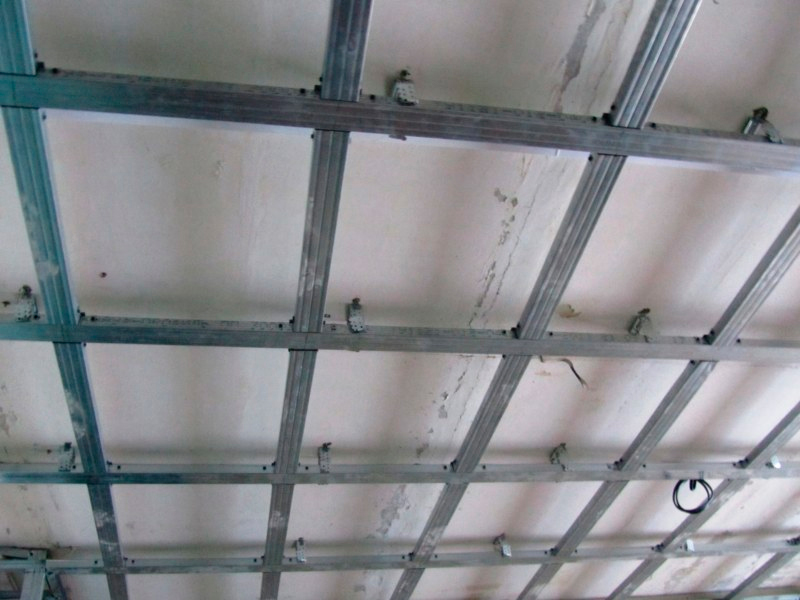
First you will need to install the UD guide profile. It is mounted according to the markup made earlier. Use dowels for mounting. Maintain a step of 50-80 cm. Be sure to check the horizontal profiles with a level.
In accordance with the markings, fix hangers for CD profiles on the ceiling. They should be installed at a distance of 1 m. For fastening to a wooden floor, use self-tapping screws, to concrete - dowels. The installation of these devices on adjacent parallel lines is carried out in a checkerboard pattern.
![]()
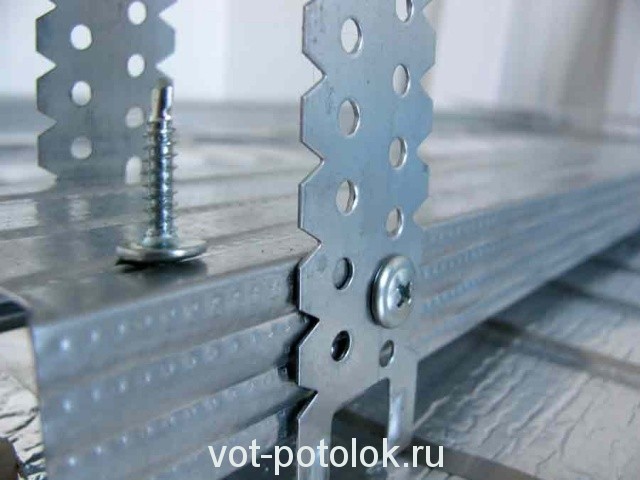
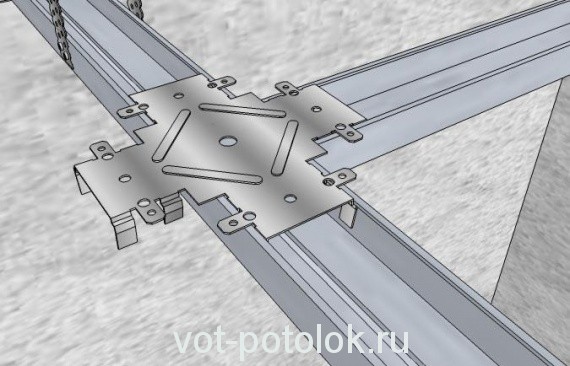
Pull the thread along the marking lines. It is stretched at the level of mounted UD profiles. Attach the main CD profiles to the UD profiles along the thread using screws. Carefully check the horizontal position of the installation. At the walls they should be inserted into the guide profiles. If the long wall of the room is larger than 1 main profile, use crabs or connectors for joining. The transverse profiles are fastened to the longitudinal crabs and with the help of self-tapping screws at a distance of 40-60 cm.
After the frame is assembled, you need to check the structure for rigidity, horizontality and evenness. If rigidity is not enough, tighten the screws. At this stage, electrical wires and fixtures for chandeliers are mounted. All wiring safety requires installation above the structure. Cables must not be laid in profiles.
Back to index
You will need the following:
At this stage, you will need an assistant. Drywall sheets are quite heavy, and it will be inconvenient to hold them on your own during the fastening process.
Before proceeding with sheathing, take a planer or knife and chamfer about 2/3 of the thickness on the end edge of the sheet. You don’t have to try too hard, the joints don’t have to be perfect, because in the future, all the irregularities will still be puttied.

Sheets are attached to the CD-profile using self-tapping screws. You need to slightly sink the heads of the mounting screws. It is important that the long sides of the gypsum board join in the middle of the longitudinal profile. It is also impossible for the junction of the end sides of the sheets to sag in the air. A transverse piece of the profile is fixed under this joint. Lay the sheets of material so that they are slightly offset on the long side in relation to each other. The distance of the offset does not really matter, it is only important that the 4 corners do not coincide in one place.
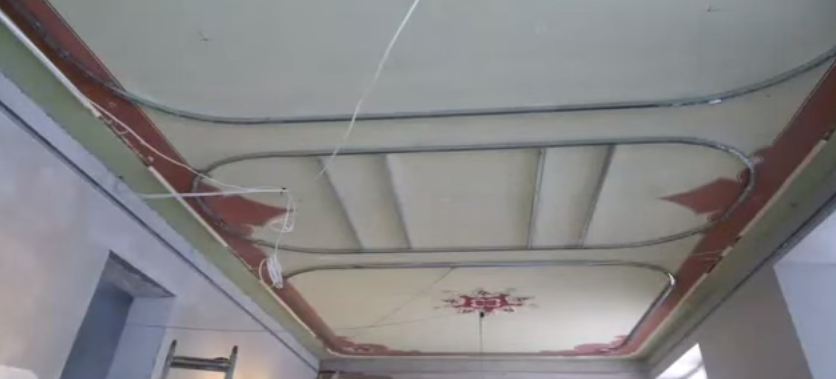
Drywall is perfect for wall decoration, creating various niches, building partitions and, of course, arranging the ceiling. And if with the installation of an ordinary straight plasterboard ceiling there are usually no difficulties even for an inexperienced master, then the creation of a figured structure requires the performer to have certain knowledge and skills.
For your own arrangement of a figured ceiling, you must know how to cut drywall sheets, how to bend sheets and how to create bends in the design of fastening profiles. Check out the tips below and get started.

Multi-level figured plasterboard ceilings allow you to visually increase the height of the room and the overall space of the room. Such a ceiling design opens up wide possibilities for zoning rooms. For all its advantages, curly plasterboard ceilings are extremely easy to install.
Drywall allows hide even serious defects and irregularities of the rough base. This makes it possible to refuse self-sealing of cracks with means such as a primer, putty, etc.
Sheet material is extremely easy to process. It can be bent and cut without much effort and complex tools, which allows you to create the most intricate ceiling structures with all sorts of recesses, protrusions and other additions.
In plasterboard ceiling can be built in any lighting fixtures– from ordinary chandeliers to spotlights and LEDs. At the same time, the lamps can be placed in different places and at different levels, which allows you to create the most pleasant and effective lighting.
Drywall allows you to hide a variety of communications. Thanks to the GKL, electrical wiring, ventilation ducts and other elements will not be noticeable, which will favorably affect the interior of the room.
You can glue wallpaper on drywall, also sheets are painted and lined with other finishing materials without any problems.

Wherein the purchase of sheet finishing material is available to almost everyone. Despite the relatively low cost, drywall is characterized by high quality and excellent performance properties. On the arrangement of a figured plasterboard ceiling, you will spend much less money than for the installation of a tension or cassette structure.
Drywall ok breathable, does not rot and does not pose any danger to others.
The main disadvantage of a figured plasterboard ceiling is quite big weight finished structure. Unlike the same PVC panels and stretch fabrics, GKL has a rather impressive mass - about 20 kg per 1 m 2 of finish.
The second significant drawback of curly plasterboard ceilings is their low resistance to flooding. For example, stretch fabrics able to recover to their original state even after severe flooding. Drywall does not have this property.
Partially solve the problem allow moisture resistant sheets. If your home has a risk of flooding from above, use moisture-resistant drywall.
Also among the relative disadvantages of curly plasterboard structures is the fact that after finishing work, the system cannot be disassembled without causing serious damage to it. Therefore, plan in advance the order of placement of communications and lighting fixtures and install the appropriate components in the places provided for them.
Choose the appropriate design option. Make a plan for the future ceiling in accordance with personal preferences, or choose the appropriate ready-made option in open source. Also, the creation of the project can be entrusted to a specialist. In this regard, make your own decision.
When the project is ready, start marking the rough base.
First step. Remove old finishes, lighting fixtures and any foreign objects from the surface if they are found.
Second step. Find the lowest point of your ceiling and set aside from it along the walls the attachment line of the first level of the ceiling structure. The minimum allowable height is 2.5 cm. the mentioned thickness has a fixing profile (guide) CD. Mark up using a level.
It will be more convenient to apply the level points in the corners of the room, and then connect them with straight lines. To draw lines, you can use a thread dipped, for example, in blue. Pull the thread between the points, pull it slightly away from the wall and release. The thread will hit the surface and leave a streak.
Third step. Find an angle in the room that is as close to a right angle as possible (90-degree angles are extremely rare in residential areas). Start marking the ceiling from this corner every half a meter.
Do the same on the opposite side. Beat straight lines between the marks. On them you will fix the U-suspensions necessary for mounting the ceiling CD-rails.
Proceed with the installation of the frame for the first level of the ceiling structure.
First step. Fix the ceiling UD rails around the perimeter of the base. The profiles must be fixed in such a way that their lower edges fall clearly on the previously broken lines.

Usually, profiles initially have holes for fasteners. If they are not available, prepare the holes yourself in increments of 400-500 mm. Screws and dowels are used to fix the elements. Dowels with a diameter of 6 mm are optimally suited. The best diameter of screws for fastening such products is 0.5 cm.
Second step. Attach the U-suspensions in accordance with the markings. The requirements regarding the dimensions of screws and dowels do not change. Hangers fasten with a step no more than 600 mm.
For fixing suspensions, flared dowels are best suited. Use them whenever possible. Such fasteners have a special cap that does not allow the dowels to go into the voids, which are most likely to be found in the concrete floor.
When mounting hangers, fasten the elements through the internal holes. It is better not to fasten using external ears, because. in the case of such installation, the suspension will be pulled back over time, which will lead to deformation of the ceiling.
Install all planned hangers.
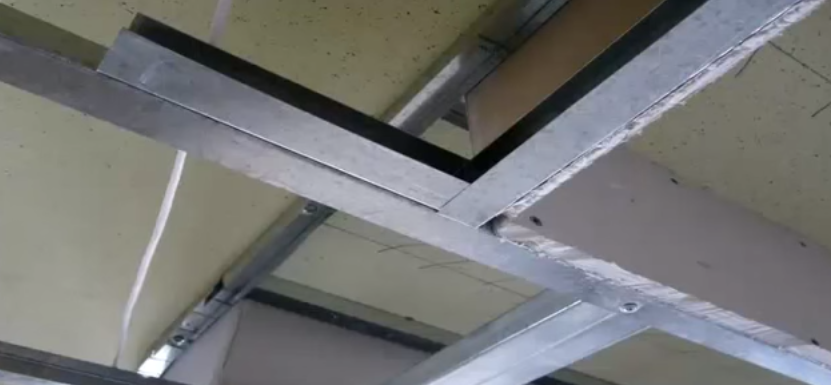
Third step. Cut the CD rails according to your project requirements and fit them into the UD rails. Elements must be set strictly on the same level. To make it more convenient, stretch an ordinary nylon thread from below. Pull this thread across the CD guides, while attaching it to the UD ceiling profiles with screws.
The CD guides at this time must be tightened with hangers, otherwise the products will pull the thread. To do this, simply bend the middle suspension under the mounting profile. You can remove this thread if you wish. It will come in handy at the stage of arranging the second figured level.
Fourth step. Align the guides with the tensioned thread and fix them to the hangers with small self-tapping screws, designed specifically for mounting profiles under drywall.
Install electrical wiring and other planned engineering structures, and then proceed to attach the sheet trim.
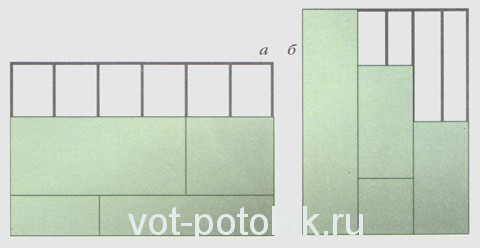
The standard length of a drywall sheet is 2.5 m. During the installation process, you need to lay the sheets in such a way that the CD guide sheet covers only half. The remaining half is needed to attach the next sheet.
It is quite difficult to carry out such a finish alone. Seek additional help if possible. Generally, 2-3 people will be sufficient.
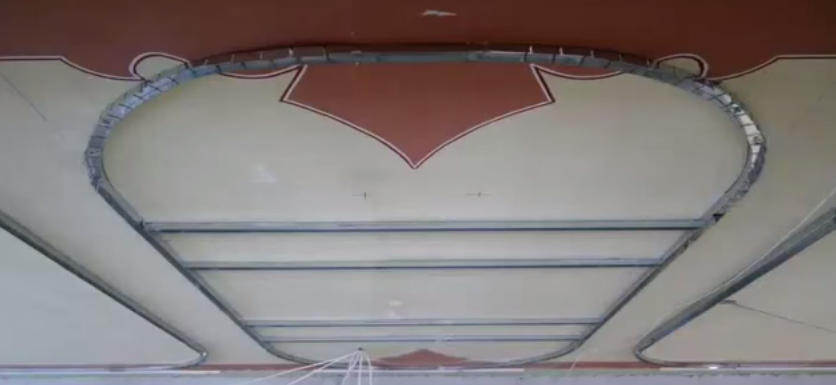
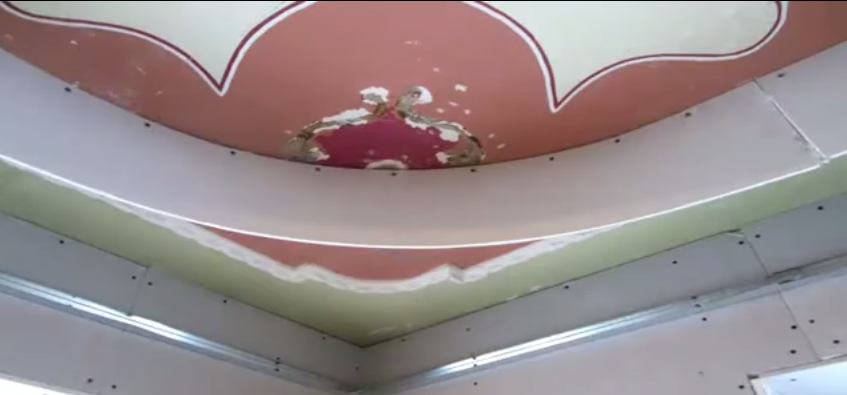
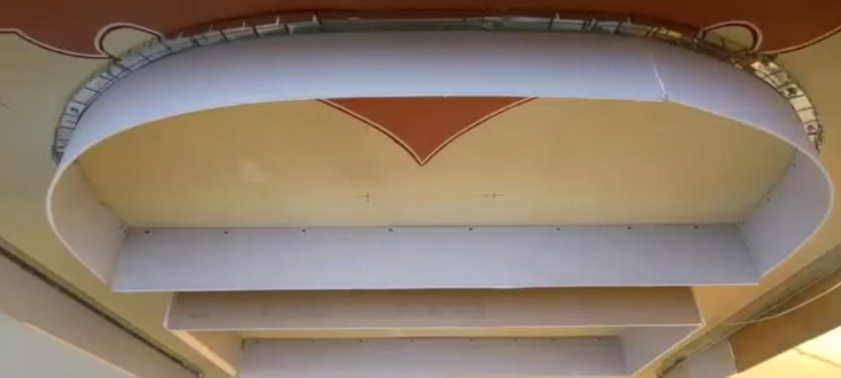
Fix all the entry-level sheets and proceed to the arrangement of the figured part of the ceiling.
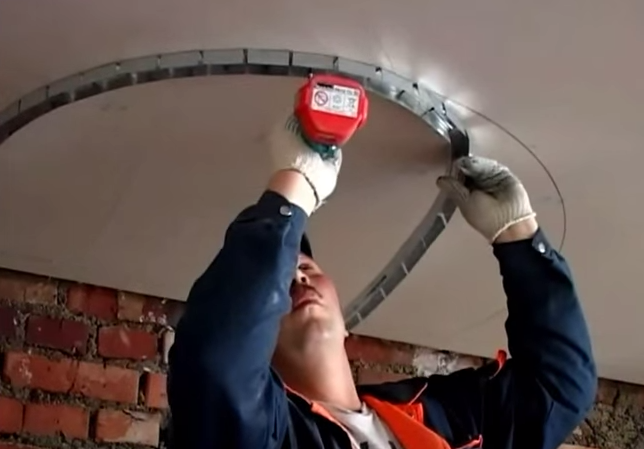
First, carefully draw on the base of the figure with a regular pencil. Next, mark on the walls the location of the second level of the structure and attach the UD profile to the walls.
To bend the mounting rail, it is enough to simply prepare cuts on it in the necessary places with a step of 50 mm. Make cuts on the side, as well as on the outer part of the bend of the guide.

Screw the bent profile to the contour created earlier. Fasten to the CD-rails through the GKL of the first level. In some places, to maintain the correct bend, the fixing profiles will have to be fixed directly to the finish.
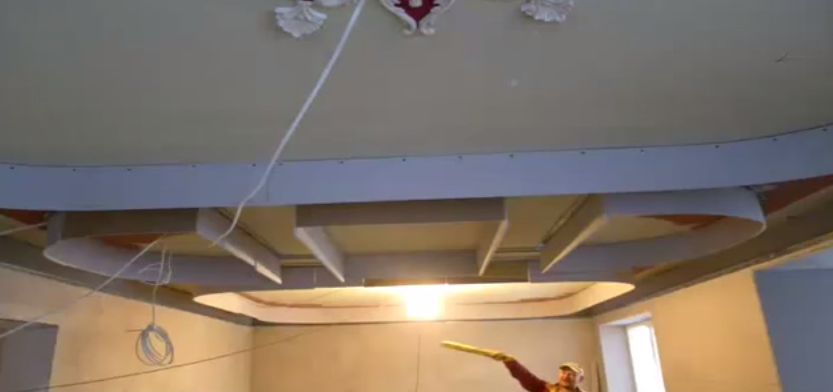
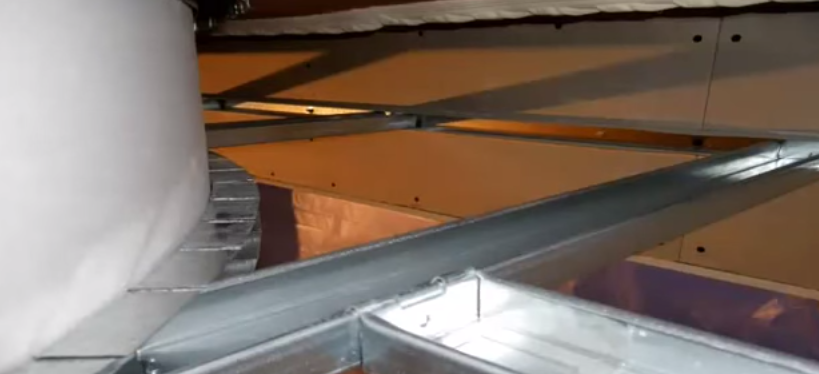
After completing the previous manipulations, the frame design will become such that you will have nowhere to insert CD guides from the side of the curved line. To continue working, you simply need to cut off the sides of the products at the connection points and attach the bottom plane to the previously bent UD-rails.
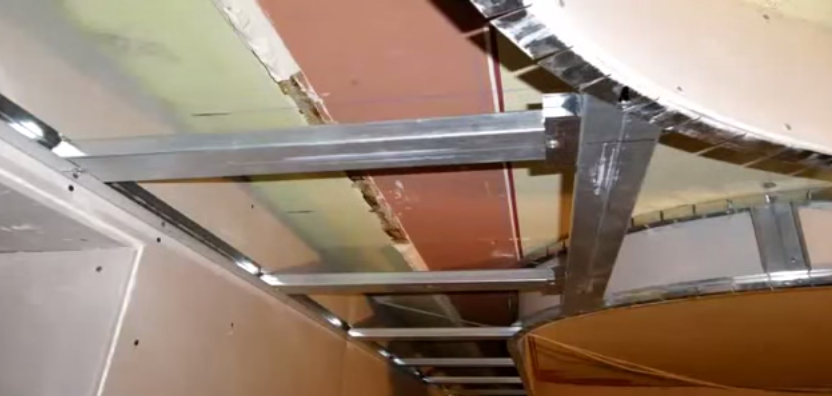
The vertical CD-rails of the figured level with a length of more than 500 mm are additionally strengthened with U-suspensions.

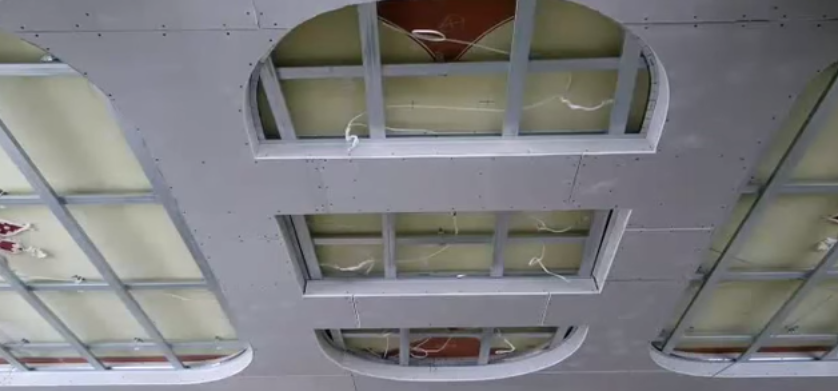
Start fixing drywall. First, fix whole sheets, and then simply cut off the excess with a hacksaw in accordance with the contours of the planned figures.
This completes the main stage of work. You can move on to puttying and finishing the ceiling.
If during the construction of the ceiling structure it becomes necessary to bend the sheets, it will be enough to simply moisten the drywall with water and give it the required bend.
Do-it-yourself installation of a multi-level plasterboard ceiling
Thus, it is quite possible to cope with the arrangement of a figured plasterboard ceiling on your own. Having understood the main features of performing such work, in the future you will be able to build much more complex compositions from several levels, with sharp bends and atypical drops. In the meantime, follow the instructions and gain experience.
Successful work!
The reason for such a high popularity of drywall lies on the surface, because this material is very convenient and solves many problems that cause serious difficulties when using ordinary plaster.
Among the main advantages are:
One of the main advantages is the possibility of additional wall insulation, as well as masking various communications from prying eyes.
Available options for ceilings and plasterboard ceiling structures:
Also noteworthy is various designs on which additional decorative elements are mounted.
The above information is not the only classification of structures, quite often you can find a grouping according to integrated lighting (the presence of spotlights) or the presence of various LED elements, the installation of which is prematurely provided for by the design.
If you are interested in how to make a false ceiling from drywall yourself, then let's deal with a set of tools that you will definitely need during the work.
Ceiling plasterboard sheets (when buying, you should calculate with a margin, with all cutting records).
This is just a basic set of what you need, depending on the additional tasks, it can expand. It should be noted that if there is excessive humidity in the room, then it is better to purchase moisture-resistant sheets.
Before proceeding with any ceiling work, be sure to complete all operations on the walls (if any are planned) and allow them to dry well
The first step is markup. How flat the plane of the ceiling will be and how the overall picture will look depends on how correctly and efficiently you follow the instructions in this paragraph.
Find the lowest point of the ceiling, the level of the ceiling will be adjusted according to it, so the more drops, the more it will drop. To determine, measure the height from the floor at several points (the floor must be flat). Now you need to mark the entire perimeter at the same height, the water level will help us with this. We make marks in each corner and with the help of a paint cord or any long and even object.
As soon as the markup is completely completed, you can proceed with the installation of the frame. We attach the guides to our lines, fasten them to the sealing tape and securely fasten them to the wall. Now you should fix the ceiling profile, but before that you need to mark the places where they will be located.
A sheet of drywall has a width of 120 cm, each sheet should have n-th number of profiles, most often there are 3 of them, while the step is 40 cm.
If you additionally put marks on the walls, then you will not have problems finding a profile, when fixing sheets
Next, you can proceed to embedding the transverse profiles, here you need to be extremely careful not to get the borders of the profile to the attachment points of the suspensions. With this arrangement of longitudinal profiles, it is enough to fix the transverse ones only at the joints of the sheets. The optimal suspension pitch is 0.5 m.
The settlement work is over, now we take the suspensions and with the help of anchor wedges we begin their installation, do not forget to use the sealing tape.
At this stage, everything is ready for fastening the longitudinal profiles. Their length is mainly from 3 to 6 meters. Therefore, depending on the size of the room, we cut or connect them to the desired length.
Fasteners should start from the corners of the room, it is better to do it with an assistant. Which should attach the rule to the corner, to the guides, thereby supporting the profile, at this time you must fix it on hangers. With each established profile, the procedure becomes easier.
Installation of transverse profiles is carried out using special crabs. For additional rigidity of the structure, additional fasteners can be used, for example, profile trimmings can be used to fasten the transverse elements to the ceiling.
Here we come to the final stage. Treat the sheets well with a primer. It is best to start fastening from the wall, it is better to leave small indents in case the walls play a little. Fasten the sheets to the profiles with self-tapping screws in increments of approximately 20 cm.
![]()
In this article, you learned how to quickly make a high-quality plasterboard suspended ceiling yourself. At this point, the work can be considered finished, it remains only to cover up the seams and putty the entire ceiling.
Drywall refers to materials that are widely used in repair work. Many structures can be made from it - partitions, suspended ceilings or walls. The material is very easy to install, does not harm health even with prolonged use and is inexpensive. Especially if you do all the work yourself. The following article is intended to help those who want to make a drywall ceiling with their own hands, but do not know how.
The main thing is to be patient and not get involved for the first time with the installation of very complex, figured structures. Since hl is a universal material, two installation options can be chosen as an example. The first is in the living room with a height of 2.5 meters, and the second is in the form of a structure for a country house with wooden floors. So, a few words about how to make a plasterboard ceiling in such different places.
The choice of design and materials, first of all, depends on the conditions of future operation. Country houses are usually premises that are used only for a certain part of the year. Therefore, it makes no sense to insulate the ceiling or make it soundproof in such a place. In addition, such buildings are most often exposed to mold and fungus, and are also often destroyed by insects and rodents.
The list of basic requirements that materials for the ceiling in a country house must meet:
All of the above points will correspond to a suspended ceiling made of gypsum craton of the “moisture-resistant, fire-resistant” type. Overlappings should be treated with special anti-mold compounds before installation, and silicone or acrylic paints should be used for finishing. You can ask the craftsmen who have encountered the repair of country houses about how to make such a ceiling correctly.
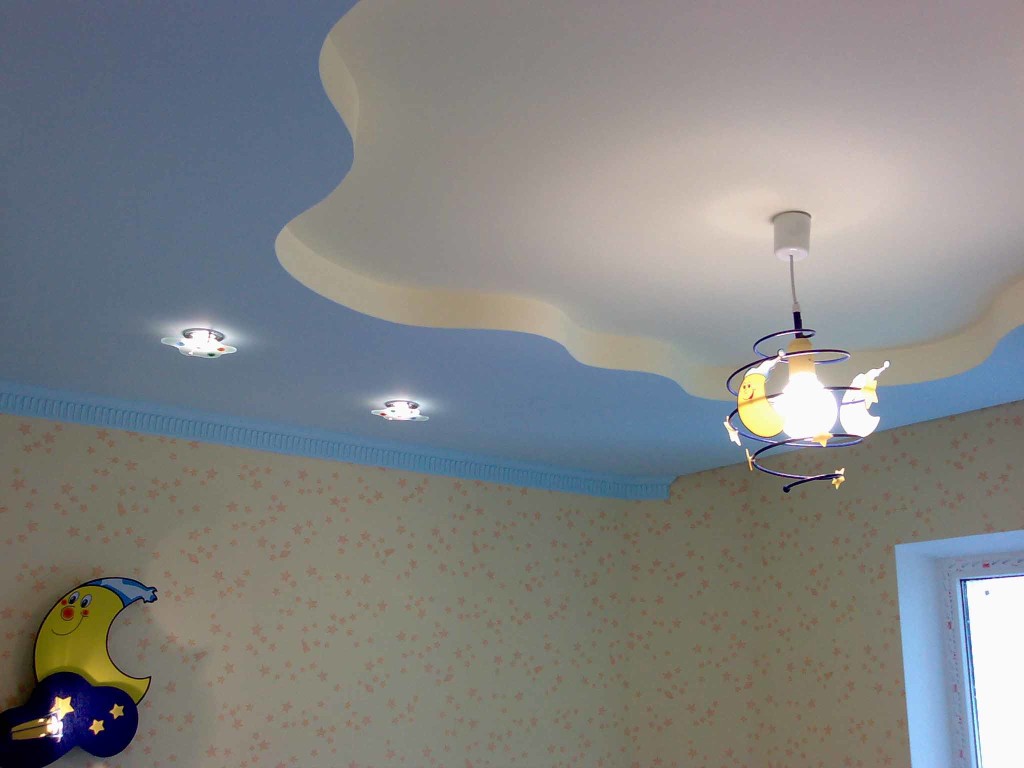
Since the ceilings in these buildings are rarely very high, it is not recommended to create complex multi-level ceiling structures. It is better to make a simple single-level backlit system from spotlights. If the walls of the house are lined with wood inside, then warm colors should be used for decoration, for example, light yellow. It all depends on the interior as a whole, since the dacha is a place for rest and recuperation. Therefore, the environment must meet these requirements.
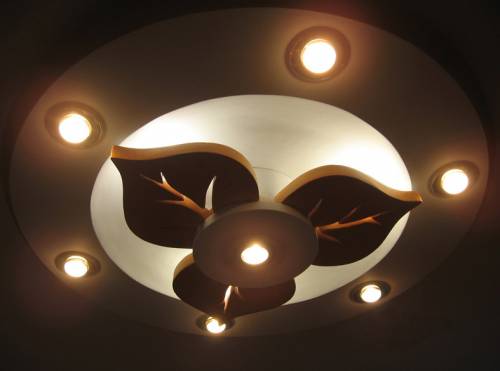
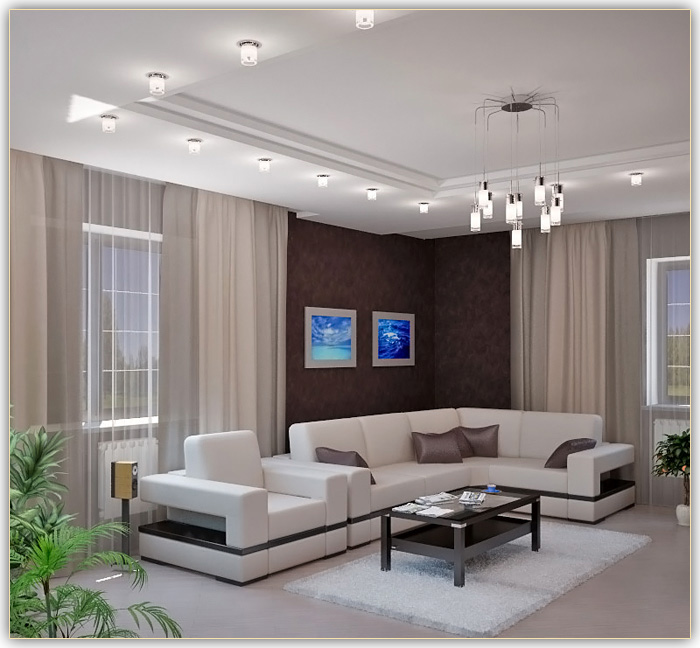
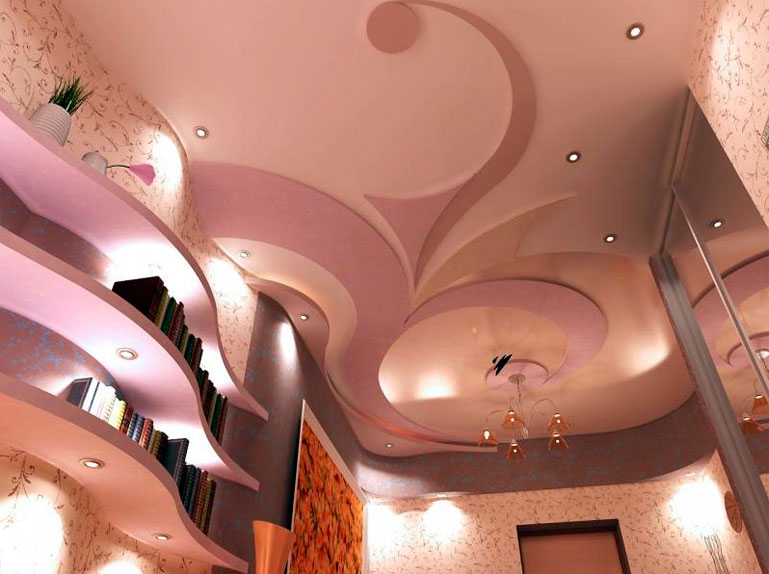
The living room is the central place in the apartment, so the interior design is of particular importance here. How to make a ceiling project in this room yourself, on which drywall will be attached? First of all, it is worth deciding on the choice of material: it can be standard HL of different thicknesses. For the first level, sheets of greater thickness are used, and to create figures, less. Alternatively, you can make figures in the form of waves, with hidden illumination. The cornice will also look good, along the perimeter of which spotlights are installed. Photos of finished projects can be viewed on the Web or specialized magazines.

1- plasterboard ceiling with lighting; 2 - figured plasterboard ceiling; 3 - false ceiling with built-in lights
After the design issues are resolved, you can proceed to the choice of the frame, the purchase of "consumables" and the marking of the ceiling. According to the Knauf documentation, frames are two-level and single-level in design, as well as metal and wood.
For reinforced concrete floors in the living room and creating a multi-level ceiling, you will definitely need a metal frame. For a country house, sometimes a wooden one is chosen, since the floors themselves are made of wood. But we should not forget that the wooden structure has a number of disadvantages:
Therefore, it is advisable to still use a metal frame for both city apartments and country houses. After the base is chosen, the conversation should continue on how to make a plasterboard ceiling.
The next steps are budgeting, project development and markup. For the assembly of metal frames, a U-shaped profile is used, which can be located both in one and in several levels. To fix it, anchor hangers with clips-latches are used.
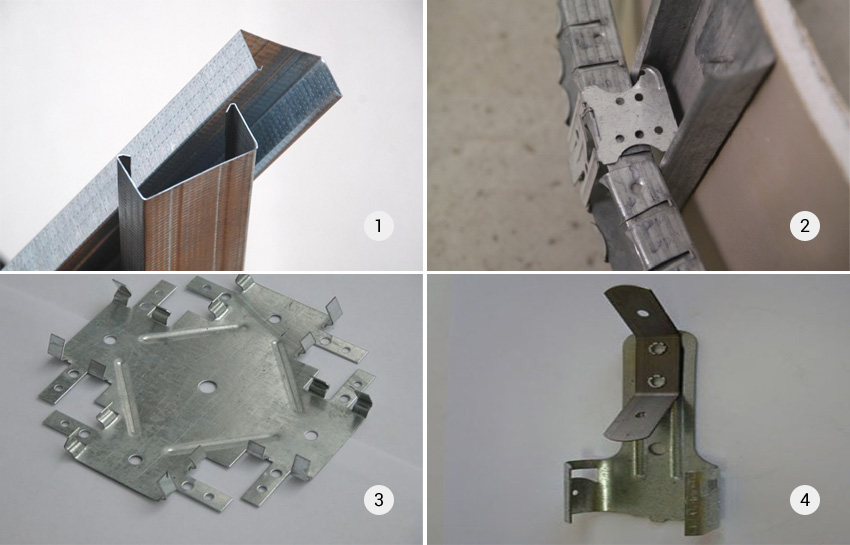
1 - CD profile; 2 - two-level profile connector; 3 - single-level connector (crab); 4 - anchor hanger
In addition, during installation, you can use direct suspensions, the ends of which are bent. They are convenient for low ceilings, when the distance between the ceiling and drywall should be as short as possible. You will also need:
We'll have to spend money on "tools". If you ask a consultant in a building supermarket the question “How to make a plasterboard ceiling?”, Then he will definitely advise you to first purchase a quality tool. This list will include: puncher, screwdriver, metal shears, construction knife, paint, roller, brush, planer and spatula. After everything you need is assembled, you can start marking the ceiling and mounting the frame.
One of the most important parts of this process is markup. If marks are not applied correctly, the functionality and stability of the structure will be impaired, which will lead to its premature destruction. Before proceeding with the procedure, you need to make a drawing to scale, especially if a figured or multi-level design is intended. The choice of scale is very important, as it will help to correctly calculate the consumption of materials and save money when purchasing.
The markup should always begin by determining the lowest corner in the room. It will become the starting point for all further operations. The required distance should be set aside from it (depending on the “overlap-drywall” gap) and a mark should be placed.
Further from this mark, with the help of a level, a horizontal line is marked, which is beaten off with a paint thread. On it, the guide profiles are fastened with dowels. Then parallel lines are applied to the ceiling for fastening the main profiles, suspensions and the profiles themselves are installed. The last stage is the installation of jumpers on the cross connectors and the installation of drywall.
If a multi-level structure is assumed (in the living room), then the frame of the first level should be made and the frame of the second should be immediately mounted. The scheme of the second design is transferred to the ceiling. The basis for future figures in the form of jumpers is installed on the first level.
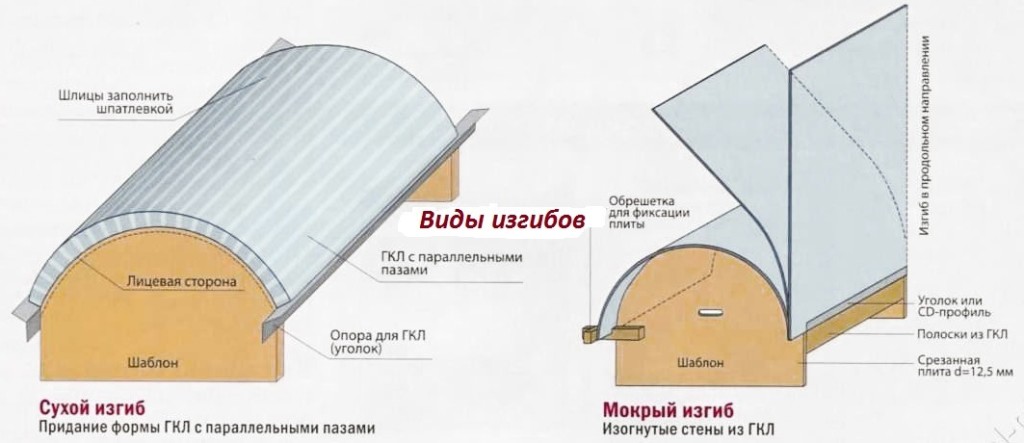
If there are bending radii in the figure, it is necessary to properly prepare the guide profile using cuts and bend the hl. To make an arc on a plasterboard ceiling with your own hands, for the manufacture of figures you will need not only a special frame, but also bent sheets. This can be done with an awl or needle roller, fixing the material in desired position and when wet.
The installation of figures of the second level will be carried out similarly to the installation of the first, but taking into account bends or waves. The main thing is not to forget, after creating the frame, to prepare the wiring and provide places for attaching lamps.
As light sources for a suspended plasterboard ceiling, you can use several options for fixtures:

For a country house, a row of spotlights with warm, yellow light will suffice. It is desirable that they be protected from moisture, as high humidity in the country is not uncommon.
The living room will require more spectacular lighting. For example, a combination of a chandelier and LEDs, or an overhead lamp and spotlights is suitable. In any case, all fire safety rules must be observed and heavy elements must not be attached directly to drywall.
For electrical wiring use cables (wires) with two or three conductive cores in PVC insulation. It is very important to do all the electrical connection work correctly. The fact is that in the event of a fire, the drywall itself will not support combustion, but the plastic compound burns with the release of chlorine. And since the use of halogen-free compositions as insulation in everyday life is not advisable, it is very important to observe safety precautions.
After installing the light, the turn of finishing work comes and the question arises of how to do the finishing of the plasterboard ceiling with your own hands. You must first carefully prepare the surface, seal the seams between the sheets, putty and prime the surface. This will ensure excellent adhesion of the coating and eliminate the appearance of sagging and cracking.
For the living room, a standard water-based paint of several shades is suitable. But for summer cottages it is better to use moisture-resistant coatings (for example, silicone). The main thing is that they not only serve the prescribed period, but also do not harm health in any operating conditions.
After the finishing is finished, you can sit down and admire the creation of your own hands. After such work, you can already give advice to others on how to make a plasterboard ceiling easier and faster on your own. After all, it is the recommendations of experienced craftsmen, and not the theory of repair in five volumes, that are the most useful for beginners. Is not it?
Such a ceiling will hide any communications passing under the floor slabs. It is perfect for zoning a room when performing original design projects.
Every self-respecting man can (there are even women's teams for drywall). How to properly install drywall on the ceiling, you will be shown the video below.
Let us consider in detail how to properly finish drywall, abbreviated as GKL. The first step to take is to create a work plan. It will provide an opportunity to avoid mistakes and unnecessary actions (this, as a rule, is the reason for extending the timeframe for performing general repairs).

Here is a detailed work plan on how to finish the ceiling with drywall with your own hands:
Each item of the plan provides for a set of actions that must be performed without fail. Let's analyze each point in more detail.

Thickness for ceiling 9.5 mm. They are lightweight and simplify the process of assembling the structure of the entire ceiling. To putty the ceiling you will need the following materials:
The area of gypsum board sheets should be equal to the area of \u200b\u200bthe ceiling of the room. However, when trimming GKL sheets, a slight overspending of the material is possible due to the thickness of the cut, so if you take drywall back to back, it may not be enough. To avoid this, it will be correct to add 3-5% to the ceiling area.
The quantity of the guide profile UD-27 on the mounted plasterboard ceiling with your own hands corresponds to the perimeter of the ceiling. The same number of profiles will be needed for the jumper device. The carrier profile CD-60 is mounted on straight U-shaped suspensions with a pitch of 600 mm.
The carrier profile on suspended ceilings for plasterboard finishing is fixed in the following order: the first and last at a distance of 300 mm from the wall, the distance between the remaining profiles is 600 mm (possibly less). The remaining profiles are fixed to the ceiling with an interval of 600 mm. The number of CD-60 profiles is equal to the number of rows multiplied by the length of the room
The consumption of a deep penetration primer under drywall is 200-300 g / sq.m. The consumption of finishing putty is approximately equal to 460 g / sq.m.
Such a device as a water level can be made at home. The video below will help prepare the necessary tool.
Installing drywall on the ceiling begins with marking the horizontal plane of the future ceiling. In order to do this, use a water or laser level. In the process of marking, as well as in all processes of installing a suspended plasterboard ceiling, the assistance of one assistant will be required.

Applying the level, marks are placed on the walls of the room around the perimeter. It's important to know! The minimum height to which a plasterboard ceiling can be lowered is 3 cm. If planned, then the ceiling is lowered to the height of the lighting device.
The marks are linked together. To do this, use a paint coloring thread. The ceiling is marked for the installation of direct suspensions and load-bearing CD-60 profiles.
After the markings for finishing with drywall are completed, the guide profile is fastened. It is installed on the walls around the perimeter of the room, guided by the markup. The profile is fixed with dowels in increments of 300 - 450 mm but not more than 500 mm; a drill is used to do this.
According to the markings on the ceiling with a step of 600 mm, direct suspensions are fixed with dowels and self-tapping screws. Their ends are lowered at an angle of 90 degrees in the form of the letter "P". Self-tapping screws 12 mm with a drill, carriers of the CD-60 profile are attached to the U-shaped hangers.
The profile has a length of 3 or 4 m, therefore, if necessary, they are joined using a straight connector for this. Sometimes it is made from the same carrier profile.
Crabs are attached to the supporting profiles for drywall, with a step of 600 mm. To do this, use segments of the guide profile UD-27. They are connected between crabs and guide profiles with 12 mm self-tapping screws.
Important to remember! It is necessary to connect profiles CD-60 and UD-27 strictly at an angle of 90 degrees. The video below will guide you in more detail.

Before fixing drywall to the ceiling, all wiring must be laid in corrugated plastic pipes and clamped to the floor slabs. In accordance with the plan for the placement of spotlights, loops of wire are released at the points of connection of lighting devices. The video below will show you very clearly.
Drywall on the ceilings begin to mount from a whole sheet. When the first row is correctly laid, the second row begins to be fixed to the ceilings with an offset. The joints of the first row must be overlapped with sheets of the second row by at least one transverse profile. The video below will give you a better idea.
It's important to know! It is necessary to mount the drywall correctly so that the walls have a gap of 5 mm. It is needed to compensate for the temperature and humidity expansions of drywall. If this is not done, then the ceilings will be covered with cracks.
When the entire plasterboard ceiling structure is fixed, holes for fixtures are cut out with a drill and a crown. Loops of lighting wiring lead out through the holes.
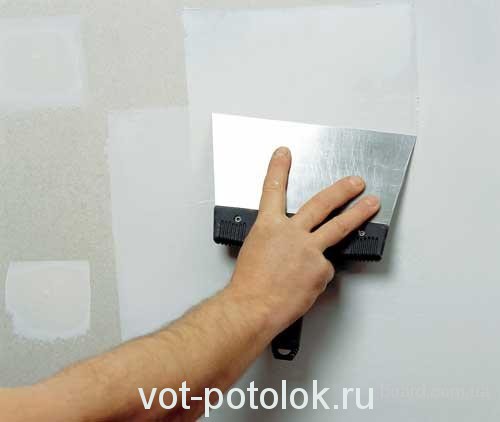
A deep penetration primer is applied to the surface of the ceiling with a roller. After it dries, the joints of the drywall plates are glued with a reinforcing sickle. In a container, in accordance with the manufacturer's instructions, putty is prepared.
Using a spatula, it is carefully applied to the surface of the ceiling with a layer of 1.5 - 2 mm. After the putty has dried, it is rubbed with a sanding net. This will eliminate minor irregularities. Finally, drywall is treated with sandpaper until a smooth surface is obtained and primed again. The video below will walk you through all the details.
After the primer dries, the final finishing begins. On a plasterboard ceiling, you can glue wallpaper or paint it with water-based paint. To paint drywall, a cloth roller is used on an extension rod. Here is a video to help you.
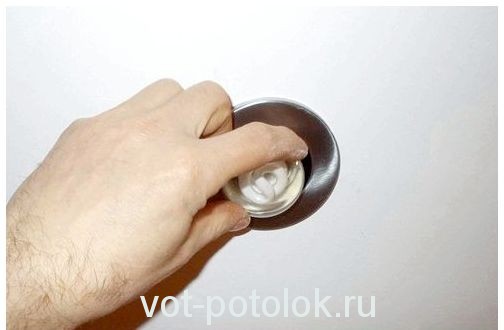
The lighting wires on drywall (loops) are cut and cleaned with a 2-2.5 cm knife. After that, the fixtures are connected to the terminals (the stripped wire is inserted into the hole and the screw is tightened). After depressing the springs on the lamp, it is installed in a hole in the ceiling. GKL ceiling finishing completed. How to install drywall on the ceiling, the video below will show you very clearly.
Description: War Thunder is a next generation military MMO game dedicated to...

"Titan Siege" is a large-scale online game on the theme of Scandinavian and ancient Greek...

Being an avid lover of German tank looks, I spent a lot of time...