Description: War Thunder is a next generation military MMO game dedicated to...

Stretch ceilings, as a type of decoration, rapidly gained popularity. Many apartment owners have long appreciated their advantages. But for those who are just going to install them, it can be advised to find out how they are attached stretch ceiling , because their installation and fastening can affect the cost of work, and, ultimately, gain savings and benefits in operation.
Step 4: Install the screw according to the ceiling chart. The long ceiling grid panels are installed parallel to the ceiling joists, so the main T-rail must be attached at right angles to the joist supports, every 4 feet across the ceiling. Hanger wire, threaded through the screw eyes into the beams, suspends the main grid guides.
Step 5: For each screw, cut out a length of hanger that is long enough to secure it securely through the screw. Pull the wire down to the tensioned guide and secure the runner. Thread a wire through each screw and twist the end tightly around the hanging wire. Exactly where the wire crosses the column below it, bend the wire hard at a 90 degree angle with the pliers.
Even at the dawn of the appearance of stretch ceilings, two main directions of fastening were developed: with harpoons or the French method, and fastening without harpoons or Dutch technology. These basic fastening methods are in turn divided into cam or wedge fastening.
Important! But before performing one or another method of installing a stretch ceiling, you need to install profiles or baguettes, which will be the basis of the structure.
Step 6: Put the main rails back in place. Turn the other end and position the runner exactly along the marker thread and under the screws in the beams. Thread the bent end of each hanging wire through the hole in the runner's leg; bend the end of the wire and secure it.
Check each runner with a level and adjust hanger length if necessary. Repeat until all basic runners are installed. Step 7: Install the Cross Sections of the Ceiling Mesh. Pin the sections into place every 2 feet along the main runners.
The most commonly used aluminum profiles. They are durable, practical and do not corrode.
The profile structure is fixed to the walls or ceiling, depending on whether there is space under the ceiling space. With low ceilings, stretch ceiling installers recommend making a frame on the walls. If the ceilings are high or it is planned to make stretch ceilings in several levels, it would be more rational to attach the structure to the ceiling.
Tilt each panel to guide it through the mesh opening, then carefully lower it until it rests on the edges of the mesh section bracket. Slowly measure the border panels and cut them to size with a knife. To fit the panel around the post, carefully measure across the holes on the post in both directions; thumbnail opening and tag the post. Measure the diameter of the post. Mark the panel lightly where the message will run through, then cut the panel with two dots through the center of the message, to the shorter length.
To begin with, the lower point of the entire structure is determined, from which the level setting of the guide profile will be counted. In general, stretch ceiling installation professionals advise installing it up to 60mm below the base ceiling.
Important! When planning multi-level stretch ceilings, markings are made for each level separately.
Cut a post hole on the inside edge of each panel, making two semicircular or rectangular cutouts. Cut only a little at a time, holding the cut sections in place so they fit exactly. Install the two sections in place in the suspension grid.
Whether you're using cladding over an existing ceiling or creating a new one from scratch, you now know how to approach those cumbersome jobs like a pro. With a little planning and precaution, you can have a new ceiling in no time.
Aluminum or plastic profiles are attached to the base using self-tapping screws with a screwdriver. It is fast and eliminates additional labor costs.
The issue of manufacturing the structure to which the stretch ceiling will be attached must be approached with all responsibility. Errors in measurements and an incorrectly determined level will lead to the fact that the ceiling, instead of admiration, will cause irritation and a desire to redo everything.
Of course, we've all seen high ceilings - in offices, of course, but also in many homes with ready-made basements. Traditional overhead ceilings consist of a suspended metal frame or mesh and lightweight "acoustic" tiles that simply lie in the mesh, the mesh is suspended from the floor or ceiling structure from above by metal wires. The space between the two levels hides the heating ducts, plumbing and wiring.
There is now a relatively new alternative for residences called direct mount ceilings. The name is a bit misleading: direct mount ceiling tiles don't mount directly to the ceiling, but mesh does. As with a ceiling tile, the individual tiles are laid in a grid and are not attached. The main difference is that the direct mount ceiling mesh is attached directly to the ceiling frame by screws driven into the ceiling or floor slab above rather than suspended by wires.
Important! With the French fastening technology, the fabric of the stretch ceiling is finished with a edging, which is attached to it by welding.
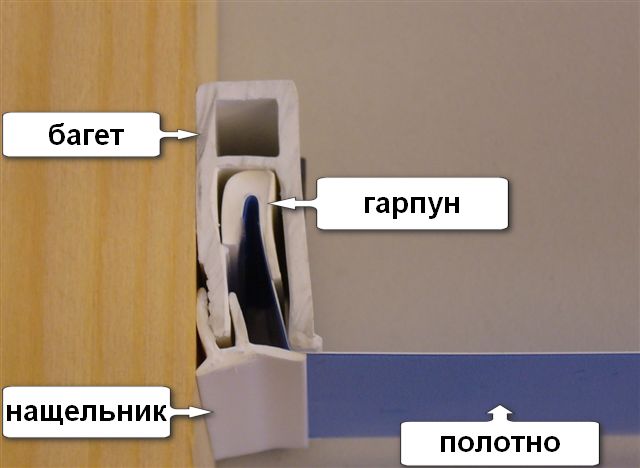
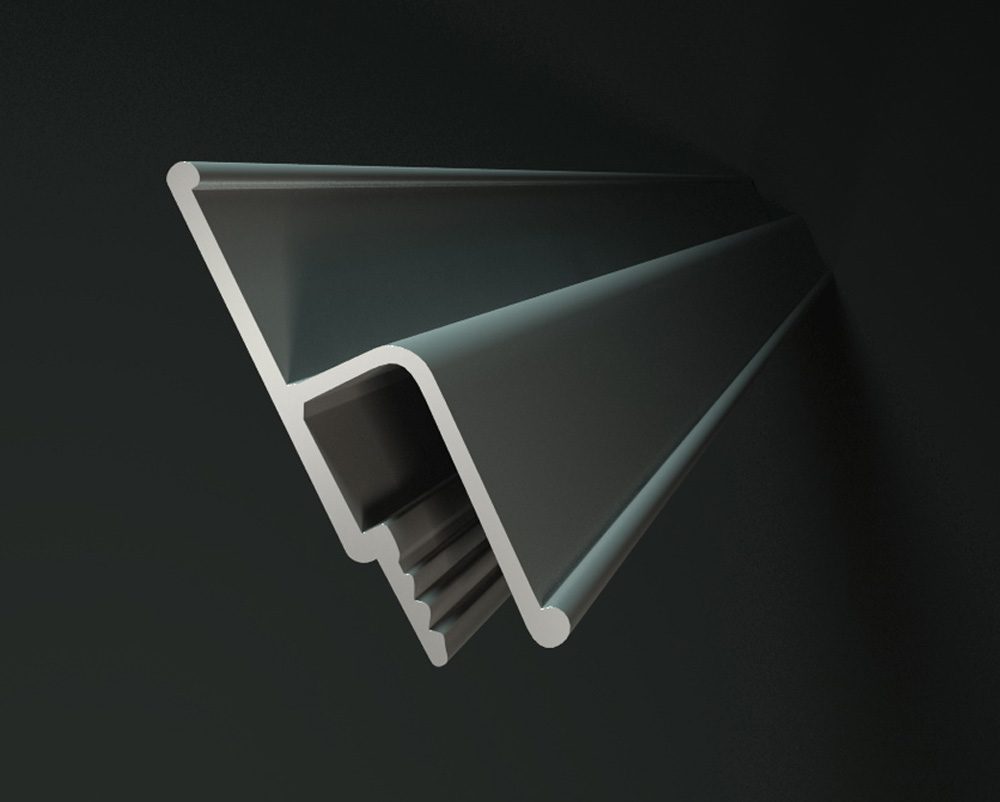
PVC edging is produced, which has increased rigidity, and is a flexible plate, which in cross section has the shape of a hook or the so-called harpoon.
Ruscher says that most of his ceiling grids are installed as part. Basement ceilings in older homes can be a tricky problem, as some are up to 8 feet high, and adding false ceiling below occupies an additional margin.
Because the straight grid attaches directly to the level above, with no intermediate wires, no space is wasted. Direct mount ceilings are also an attractive alternative to standard drywall ceilings for several reasons. If the pipe is leaking or the wire needs to be replaced, nothing will happen if you rip out the drywall.
The plate is fixed in the groove of the profile guide with a spatula, followed by automatic blocking, but not for aluminum profiles. The tension of the web is ensured by the fact that its size is reduced by about 7% compared to the size of the area from wall to wall of the room where the stretch ceiling will be installed.
Installation sequence
As mentioned, ceiling tiles have been around for decades, so it's easy to find tiles that suit your needs. Whatever you do, don't use drywall tiles that are too heavy for direct mount mesh.
To disguise the ceiling grid, Ruscher says to buy a ceiling tile that has a relief or size to it, for example, from a series from the Genesis series. If an existing fixture location conflicts with the Grid ceiling, it's best to relocate the fixture, Ruscher says. With open beams, it is easy to move the fixture a few centimeters to avoid the grid. If the ceiling drywall is in place, you will need to cut a small section of drywall to access the fastener mounting hardware. Flat tiles tend to highlight the grid. . Draw the exact dimensions of the room to scale on graph paper.
The resulting mount has reliable strength, does not deform and is durable.
The size of the drawing will determine the material requirements for the ceiling. Each pattern has a different look. Draw the various layout possibilities for the planned ceiling. It is important to place cross tees so that the border panels at the ends of the room are equal and as large as possible.
If the ceiling will be recessed and recessed lighting will be installed, determine where to find the light panels and label them clearly on the drawing. Determine the exact height at which the false ceiling will be installed. Allow a minimum of 3 to 4 inches for the gap between the old ceiling and the new ceiling. Please note that additional permission will be required when using built-in lighting.
This fastening technology has not only the advantages of strength and reliability.
When using the harpoon mounting method, you need to consider the following points:
The French fastening method requires experience and professionalism. Otherwise, the canvas will be damaged.
After determining the exact position of the false ceiling, use a spirit level to draw a full line around the room indicating where the wall corner will be applied. Don't assume that the original ceiling is level. Fasten the corners of the wall securely at all points. Attach them to studs or use screw anchors or other fasteners on brick or masonry walls. Position the corner of the wall so that the bottom flange is on the level line you drew on the wall. Overlap the wall corner on the inside corners and round the wall corner on the outside corners.
Another feature of the installation of a stretch ceiling by this method is the duration of the process, since the harpoon technology must be carried out with great care, accuracy and consistency.
Important! The edges of the canvas according to the Dutch technology are not processed, but refueled in profile! Therefore, the dimensions of the canvas should be up to 150 mm larger than the area of \u200b\u200bthe base ceiling.
Make a temporary wooden title box if you don't have one. Cut out any required corners with a metal cutter or a hacksaw. If recessed lights are installed, place the wiring before inserting the suspension wires. Fluorescent fixtures can also be centered on panels, and a lightbar can be used instead of a regular ceiling panel. The main tees should always be at right angles to the joists in the room. Find the position of each main tee by extending a tight line from top edge wall corner on all sides of the room at each position where the main tees are to be placed.
The basic principle of this method is that when the fabric is stretched, its excess is hidden and clamped in a baguette, for which a special bar is used.
The completely straightened and smoothed canvas is heated with a heat gun, and its edges are pressed against a pre-prepared frame using a spacer profile. The Dutch method of installing a stretch ceiling is somewhat similar to fixing the fabric with hand embroidery.
Now cut the suspension wires to the correct length. The wires should be 12 inches longer than the distance between the old ceiling and the new lead line. Locate the first hanger for each main tee directly above the point where the first cross tee meets the main tee. Check the room's original sketch to determine this location. Make sure the suspension wires are securely fastened. Apply them to the ceiling with screw eyes, screw hooks, nails or drilling.
Attach a suspension wire every 4 feet along the reference level. Run through each wire to remove any kinks and make a 90 degree bend when the hanger wire crosses the level line. Refer to the layout to determine the distance from the wall to the first cross tee. Measure this distance along the top flange of the main tee and locate the socket just beyond this point. If the corners of the wall are not square, install the cross slots accordingly. For rooms over 12 feet wide, the main tee can be spliced.
Finishing the installation of the ceiling consists in shaping it and cutting off the protruding edges of the canvas, both from PVC film and polyurethane-based fabric. Trimming should be done with particular care and accuracy so as not to damage the main canvas.
Stretch ceiling finishers believe that the main advantage of the Dutch method is that the fastening baguettes are hidden, and the decorative plastic strip can focus on style.
Be sure to align the splice so that the suspension wires are correctly positioned. Hook carefully or all the main tees will be thrown off. We have no relationship with the advertisers, products or services discussed on this website. This article looks at drop ceiling materials or overhead ceiling materials, selection, installation, troubleshooting, and the effect on building heating and cooling when a ceiling ceiling is installed.
In our photo, a typical mesh used to support a false ceiling panel is lowered from top to bottom. What is a "suspended ceiling" or "fall ceiling"? Suspended ceilings or drop ceilings is a ceiling suspension system that uses a system of metal members designed to support a false ceiling, usually an acoustic ceiling.
But this method of attachment has some disadvantages that it is desirable to consider. Namely:
With the cam method of fastening stretch ceilings, the canvas is fixed in the mounting profile, which is equipped with "cams" - paired semicircular sliding surfaces, between which the canvas itself is laid directly.
A false ceiling can also be designed to accommodate lighting fixtures or air diffusers. Simply put, a grid of metal bars, typically formed into an inverted tee shape, is suspended from the building's original ceiling or ceiling decoration.
The support grid is typically positioned two feet from the center to form square holes, or to form rectangular holes with two feet x four feet that include "packed" prefabricated ceiling panels that are offered in a wide variety of designs and materials. Other suspended ceiling system designs include Armstrong's "plank look" which is made from 6" x 48" strips.
When pushing the stretch ceiling canvas, the “cams” first diverge and then automatically lock, clamping the edge. That is, it will not be possible to pull the canvas back out of the mount. The fastening is strong and reliable, guaranteeing long-term operation of the product.
The advantages of cam mounting include the possibility of installing stretch ceilings at a minimum distance from the base ceiling (only 8 mm), which is very important for apartments with low ceilings of post-Soviet layouts.
But this method has size limitations. The maximum ceiling area should not exceed 20 sq.m. Otherwise, you need to apply additional ribs, otherwise the canvas can sag. If you can’t do without the use of ribs, then they can easily be hidden in the place where the chandelier will be located, which performs the functions of supporting the canvas and illuminating the ceiling.
A feature of the wedge fastening of stretch ceilings is the installation of finishes without the use of additional supports. This method can be applied to various stretch ceilings, regardless of what they are made of. In addition, this method allows installation in rooms that have "impressive dimensions", starting from 100 sq.m, as well as the use of structures in several levels.
The ceiling sheet is fixed along the perimeter with the ability to adjust the tension of the product to the desired degree. The wedge fastening method is very laborious and expensive, even in comparison with the harpoon fastening, not to mention other methods.
Our native manufacturer of stretch ceilings has developed “its own” fastening system for domestic ceilings. It is impossible to conclude that it is worse or better, it just has its own nuances, but in general, the appearance of the finished product does not deteriorate, nor does its performance and aesthetic characteristics decrease. The basis of the method is fastening without harpoons.
The fastening of the canvas according to this technique is performed in this way:
The arsenal of stretch ceiling installers includes the tools needed at all stages of the production process.
Important! If you have never had to deal with the installation of stretch ceilings, and even more so with fastening - invite installers, experts in this field! You will not only save your health and time, but you will also be spared from additional expenses!
Stretching a decorative canvas on ceiling modules, installers often spoil the walls. The unfortunate experience has led home craftsmen to excel at DIY installation. Those who wish to learn, craftsmen give simple recommendations. They advise to prepare the surface with high quality (sanding, filling gaps-holes with foam) and choosing a system of actions only from the following five.
Shtapik technology. We find the zero level of the room and mark its location along the perimeter, and also determine the lowest angle and set a point with an indent of 2 cm. We saw down the rail: if it is too long, the processing angle is half the standard angle of the room; when the baguette is short, one edge of the base profile is removed at 45 °, the other is hewn at 90 °, the additional one is vice versa, then the parts are glued together. The supporting part (marked at the factory) is attached to the lowest corner of the room, the rest along the diagonal and sides are attached to the zero projections. Harpoon (French) scheme. We fill the upper perimeter of the box with a holding bar made of hard plastic, aluminum, or insert it into special holes (if there is a plasterboard figure). One end of the canvas with hooks is inserted into the plate, the material is heated, the other edge is fixed on the opposite side. The sides are also fixed, do not forget to firmly snap the “harpoon” every time. At the end of the arrangement, the surface is reheated until the defects disappear. After cooling, a decorative baguette is placed.
![]()
The basics for the implementation of all technologies are the same. Elements are attached to the walls with self-tapping screws, dowels, "molly" (for GKL). Before fixing, the ceilings must be warmed up with a fan heater to + 40 °, the temperature of the web is brought to + 60 °. The film is first fixed on opposite sides, the fabric on the sides.
Description: War Thunder is a next generation military MMO game dedicated to...

"Titan Siege" is a large-scale online game on the theme of Scandinavian and ancient Greek...

Being an avid lover of German tank looks, I spent a lot of time...