Description: War Thunder is a next generation military MMO game dedicated to...


Picking up beautiful curtains, which are ideal for the interior, many owners are faced with the problem of how to properly hang them exactly on the ledge. If the curtains do not hang properly, then the overall picture of the interior will lose its appeal. The evenness of the fastening of the eaves itself can be affected by irregularities in the ceiling. After buying a suitable cornice for curtains, you should definitely decide how you can strengthen it yourself.
A factor you have to consider if you want to place a valency on the outside of a window is to avoid doing it in places where it can get hit. Then measure the length of the hole in the windows. Subsequently, you should mark with chalk the place where the supports will be supported on the sides of the window.
Always check that the valency is at the level of the wall, for this you use a level that supports it in the support lines before installing the valence or cornice. Also check for tufts in the support area. Make holes for the supports in the wall with a drill. Attach them tightly with a screwdriver and also secure them over them. If necessary, check the stability of the valence using nuts. It's important to think that the "wind factor" can cause you to fly with an incorrectly applied valence.
The main requirement in fastening the cornice is reliability. It is not recommended to hang curtains made of heavy fabric on the ceiling cornice; it is better to give preference to a wall structure.
In general, curtains have a weight that has a direct impact on the strength of their fastening. When buying a product at a fairly low price, it is better not to use the fasteners that are included with it. The cornice can loosen and fall under the weight of the curtains that hung on it. If the walls are made of brick, then it is better not to use plastic plugs when fastening, which cannot withstand the weight of the curtains and cornice, flying out with self-tapping screws from the holes in the wall.
Home decoration gives fundamental importance to textiles. The upholstery shows one of the decorative aspects of the sofas and chairs, while the windows are dressed in curtains and curtains of various motifs. The problem is that sometimes we don't know how to place them correctly. However, only certain materials and basic knowledge are needed to complete this task.
Exist various forms fasteners, depending on the type of fabric, as well as where it will be, and the overall finish of the room. In addition, this decorative element is complemented by the huge variety of bars that we find on the market. There are three installation mechanisms.
The most reliable type of fastening are wood corks impregnated with resin. With their help, they hang a cornice that will hold on very tightly. The fastening of duralumin cornices is usually done closer to the surface of the ceiling. If the surface is perfectly flat, then this type of attachment is most convenient. If there are bulges on the ceiling, do not strengthen the product too high, since all uneven places will be more noticeable.
The materials we find range from different types and shades of wood to metals such as iron in different colors. The curtain is attached to the rings that are inserted into the rod. In this case, we will see only the curtain, which will be hung on hooks and will be moved by a rope.
A good idea, also suitable for large curtains, are cable bars. First of all, we must know that gratings and rails can be fixed on the same window wall, both on the sides and on the roof. Measures will be taken as follows. The materials we need are: a drill press with drills, a meter and level, a hammer, a screwdriver, rails or rods, rings, clips and screws.
The cornice must be strengthened so that it does not interfere with the free opening and closing of the window. If the presence of additional parts, that is, cornices or hooks, prevents the use of a window or window, then the product should be hung much higher than usual. At the same time, curtains, together with a cornice, will not interfere with the free opening and closing of windows with their close location.
We indicate a straight line, using a spirit level and a meter, to the height at which we want to place the mounting system. Place the supports and mark the fixing points, the ends of which should be at the same distance from the window frame. We drilled, inserted the blocks and screwed the supports. We place a bar above them, well centered. The rails are installed in the same way.
In any case, we will not forget that the sizes of blocks and screws will vary depending on the weight of the mechanism and fabrics. In addition, if the fabric is very heavy or more than two meters wide, it is convenient to place another point of support in the center. Finally, we will hang the curtain.
The determination of the distance at which to hang the cornice takes place at the level of the symmetry thesis. If the best version of the product has already been selected, then the vertical distance, which is the difference between the window opening and the ceiling surface, at the level of the symmetry thesis differs when fastening.
What do you think of this idea? Excellent Very good Good Average Poor. Subscribe and receive in our mail our best ideas. Ideas that you can make yourself, because they are very simple, like hanging curtains. You won't need a bar or rings! This box of curtains was made with pieces of the '70s 'marvelous nest'. On this occasion, we will see a couple of boxes that we made a few years ago with bed rails.
The advantage or disadvantage of building a box with these stringers is that if you're going to put in a blind, the wood is not visible. They also dampen outside noise and soften cold or heat. The most common way to hang curtains is to use a metal or aluminum rail attached to a wall or ceiling with squares. Exhaust covers are a fundamental part of the kitchen, as they are accessories that help us avoid having smoke in the kitchen.

The choice of mounting method is associated with taking into account all the features of the installation. The cornice for plastic windows should be installed using a wide washer as a spacer, capable of sufficiently increasing the existing area of the product, which is under pressure of the curtains on it. If the washer is not used in time, then the product will not be able to stay on the self-tapping screw with a too narrow head for a long time, so the risk that the curtains will fall is quite large.
That's why it's important to know how to install a wall extractor, for example. However, if you do not know how to install an extractor, do not worry, an expert electrician will help you with this task. 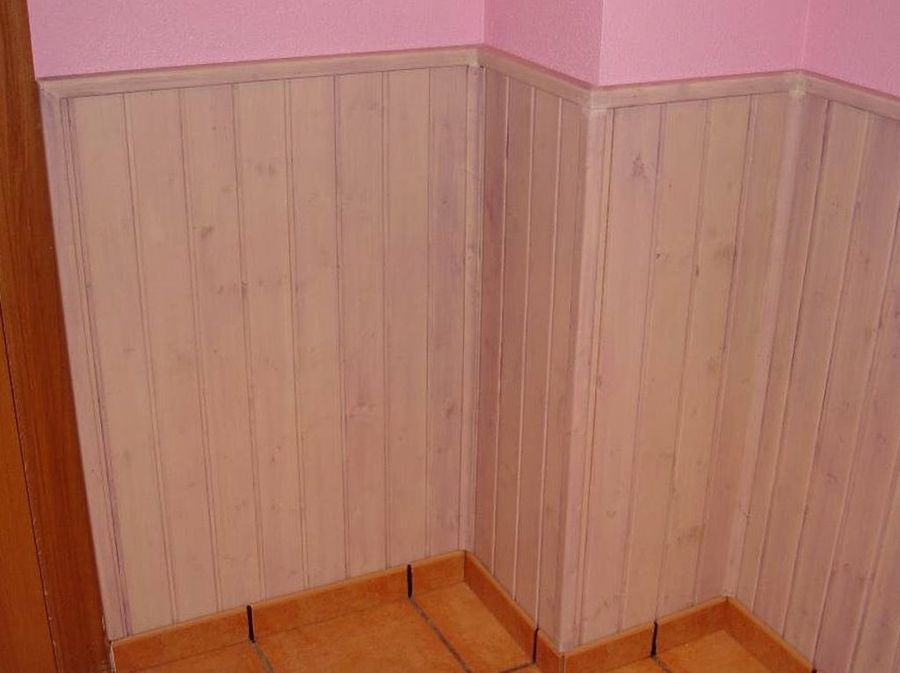
Placing pots in window sills gives a very bright and cheerful touch to the front of our house. Now, bad weather and heavy rains can cause our fine pots to fall to the ground for temporary bad if they don't obey properly.
To replace a wall window, it is most important to know the measurements you need, for this you must measure the opening from the outside, including the fence. Take advantage of the opportunity to choose a window with greater insulation capacity, which will save you up to 50% on heating costs. Remove the leaves from the window.
If heating pipes run vertically along the walls in the corners of the room, they will be a hindrance. When choosing a product, it is necessary to check the depth of the fasteners in order to bend around the pipe, that is, their required size, which should be enough. In this case, it is impossible to allow the cornice body to come into contact with the pipe. Heat in the pipe can spoil the entire surface of the product.
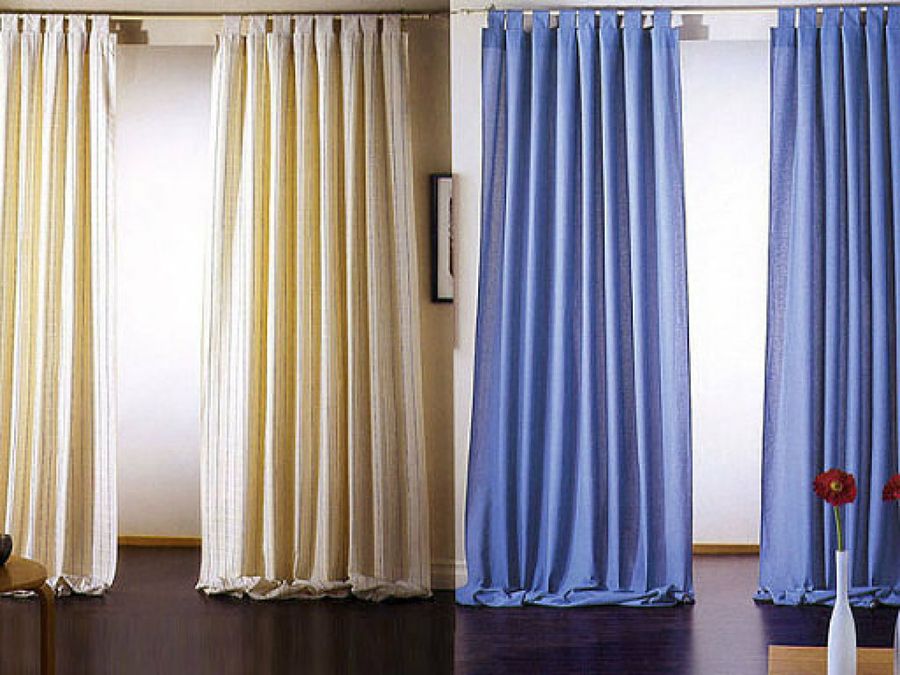
Curtains are an element that must be chosen with great care when decorating our home. But what should we consider when choosing? Rods: yes various designs bars, from wood and metal, as well as different diameters and colors. Choose the one that best suits your décor and will allow you to withstand the weight of the curtain you are about to install. Keep in mind: light-colored curtains reflect more natural light than dark-colored curtains. If your windows have different heights and widths, set all rods to the same height. If you want windows to look taller, install curtains as close to the sky as possible instead of placing them directly on the window frame.
When purchasing a cornice, they think in advance how it will be more correct to strengthen it, since there are many options.
Poor repair and a chic cornice for curtains will not look harmoniously against the general background of the wall, they will spoil the look of the interior of the room. To hang the product in the bathroom, you will have to strengthen it to the cladding by making holes on the tile.
It's best to leave the installation in charge of a professional, but if the installation isn't complex or extensive, you can do it yourself. This is very important for the pre-installation, planning phase. At this stage, you must determine what you want, how you want it, and what materials and products will be needed.
Before installing LED strips, it is necessary to determine which power strips, what voltage and what characteristics we want them to have, how much light we want to give them, which should differ depending on where they will be installed. This is very important, as we must perform a power or consumption calculation for the installation in order to be able to select suitable power supplies. Selecting an inappropriate source may result in installation failure.
There is an empty space between the wall and the tile, so small self-tapping screws are not suitable for strengthening. In the case of using self-tapping screws, the cornice will not be fixed to the wall, but to the tile itself and at some point it will fall with the tile. It is more convenient to use self-tapping screws that are longer, and therefore better passing through the wall.

Another key factor to consider when installing LED strips is knowing the total length of that strip pattern that can be installed in series. This point is important because it will determine the wiring pattern to be done and in turn ensures that if we follow the manufacturer's recommendations there will be no voltage drop along the strip for excess meters placed in series, which is what all the LEDs will look like equally, with the same intensity and in a uniform way.
If it was discovered when buying a cornice that there were no certain parts, then they can be replaced with metal corners. Such devices allow you to strengthen it the best way, but the use of corners can spoil appearance rooms. Before starting the installation, you should choose the method of fastening, that is, to one wall or to two opposite walls located perpendicular to the window.
In order to select the correct power supply, you must know the total power that must be connected to the supply. It should be noted that if the total power of the installed bands is, for example, 50 W, the source must be at least 60 W, since many of the existing sources have a capacity that is usually no more than 85%. This implies that we should leave a margin of 20% at least, even better than 30%. In this way, we avoid that the source always works at maximum performance, extending its service life.
After that, you should check whether the cornice with a curtain will interfere with opening windows. To correctly install the console, step back 10 cm from the window upwards, making sure that the curtains cannot touch the radiator or window handles. To fix the structure, a line is first drawn with chalk on the surface, using a level and a long ruler.
Likewise, and because of the many disturbances that, although it shouldn't be the case, companies' power supply usually has, it is recommended to use power supplies with a wide input range so that they can easily absorb possible voltage peaks. On the other hand, it is recommended that the power supply be installed in a ventilated place, which allows for proper heat dissipation, which can eventually lead to a longer service life.
Depending on the distance, it will be necessary to calculate the section of wiring that will be used in the installation in order to alleviate, if necessary, a possible voltage drop. There are currently applications for mobile phones and tablets that will help us to perform such a calculation.
In places far from the window, located on the left and right, points should be marked. Having made the necessary marks, the brackets are carefully fixed. After that, you should fix the cornice, aligning it along the length. If you plan to mount it on the ceiling, then mark the places where the brackets will be installed. The distance from these points to the window should be the same.
In connection with sources, finally, add that sometimes technical data are given in Amps. The formula for calculating power, if we know the current strength of the computer and its voltage, is very simple. Very important: always remember and maintain the polarity in the connections. Polarity reversal may cause malfunction or inoperability of the unit.
Here are some diagrams of possible connection types. Basic wiring diagram without regulation. Scheme of installation in series, without regulation. Parallel installation without regulation. When mounting, it is recommended to mount the strips on an aluminum tape or profile, if not necessary. Currently strips range from 4W to 45W per linear meter. We recommend that all strips exceeding 9W should always be mounted on aluminium. The density of an aluminum or profile model will depend on the strength of the strip.
At the marked points, the brackets begin to be fixed, followed by the installation of the console rods on them. If it is necessary to fix the system between the walls, the required distance is measured, starting from the corners of the wall and from the ceiling. Then special marks are made in the form of neat dots. It is necessary to fix the brackets, focusing on the marks, and then mount the bar. With a console length of more than 2 m, additional brackets should be placed in the middle so that there is no risk of the curtains falling.
Otherwise, we risk that the strip will be damaged after a short time of use, especially with power above 20 watts per linear meter. Visual Discomfort: Streaked stripes can irritate the eye and cause glare. Many commercial establishments have incorporated LED strips directly into counters and showcases, as such, without profiles or diffusers, which, apart from being an unsightly solution, irritate the eye.
The installation must be well integrated into environment and the space in which it is produced, or in furniture, cornices, ceilings, floors, etc. That's what they are for and we have a wide range of aluminum profiles and diffusers for LED strips. There are even various models linear optics. We highly recommend using it. Profiles are available in a variety of formats and measures to adapt to any possible need, usage, application or installation requirement.

There is a misconception that the design stretch ceiling it is impossible to strengthen the product. You can install the cornice using pvc film and without experiencing much difficulty. It should be noted the place where you want to hang the product.
Any person can assume that a thin PVC film will not be able to bear the load associated with the weight of the curtain rod. But you can find a way out of this situation. Used for the purpose of aesthetic design of rooms, cornices not only support the curtain, but also carry a multifunctional load. Eaves for stretch ceilings allow you to visually increase the size of the room, and not only serve as the basis for curtains.
When choosing cornices for tension structures, you can see that they have little difference from ordinary ones. They look like a flat tire fixed to the surface of the stretch ceiling. The use of a cornice mounted on this surface allows you to limit it on the one hand, and on the other hand, visually assign it a certain completeness. The design itself, apart from its design purpose, should be a reliable fastener. It is necessary to mount the structure to the ceiling, relying on a sound approach, since the location of the canvases after their installation will no longer be possible.

The design of the cornice for stretch ceilings consists of two different parts. It is possible to strengthen the wall cornices under the conditions that the dural clip for strengthening the curtains or the hook cannot break through the film. Much less risk of accidental damage in fabric ceilings, which are stronger. The strengthening of the wall cornice for the tensile ceiling structure is carried out regardless of how close the ceiling surface is from the cornice.
You can also use the option of the product to install a hidden backlight. In this case, a polystyrene profile is used, fixed to the wall with glue. An LED strip is attached to the surface of the cornice from the inside or to the wall, and the cornice serves to hide the backlight.
The ceiling type of eaves is divided into the following types depending on the material of manufacture:
The most preferred method is the installation of cornices after the installation of the tension structure. There are several reasons why it is more acceptable to hang wall cornices in a room with a stretch ceiling:
Available in many different configurations wall cornices they are relatively low cost. If you opt for an ordinary stick product for an ordinary ceiling, it will not differ in any way from a cornice for stretch ceilings. The product is fixed on the wall, and then the curtains are hung with the help of rings on the shelf.
The most important thing is to pay attention during installation at what distance to hang the cornice from the stretch ceiling. If the rings are turned up with hooks, then they should not touch the canvas. If you opt for profile products, then they do not differ from ordinary ones. At the same time, their design does not allow the hooks to cause damage to the stretch ceiling film. It is important to observe all necessary measures safety, so as not to cause any damage to the finish.
The interior of the room will not be complete if you do not use curtains to decorate the window. However, they must be hung on special structures - cornices. In turn, these elements must be securely fixed to the wall so that they do not fall and look aesthetically pleasing.
Of course, the installation of cornices should be transgressed when all other finishing work has already been completed and it remains only to supplement the room with accessories to complete the picture. Meanwhile, not every owner knows how to hang a curtain rod so that it is securely fixed and looks attractive.
It is necessary to make accurate measurements - the width of the window opening and the wall. It is important to consider that the distance from the side walls to the eaves itself is not always the same and may differ depending on the type of construction.
When determining the place for the future cornice, it should be remembered that it is largely determined by the type of curtain fabric, so light curtains can be hung directly above the window, and voluminous ones will require the cornice to be attached to the wall.
The cornice should be placed so as not to create inconvenience in the process of opening and closing the window, so it should be fixed 10 cm above the window opening. There are single-row and multi-row cornices, so this design feature should be taken into account when choosing a place for it.
If a multi-row cornice is used, then during its installation it must be taken into account that the removal from the wall, the curtains should not touch the handles installed on the window, should not touch the battery and the protruding part of the window sill, if any. 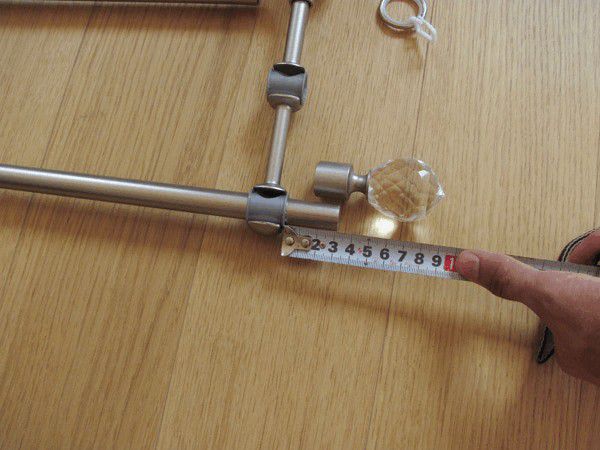
In order to make calculations and measurements accurately, you should focus on the row of multi-row cornice closest to the window sill.
You can fix the cornice on the wall, focusing on its width along with the window opening, making calculations on the side walls. In addition, a lot depends on the type of curtains to be hung, so rolled or Roman ones are placed on the window frame.
If the cornice is bought in a larger size, then there is nothing to worry about. In order to fix this, you need to cut the cornice pipe to the required length so that it fits perfectly. After that, you will need to try on the cornice again to the place where it is supposed to be fixed, and if everything is normal, then you can safely continue to work. After that, the pre-assembly phase begins. To do this, the bracket is fixed with self-tapping screws, which must be attached as discreetly as possible. It is required to carefully monitor that the heads of the screws remain in the upper part of the bracket, and when installing the eaves, they are directed to the ceiling.
Next, you need to take the two rings that come with the kit, and put them on the eaves. Then comes the turn of fixing the bracket. Then the rings are put on again. When fixing, it is necessary to control the moment that the pipe seam is directed towards the window. If it remains below, it will look ugly and attract attention. At the end of the work, it is necessary to use the level, also included in the kit, to track whether all parts of the structure are evenly located. 
For ease of installation work, cornices in most cases can be purchased complete with fasteners. The first thing to do is to mark on the wall the places where the holes will be made. Using a drill, they can be done in seconds. It is important to remember that the short cornice is mounted on two brackets. If the length of the cornice rod exceeds 2.4 meters, it will be necessary to install an additional bracket for reliability, preferably in the center. If the cornice is made of plastic or metal, then it should also be placed using two brackets. 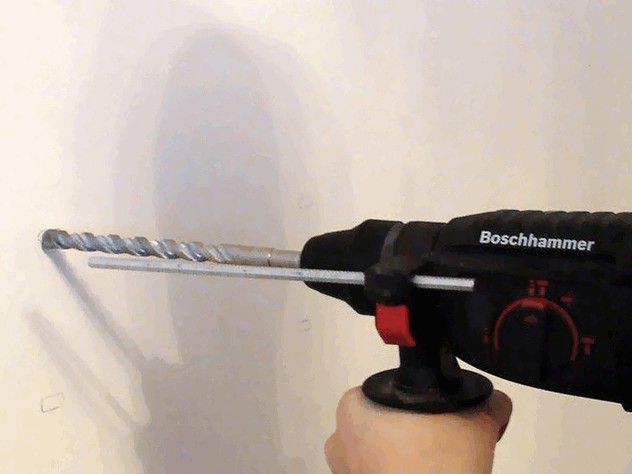
In order to apply the correct markup and not spoil the wall with unnecessary holes, it is necessary to take the middle of the window opening as the center, and then measure an equal distance to the places where the brackets are supposed to be fixed. It is important to remember that they should not be located close to the window - the recommended distance is 35 cm. Also, do not hang the cornice too high, as this can cause inconvenience, for example, when removing curtains for washing. 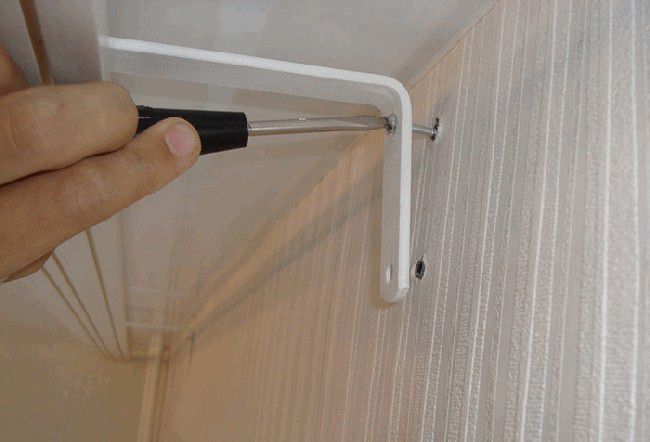
When marking the fasteners, it is necessary to focus on the ceiling, since it is not always perfectly even - if you take the window frame or level as a guide, the cornice may seem crooked, which will interfere with installation. For marking, you can use a simple pencil, since there is free space in any eaves, it will not be difficult to mark up.
After the initial calculations have been made, it will be necessary to connect the point marked earlier from the middle of the window and the distance at which the cornice will hang. Here you need to take into account the height of the ceilings in the room. The resulting place will become where the brackets will be located.
After the markup is done, you can proceed to the direct fixing of the eaves to the wall. To do this, holes are drilled in pre-marked places, then dowels of suitable diameter are hammered into them. In brick houses, it is best to use not dowels, but pine cork. You will need to drill holes in them, and then screw in the screws.
For walls made of all other materials, you can safely use the set of fixing tools that is offered by the manufacturers of cornices and is included in the kit. Then you should fasten the bracket with screws and then install the eaves. 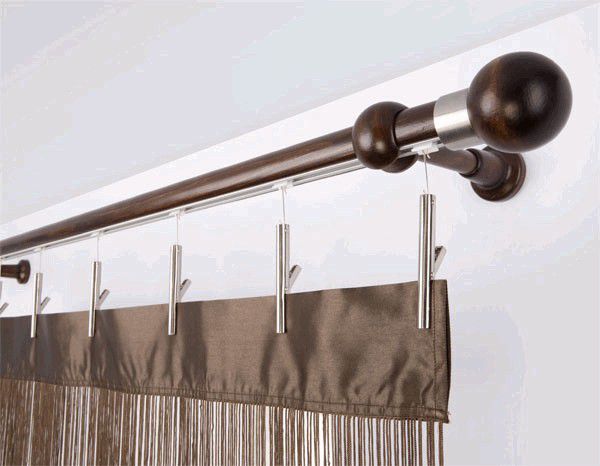
Thus, the work of installing cornices requires attention to detail, since irregularities or an incorrect mark made in a hurry can disrupt the harmony and beauty of the entire interior. In addition, the extra holes made by the drill will not decorate the room, require cosmetic repairs or the search for accessories in order to close them from view. If done correctly, the cornices will last a long time and will be an integral part of the design of the room.
Description: War Thunder is a next generation military MMO game dedicated to...

"Titan Siege" is a large-scale online game on the theme of Scandinavian and ancient Greek...

Being an avid lover of German tank looks, I spent a lot of time...