Description: War Thunder is a next generation military MMO game dedicated to...

Today it is the best solution for apartments and houses. It helps to give the room more volume, hide the shortcomings of the base floor and wires, and protect against leaks and noise. Their installation is easy and does without annoying construction debris. And one more indisputable plus - very effective.
AT recent times in the market of building finishing ceilings occupy not the last place. It became possible to choose a vinyl canvas of different structures. There are matte, satin, glossy. It can also be with seams and seamless.
All work on the installation and installation of the ceiling is recommended to be carried out after the completion of all finishing work. This is due to the fact that the ceiling material is very delicate and requires special and careful handling. Therefore, in order not to damage the canvas and not spoil the mood in anticipation of a spectacular result, experts recommend excluding all possibilities of contact between the canvas and sharp objects.
A special mood will give the room a combination of stretch ceiling with plasterboard. Work must be carried out with the utmost care. If you do not consider yourself a professional installation, it is better to seek help from specialists.
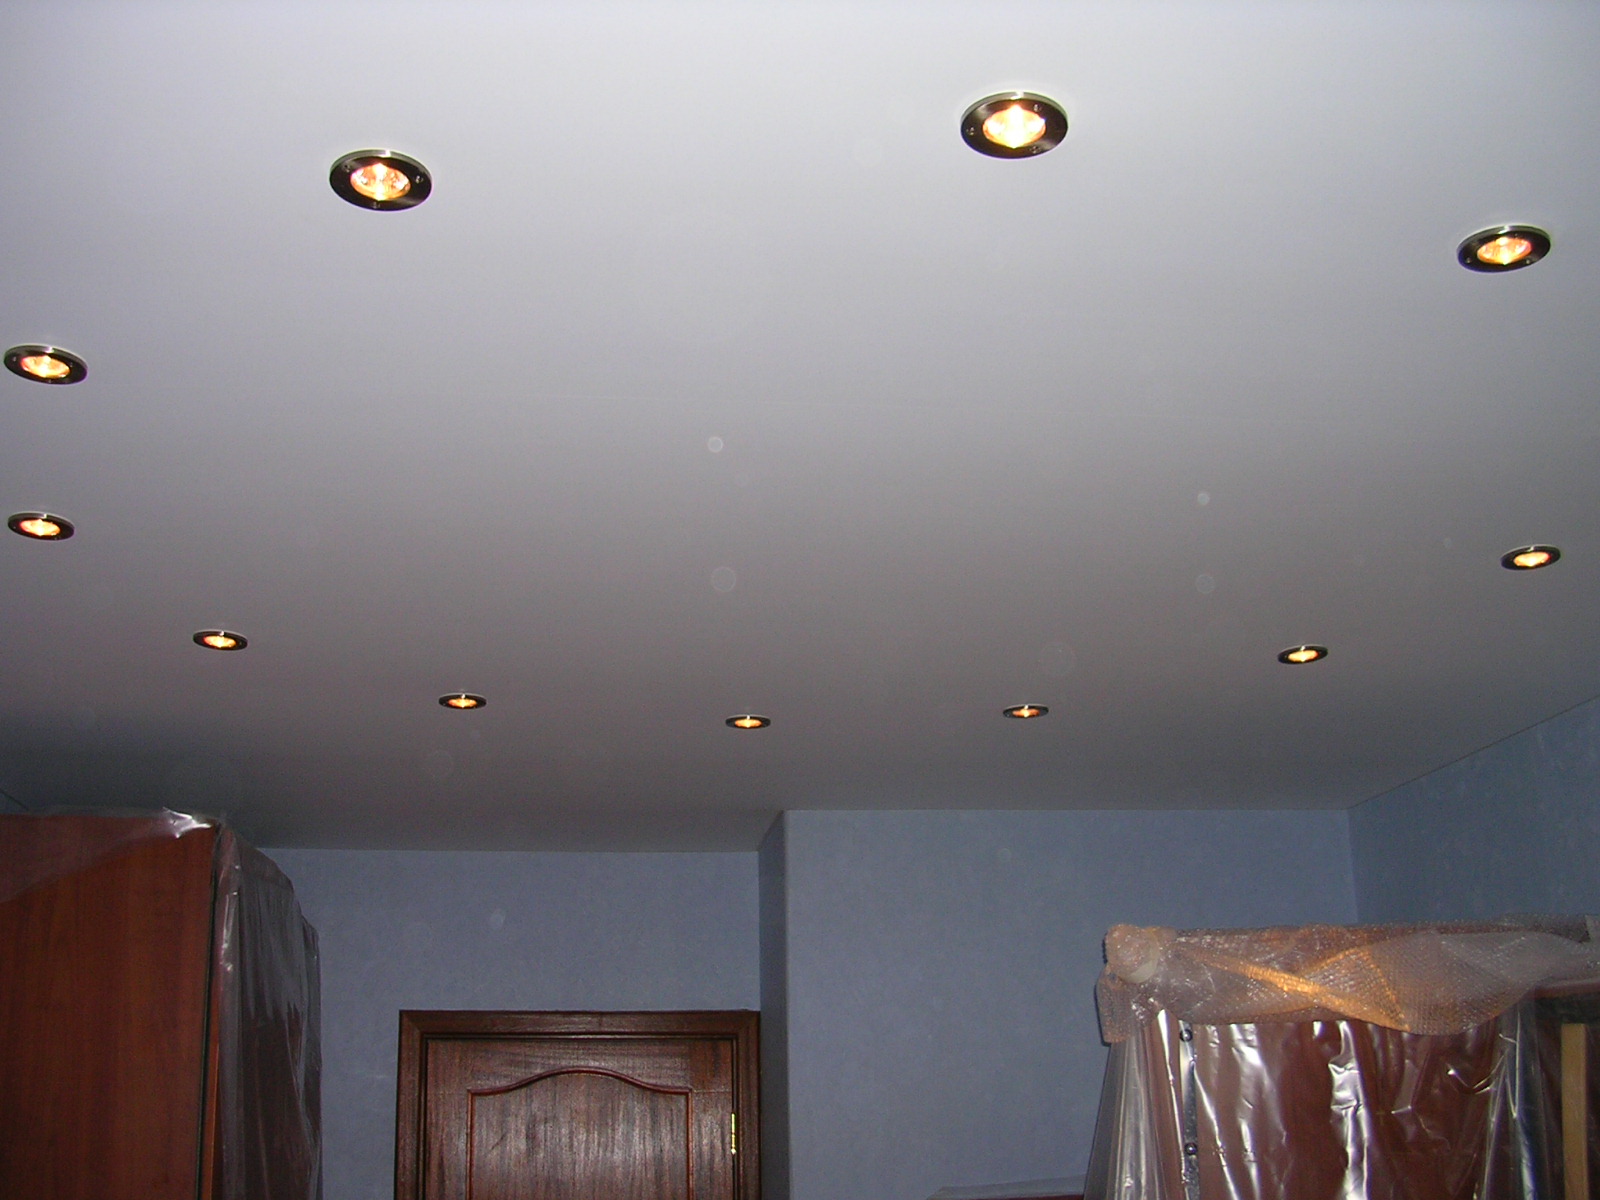
Separately, it is worth mentioning the role of lamps. They occupy not the last place in the mount stretch ceilings.
In general, the technology of fastening a stretch ceiling involves the use of various fixing methods.
Among them, the most common are:
Each of them is distinguished by the level of complexity of measurements, cutting of fabric, installation and terms of work.
The reliability of the entire structure depends on the quality of the chosen method of fastening.
As a rule, specialists choose exactly the installation method that is ideal for a particular room, taking into account all its features.
To fix the stretch ceiling, are used various ways. But all methods are united by a baguette mount. Its essence lies in the fact that a profile is attached around the entire perimeter of the room, to which, in turn, the material of the stretch ceiling is mounted. And after that, the common features in the installation end, because depending on the size of the room, it depends which type of fastening will be chosen.
First of all, the installation takes into account the evenness of the base ceiling. If it is relatively flat and the light source is a large chandelier, then ceiling mounts are used. With curvature, it is better to fix the ceiling to the walls.

If you decide to take such a desperate step as self-installation of the ceiling, then consult with experts, watch video tutorials.
Basically, three main installation systems are used: harpoon, harpoonless and cam.
The harpoon method is the most complex and time-consuming. It requires accurate measurements and maximum compliance of the canvas with the parameters of the room. If the specialist decided to fix the ceiling in this way, be prepared for the fact that the installation will last more than one day.
One of the advantages of this method is the possibility of reinstalling the ceiling if necessary. There are many more disadvantages.
These include:

The next method is harpoonless or wedge. It is also called the bead fastening method. This is the most accessible view installation, so it is used more often.
The benefits include:
Disadvantages of wedge installation:
But among its obvious advantages:
The disadvantages of this method include the impossibility of mounting ceilings in large rooms without the use of additional stiffeners. Before the master proceeds with the installation of the ceiling, discuss not only the structure, pattern, cost, but also other nuances of installation work.
For each type of tension structure, its own fastening system is selected, the scheme of which is not only individual, but also worked out to the smallest nuances.
The fastening system reflects to some extent the nationality of the manufacturer.
There are Dutch and French types of fasteners that are popular when installing decorative canvases. The bead (wedge) fastening system was developed by Russian craftsmen. It is used in the installation of vinyl ceilings of domestic manufacturers. This fastening system is not designed for denser structures. But, nevertheless, the use of a glazing bead (wedge) during installation significantly reduces the cost of the installation process.
When installing a stretch ceiling, depending on your wishes, there may be decorative elements and other finishes. It all depends on the possibilities of the premises and the qualifications of specialists. One of the frequently asked questions from customers to installation companies is: "Can a stretch ceiling be attached to the ceiling?".
If the master shrugged indifferently, then it is better to refuse his services. An experienced craftsman will draw your attention to how exactly the builders laid the slabs. Only on how even the base ceiling is. It depends on this whether the profile will be fixed to the ceiling or walls.
Work on the installation of a stretch ceiling begins with the creation of its frame, which consists of profile elements located along the upper perimeter of the room. Today we will tell you how to install a profile for stretch fabrics on one's own.
The content of the article:
An important function is assigned to the stretch ceiling frame: it holds the canvas in a taut position, preventing its deformation and sagging. In this case, the frame profiles experience significant loads, which are evenly distributed along the entire length of the elements. The technology for mounting profiles depends on the type and quality of the surface of the walls or ceiling, as well as on the material of manufacture of the baguettes themselves.

The existing sizes of stretch ceiling profiles allow them to be easily joined together and it is convenient to place mounting holes on them. When installing the ceiling frame, you need to take into account some of the nuances:
It is recommended to complete the finishing work in the room before starting the installation of profiles for stretch ceilings: install windows and doors, level and plaster the walls. On "later" you can leave wallpaper pasting, since when the ceiling is stretched with a heat gun, they can be deformed when the air in the room is heated.
To prepare the room for the installation of the ceiling frame, it is necessary to arrange free space at a distance of 1 m from the walls along the perimeter of the room for ease of movement along it during work, it is advisable to cover furniture and equipment to prevent debris and dust from getting on them.
To ensure the safety of work when drilling walls to fix profiles, you should pay attention to the location of hidden electrical wiring. In this case, you can navigate by the placement of sockets, junction boxes and switches.
Most often, the wiring runs horizontally at the level of the boxes, and then descends vertically to each device distributing electricity. In dangerous directions, you need to make marks that will later come in handy when planning the location of the frame.
When installing a profile for attaching a stretch ceiling, you will need a stepladder, a hammer, a screwdriver, a hacksaw, a puncher, a paint cord, dowels and self-tapping screws, a drill and a drill with a diameter of 6 mm.
In addition to tools, you will need plastic or aluminum profiles with a standard length of 2.5 m. Their number is selected depending on the perimeter of the room, taking into account the small margin that is needed when cutting and joining the frame elements. Preparation of profiles for installation is carried out by pre-drilling mounting holes in them.
There are rules for this process:

Professional marking of the fastening lines of the profile frame of the stretch ceiling is carried out using optical instrument- laser level:
To work with the hydraulic level, you need to draw water at room temperature into the hose, preventing air bubbles from entering it. In order to avoid errors when marking, the hose must not be kinked. The principle of operation of the hydraulic level is based on the property of water: the preservation of the horizon of its surface in a calm state. Therefore, the same liquid levels in the glass tubes of the hose will correspond to marking points located in the same horizontal plane.
In practice, this work looks like this:
If self-tapping screws screwed into loose walls do not hold the profiles well, there are two ways out of this situation: you can screw additional screws into one fastener hole or use spacers. Often, one or two additional self-tapping screws are quite capable of solving the problem of reliable fixation of the profile. Otherwise, you need to install a jib.
The work is done like this:
Often the walls are leveled using drywall sheets. If at the same time a stretch ceiling was provided, then fixing its frame to walls made of gypsum plasterboard will not be difficult. Self-tapping screws fixing the baguettes are screwed into a pre-installed under drywall additional profile 60x28. In this case, they have a standard mounting pitch - 120-150 mm. When there is no profile, the baguette is fastened with a “herringbone” to the GKL sheets with a screwing pitch of 80-150 mm.
How to install a profile for a stretch ceiling - look at the video:
How are stretch ceilings attached? Such designs are becoming increasingly popular among owners of their own homes when decorating the interiors of rooms and premises in offices.
Designs are distinguished by originality and excellent appearance. When they are arranged, the surfaces acquire absolute evenness, without noticeable joints. How to fix stretch ceilings will tell the article.
Stretch ceiling - a sheet of material, which is fixed under the main ceiling with special baguettes.
The shape of such a ceiling is:
For the manufacture of coatings are used:
Such materials make it possible to produce a ceiling using a seamless method, but only for surfaces of small sizes. To finish a large area, the prepared sheet is cut into pieces, subsequently they are joined and sewn together.
A wide variety of color palette allows you to choose a fabric:
According to the color of the ceiling, maybe:
By the number of shades, materials have:
The advantages of tension structures are:

In addition to the advantages, stretch ceilings also have disadvantages:
Before fixing the stretch ceiling, you will need to perform the following steps:
Tip: Before starting to warm up the room, for PVC ceilings, you should remove plastic windows, if any, sloping corners.
Proper installation of a stretch ceiling - fastening it in baguettes. There are two types of fasteners, which differ from each other in different constructive approaches. In addition, the fixation option depends on the material of manufacture of the canvas.
Mounting method can be:
Such fastening can only be used for mounting PVC sheets. With this connection method, two elements are involved:
The mounting process is as follows:
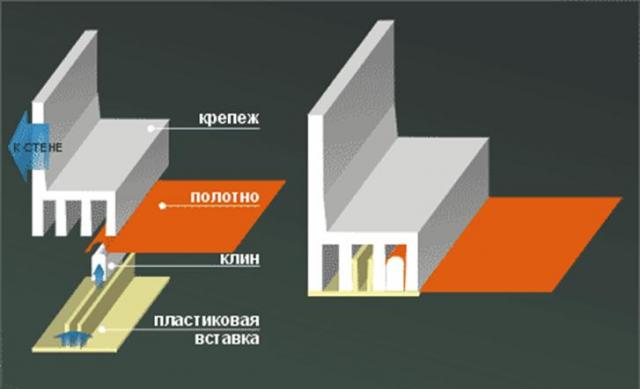
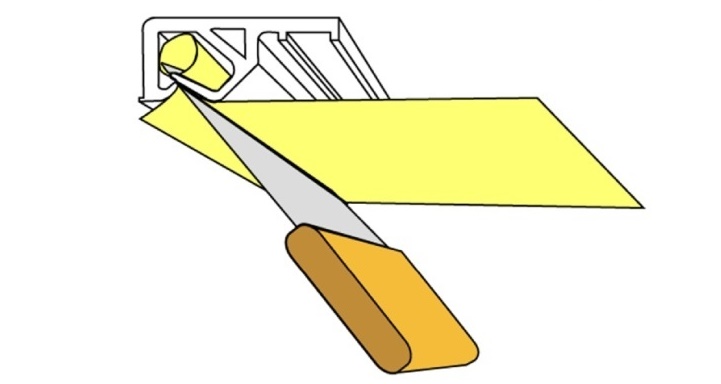
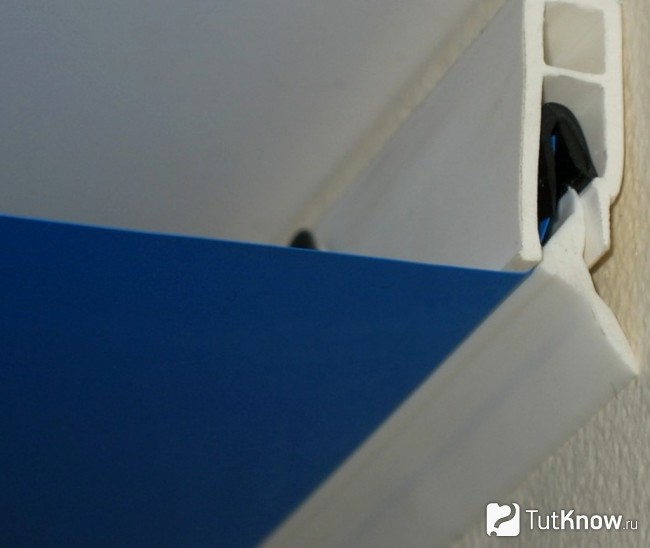
A distinctive element in it is the baguette itself, which has a U-shape and is made of aluminum. To fasten the canvas, a special bead is used, which can be made of plastic or wood. In this case:
This is the simplest and most reliable version of a do-it-yourself device of this design.
In order to better imagine what the stretch ceiling is attached to, you should first watch the video. When carrying out the installation of the ceiling in a room where there are no protrusions and communications on its surface, the instruction suggests that the film be fixed using a special baguette profile.
For this:
Tip: If the rail is longer than the width of the room, its edges should be cut at an angle that is equal to half the angle of the room. If the rail is shorter than this width, it is necessary to cut one of the corners at an angle of 90°, and the other at 45°, which will allow to achieve the correct abutment of the profile elements. The missing part of the profile is sawn in the same way, but the bevel is performed at the opposite angle. Sawed segments are glued with glue.

Having arranged such a ceiling, you can create a cozy and quite aesthetic room.
Installation of a stretch ceiling in a standard apartment can be completed in one day, provided that a team of professionals with special installation equipment and experience is working. To figure out how stretch ceilings are attached, you need to know the main design features of the ceiling system, installation methods and the properties of the material from which the stretch ceiling film is made.
The design of the ceiling system consists of a frame, it is also called a baguette and a flat film stretched over it.
The structural elements of the frame are usually made of aluminum profile or PVC profile, as these are light and durable materials that do not weigh down the construction of the crate. To install the frame, a little space is required, from four to five centimeters, between the ceiling and the stretch ceiling. If professionals know how a stretch ceiling is attached, then they leave the space necessary for placing communication lines, alarms, electrical wires for built-in spotlights or a chandelier.
Depending on the design of the structure, the frame can be made in both visible and invisible versions. If a visible structure of the stretch ceiling frame is chosen, then it is standardly decorated in a matte white color scheme. Also, special colored masking tapes are used to decorate the frame, which hide the edges of the stretch ceiling frame structure.
Due to the fact that the frames of stretch ceilings are easily amenable to mechanical deformation and have a certain flexibility, the fastening allows you to hide all the irregularities and defects of the ceiling, as well as align all the parameters of the room even in the presence of uneven walls.
There are several options for mounting a stretch ceiling.
Due to the fact that the profile of the crate is flexible and can take any shape, you can decorate the room in an original and stylish way.
After the frame is installed, a stretch ceiling film sheet is inserted into it, which is attached to the profile by means of clip-latches or harpoon hooks, depending on the chosen mounting option, and the eaves are also attached to the stretch ceiling.
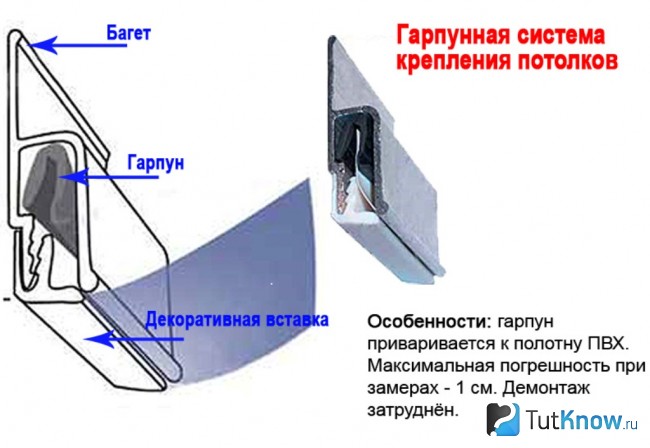
Harpoon system for fastening a stretch ceiling
The main advantage of this system of fastening stretch ceilings is the possibility of its dismantling during operation. Mounting a stretch ceiling using the harpoon method is more expensive than conventional fastening using the clip method, as it requires a lot of labor and the availability of certain components. But, nevertheless, if it becomes necessary to dismantle the structure due to pipe leakage or other unforeseen repair work, then the ceiling canvas can be reinstalled.
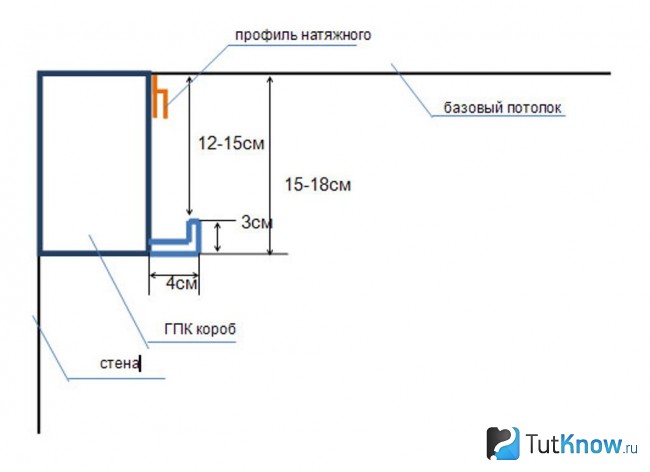
This system of fastening stretch ceilings allows you to combine stretch ceiling structures with plasterboard structures, when installing two-level stretch ceilings or, if necessary, to hide engineering communications niches.
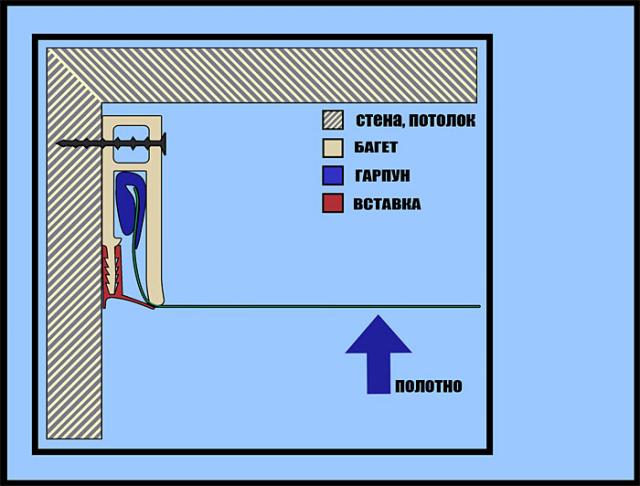
When installing a harpoon system for fastening stretch ceilings, an accurate measurement of the parameters of the room is required. A harpoon fastening system (which looks like a small hook) made of a soft PVC profile is attached to the crate according to the exact cutting in the workshop.
Tip: a company that installs stretch ceilings must calculate the percentage of shrinkage of the stretch ceiling fabric during operation.
Of course, there are various ways to fix stretch ceilings, but the harpoon method is the most reliable and durable.
This fastening system is designed for mounting fabric stretch ceilings, it is often referred to as a "clothespin" in everyday life. The methods of fastening and mounting with a clip system mainly involves a fabric base, they came to us from France and this installation method is named after the famous French textile company Clipso.
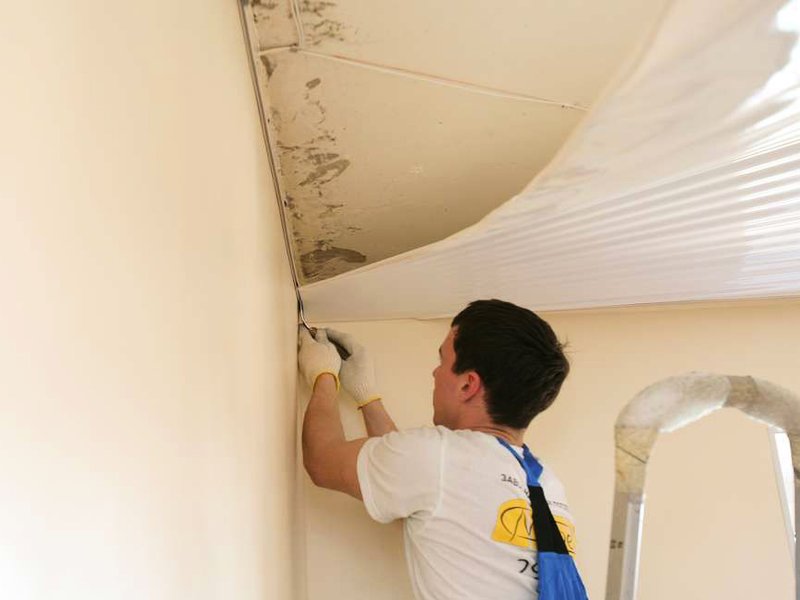
The principle of fastening the web to the frame is as follows: a tension fabric web is inserted into the frame of the structure and secured with latches in the form of clips. Ceilings with a clip-on fastening system must have a web margin of at least ten centimeters on each side around the perimeter. After mounting the ceiling structure, the surface is smoothed with a building hair dryer.
It is worth considering that this installation method is environmentally friendly and after it no cleaning of the premises is required.
In addition, they have the ability to "breathe", which means that the room will always be fresh and cool.
These ceiling systems are ideal for decorating bedrooms and children's rooms.
Saya is a simple fastening system that takes its name from the wedge-shaped PVC profile. Due to the fact that the system is fixed in place and, if necessary, the ceiling sheet is cut to the shape of the crate, this method of fastening is relatively cheap, but the results of fastening can be unpredictable in emergency situations.
Attention. A stretch ceiling fixed in this way cannot be completely dismantled.
Since the ceilings are fixed with the wedge method in place, the cleaning of construction debris is also possible.
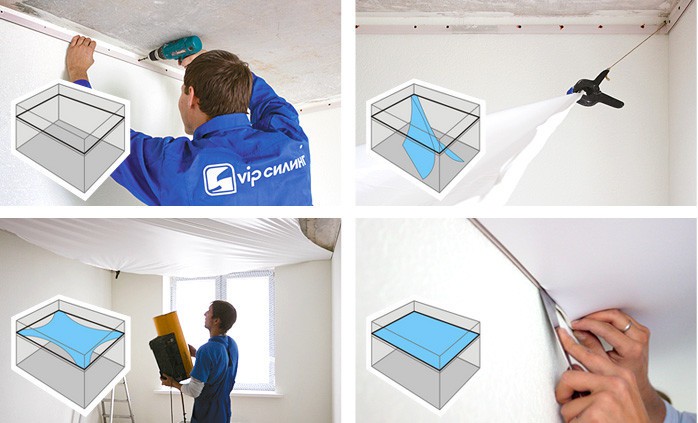
Consider the sequence of installation of a stretch ceiling in stages:
From the foregoing, we can conclude that the installation of ceiling tension systems should be trusted only to companies with extensive experience that have adequately proven themselves in the market for this type of construction services. If you follow the recommendations, then a stylish, modern and environmentally friendly stretch ceiling will decorate the room.
From the foregoing, we can conclude that the installation of ceiling tension systems should be trusted only to companies with extensive experience that have adequately proven themselves in the market for this type of construction services. If you follow the recommendations, then a stylish, modern and environmentally friendly stretch ceiling will decorate the room for many years.
Description: War Thunder is a next generation military MMO game dedicated to...

"Titan Siege" is a large-scale online game on the theme of Scandinavian and ancient Greek...

Being an avid lover of German tank looks, I spent a lot of time...