Description: War Thunder is a next generation military MMO game dedicated to...


An integral element of the design of the window opening, along with curtains, is the cornice. From right choice cornice depends on the type of composition as a whole, ease of use and reliability of fastening curtains.
High quality curtain rod
Anyone can do it with their own hands home master. The method of installation depends on the material of construction, the installation location (wall or ceiling) and the type of surface finish on which the fastener is made.
Before installing the cornice, in addition to its compliance with the interior of the room and the design of the curtains, it is worth considering a number of factors:
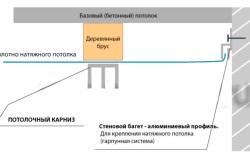
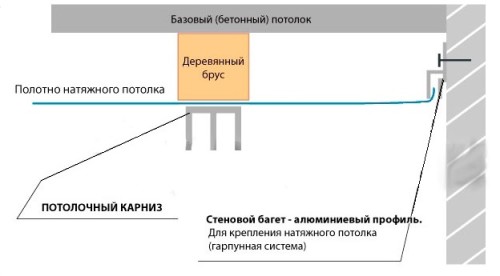
Only possible after the completion of all repairs. The exception is . In this case, the place of attachment is determined in advance and a wooden beam is installed under the film or fabric for subsequent installation.
Having chosen the appropriate model, and having decided on the location, you can proceed with the installation. To attach the cornice to the wall, you will need the following list of tools:

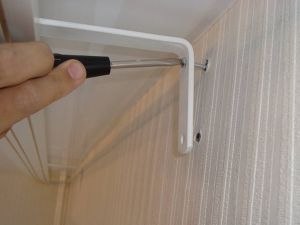
Fastening the cornice to the wall using brackets is carried out in the following sequence:
In the process of drilling, the drill can slip imperceptibly from the intended point by several millimeters, which will eventually lead to a distortion of the structure. To avoid slipping at the drilling sites, you can make recesses of 2-3 mm with a nail.
Most multi-row ceiling structures are made of PVC or aluminum, so the weight of the curtains must be taken into account from the very beginning.

Ceiling cornice installation
to install ceiling cornice for curtains you will need the same set of tools as for wall mounts, but the installation itself has some differences. Installation of a ceiling cornice for curtains on a concrete base:

When installing on a plasterboard ceiling, the installation is carried out in the same sequence, however, butterfly dowels (molly) are used as fasteners, in addition, you need to pay more attention to the total weight of the structure.
To the mortgage beam requires caution and accuracy, since the repair of a panel damaged by a sharp tool will be expensive. The drilling points are marked with a marker, after which small pieces of packing tape are glued to them (this will fix the diameter of the hole and prevent it from increasing as a result of the web tension). Further fastening to the ceiling of the eaves for curtains is carried out in the standard way. It is important to check the side adjacent to the coating for the presence of burrs or sharp protrusions, if found, they must be removed.
If, for some reason, installation on the ceiling is not possible, and you cannot return the product to the seller, do not despair - you can attach the ceiling cornice to the wall using L-shaped brackets.

Fasteners for curtains different ways, the most common options are:
WATCH THE VIDEO INSTRUCTIONS

Now you can easily attach the curtain rod. We hope there will no longer be a question of how to install a curtain rod.
different appearance and fastening method. The most optimal solution would be to purchase a cornice that exceeds the width of the window opening by 30 - 40 cm.
Hanging a cornice with your own hands is easy. Before you make a purchase, it is enough to analyze which type of mounting will be most convenient, ceiling or wall. An important role is also played by the material from which the walls are made. Having decided on the choice, we get to work.
In the process of work, we will use a level, an electric drill, a screwdriver, dowels and screws. Therefore, all the necessary items and tools should be prepared in advance. Since the installation of the cornice will have to be carried out at a height, you need to take care of a piece of furniture or a stepladder that is convenient for work. It is better to work in pairs, since it is extremely difficult for one to hang the cornice correctly.
First and main step, this is the markup on the wall.
We mark the place of attachment, stepping back five or seven centimeters above the window opening.

We check the severity of the horizontal line with a level.

With standard fastening, self-tapping screws are usually used, which are screwed into dowels. If there is no alternative. We choose this option.
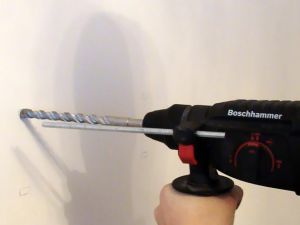
We drill holes in the wall, in the place where we made the markings.
We install the dowels and mount the brackets. It must be borne in mind that such material as drywall requires careful work and special dowels.
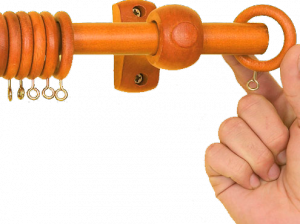
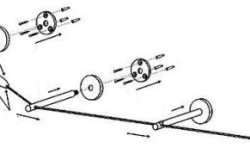
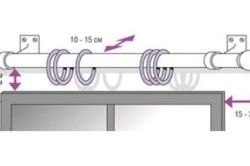
Before fixing the rod on the brackets, we put rings and tips on it.
The ceiling cornice is attached similarly to the cornice to the wall.

To fix it, we additionally need a tape measure, with which we achieve the same distances from the brackets to the wall.
Before hanging for curtains, we measure the protrusion of the window sill.
The choice of the design of the cornice for curtains depends on the features of the window opening, the style of the curtains, the height of the ceilings, the need to visually adjust the size of the room. There are now on sale systems that are fixed on the ceiling, allowing you to visually make the room higher. But wall structures are used more often. A variety of models makes it possible to choose the perfect option. It remains only to decide how to hang a curtain rod on the wall, to ensure secure fastening, ease of use.
Several types of structures can be mounted on the wall. Their choice depends on the layout of the room, the type of curtains, the number of layers of curtains. The cornice can be:
Aluminum and plastic profile systems are often fixed on the ceiling. These designs can be designed for one type of curtains or consist of two tracks for the location of light tulle, thick curtains. In fixing such a cornice on the walls, flexible profile models are most often used. This option is used in the design of non-standard interiors, it is additional to the main cornice.
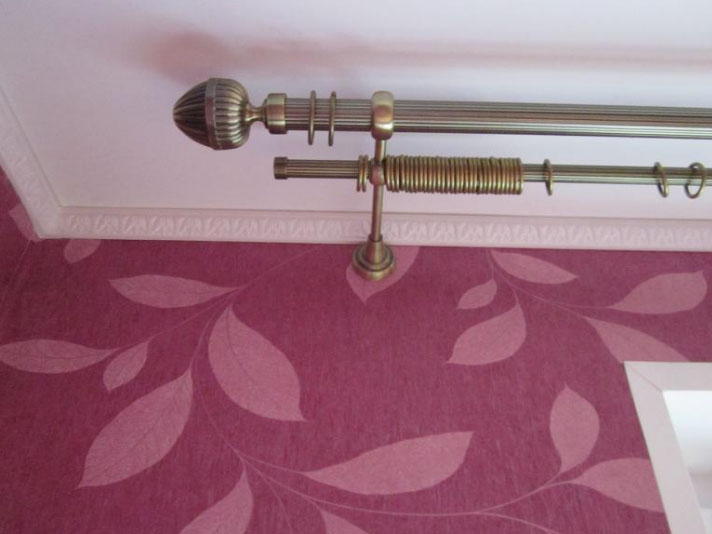
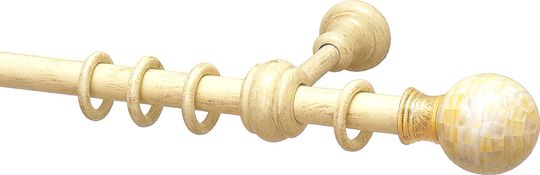
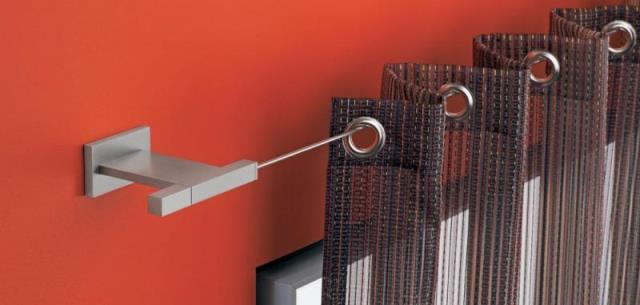
Rod systems- the most common and convenient option. The variety of materials, design styles of these structures guarantees the perfect choice for any interior. If you plan to hang curtains on the grommets, a system with a round bar is selected.
Strings designs have found their application in fashionable interiors in the style of minimalism. They are almost invisible, exclude the presence of unnecessary elements that are not welcome in such designs.
Before you hang the selected curtain rod on the wall, you need to mark up, determine the location of the fixing elements. This moment deserves special attention. The quality of the result, the ease of use of the curtains will depend on the accuracy of the execution.
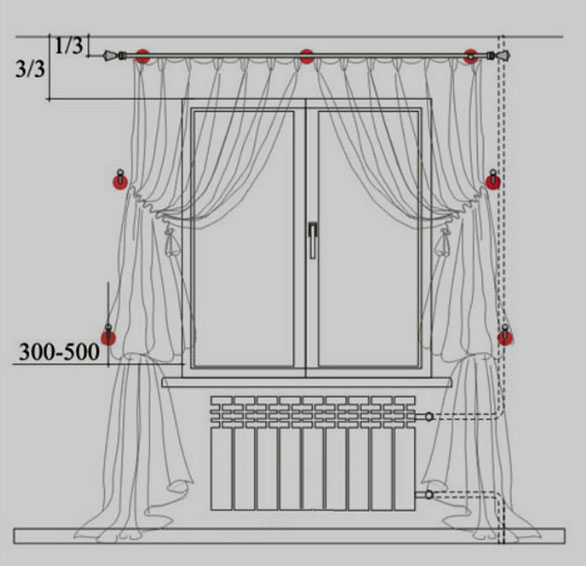
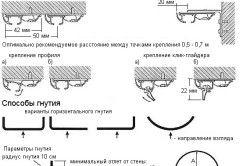
Sometimes a cornice is chosen for the end walls in their entire length. This design technique is used to visually expand the room. If this is not your case, when placing the structure, keep in mind that there should be a distance of at least 40-50 centimeters from the sides of the window opening to the edges of the cornice. Otherwise, even in the open position, the canvas will block the window.
When marking, the center of the opening is first determined so that the cornice is located symmetrically. The height of its placement is selected depending on the characteristics of the room, the type of curtains. But when marking, it is necessary to focus not on the window opening, but on the ceilings, since all kinds of irregularities in their lines are not uncommon in our apartments.

A simple screwing of self-tapping screws into the places where the brackets are attached can only be used when fixing the cornice on wooden walls. In most cases, you have to work with concrete, brick surfaces. Therefore, you need to use a drill to create holes in the marking places, insert dowels, screw in screws. Before you hang the curtain rod on the screws on the wall, you need to completely assemble it, put on the curtain mounts.
The cornice is an indispensable element in the interior, because without it it is impossible to hang curtains. For an experienced craftsman, fixing this element is a matter of a few minutes, however, beginners who do not have experience in repair work should think in advance about how to hang the cornice and what difficulties can be expected.
The cornice is an integral part in the interior, because without it it is impossible to hang curtains.
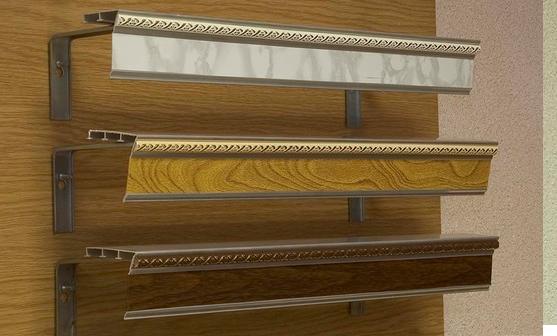
First of all, of course, you need to decide on the type of eaves. They differ in the method of fastening and can be wall and ceiling. If we talk about the material of manufacture, then they are made of wood, plastic, metal, steel, aluminum. In addition, these products may differ in shape:
The choice of cornice is determined by the material from which the walls and ceiling are made, and the curtains that will hang on it: their weight and design must be taken into account.
Back to index
Before you start working on, you need to prepare the necessary materials and tools. To install the cornice on the wall, you will need the following tools and materials:
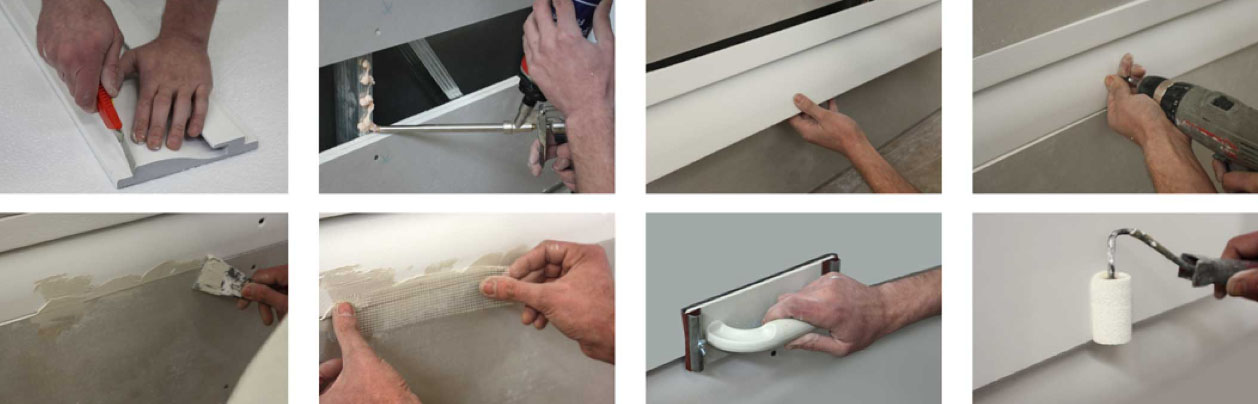
Then you need to determine and mark the location of the eaves. To do this, you need to find the center of the window and measure equal distances to the places where the brackets will be attached. It should be remembered that the brackets should not be too close to the edge of the window opening: the distance should be 30-40 cm, otherwise the curtains will close the window when open. Do not hang them too close to the top of the window, otherwise the fixed curtains will prevent the free opening of the window sashes. The distance to the ceiling is usually made from 5 to 15 cm, but if desired, it can be increased or decreased, since it does not play a big role. When marking the fixtures, you need to focus on the ceiling, and not on the window frame or level, since sometimes the ceiling has a slight curvature. In this case, the cornice, set according to the level, will, on the contrary, appear crooked.

Next, you need to connect the point marked from the middle of the window and the distance at which the curtain rod will hang relative to the ceiling and, thus, mark the location of the brackets. After that, you should attach the part to the wall and mark with a pencil or marker the places where you need to drill holes for fasteners.
After the markup is done, you can proceed to fixing the eaves to the wall. To do this, holes are drilled in pre-marked places into which dowels should be hammered. If the house has brick walls, pine plugs should be used instead of plastic dowels. It is necessary to drill holes in them and screw in 4 mm self-tapping screws. For walls made of all other materials, you can use the dowels and screws that come with the kit. Then you need to fasten the bracket with screws and install the eaves. It is hung with curtain fasteners already put on it. Next, you should fix it in an even position with the accessories included in the kit, after which it remains only to hang the curtain.
Back to index
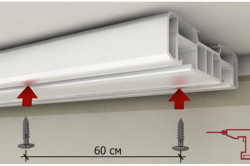
The fastening of the ceiling cornice on the brackets is similar to the fastening to the wall, but there are still some differences. In the process of marking, you need to remember that the brackets must be at an equal distance from the wall. It is necessary to take into account the presence of heating batteries: if they are located under the window, the ceiling cornice should not be located close to the wall. Do not forget that if the length is more than 2 m, then another additional bracket should be installed in the middle. Otherwise, everything is done in exactly the same way as when attaching the cornice to the wall. When to fix the plastic profile cornice to the ceiling, the scheme will be slightly different.
First of all, you need to make sure that the cornice has the desired dimensions. Most likely, it will be larger than required, so you need to remove the excess length with a hacksaw.
Next, you need to drill holes for the fasteners. For this, a drill with drills of different diameters should be used. Such a system will allow you to accurately do the work and hide the screw heads. First, a larger drill is used: they make a hole on the front of the eaves, equal in depth to the height of the fastener head. After that, a through hole is drilled with a smaller drill. First, a hole is made in the center of the eaves, then all the rest.
The distance between the holes should be about 50 cm. The heavier the curtains, the more fasteners, respectively, should be.
If the cornice has a large width, the fasteners should be arranged in several rows.
After the location is chosen and the holes are drilled, the cornice must be attached to the ceiling and mark with a pencil the place where the central mount will be located. A hole is drilled in the ceiling and a dowel is hammered in. Then it is assembled and fixed with a screw. It is leveled, after which the remaining attachment points are marked and drilled. Then it remains only to finally fix the element and hang the curtains. It is worth noting that in cases where the ceiling is made of wood, the cornice can be fixed simply with self-tapping screws.
When people make repairs or are just planning to do it, they most often turn to the services of construction companies or construction teams. By ad, by acquaintance, they search on the Internet and in newspapers. Even if the service is ordered by men, this is quite normal. But sometimes even the most elementary work, as it seems initially, is not so simple.
The cornice for curtains in the interior plays an important role, because it is from such details that a complete, integral image of the room is formed.
How does the renovation of any room end? Installing furniture and hanging curtains. Therefore, the question of how to properly hang a cornice is one of the most frequently asked. If you figure it out, then installing the cornice yourself is very simple.
If you bought an expensive cornice, you should not use the fasteners that come with the kit. It's better to use your own.

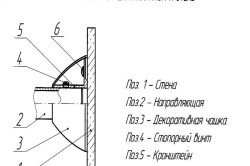
To attach the cornice to drywall, special dowels are used - “parachutes”.
Before starting work, check the availability of the necessary material. You will need tools:
All necessary tools sold in hardware stores and markets. In order to properly hang the cornice, it is necessary to carry out preparatory measuring work.
In the case of installing a cornice for curtains in drywall, you will need specialized fasteners - dowels, which are commonly called "parachutes" and "screws". It will be nice if you find drywall guides to which the whole structure will be screwed. This design will be fastened with metal screws.
Before installation, check for window opening. The design of the cornice should not prevent the window from opening. Check the length of the bracket - this is especially necessary if you have wide window sills. Tulle or curtain should not lie on the windowsill. Often there are batteries under the windows, and pipes from the batteries go up along the window. In this case, the pipe and the eaves can rest against each other.
Also don't forget the vacuum cleaner. When you drill holes for fasteners, dust will appear. The best way to clean it is with a vacuum cleaner. You can also ask someone to hold the hose right during drilling, thereby dust will immediately enter the vacuum cleaner container.
Very simple. It is only necessary to observe only the following rules:
Made cornices with different material, but according to the method of fastening, only two types are divided: fastening to the ceiling and to the wall. There are no significant differences in mounting technology. The only difference is in the attachment point. To hang a cornice, follow these steps:
For other cases, you will need ordinary screws and dowels. They can come with a cornice, or you can buy it yourself. Initially, brackets are installed, and then a cornice is installed on them. Next, the cornice must be aligned with the window opening.
Remember, if your ceiling is not perfectly level, do not mount the cornice too close. It is necessary to take into account the fact that if you place the cornice too close to the ceiling, the unevenness of the ceiling will be noticeable. Sometimes, in order to achieve evenness, the brackets must be fixed at different distances from the wall. Install spacers between the brackets and the wall if the pipe fits snugly against the eaves.
Then holes are drilled and dowels are inserted into them. After that, the brackets are fixed with self-tapping screws.
Check the mount for strength by applying a little force to it.
After that, a bar is taken and rings with tips are put on it and fixed in this position. However, it is worth leaving one ring between the tips and brackets. It is advisable to attach the hooks immediately to the fabric, and then put them all together on the rings.
If you will be attaching the cornice to the ceiling, first measure the distance from the wall to the bracket. From the wall to all the brackets, it should be the same everywhere. But do not forget about the curtains: they should not lie on the windowsill.
Description: War Thunder is a next generation military MMO game dedicated to...

"Titan Siege" is a large-scale online game on the theme of Scandinavian and ancient Greek...

Being an avid lover of German tank looks, I spent a lot of time...