Description: War Thunder is a next generation military MMO game dedicated to...

Not everyone knows how to hang a cornice, and this is not because most people do not have building skills, but because there are a number of reasons why these skills are not acquired. The first and probably one of the most common reasons is that a construction team of competent specialists is engaged in the repair of your apartment, which is able to cope with the task in a couple of minutes. The second reason is that you did not have the experience of installing a cornice because the previous tenants installed it in the apartment. But everything happens for the first time. You have finished making repairs and the finishing touches are left: window decoration with curtains.
If you want painted or natural wood cornices, look for oaks, mahogany, cherry, maple, and others in home centers. The most a big problem is to look for hardwood products other than oak. You may need to order them to special order or find a specialized joinery supplier.
The best tool for cutting mits on wide boards is a 10-inch. combination saw or sliding saw. Standard combination saws work like regular miter saws, but the motor and sideways blade make them suitable for cutting bevels. The sliding compound saw also cuts compound corners, but the motor and blade slide along the tracks so it can handle a wider stock.
For curtains - half the battle, the second half - to correctly install it.
When choosing a cornice for curtains, remember that its main characteristics are quality, practicality, ease of use and fastening, and attractive appearance.
As practice shows, choosing a cornice for curtains is a short process if the goal is to choose a practical product. The moment of choosing a mounting system and, of course, installation becomes more problematic. The method of installation depends on the type of product.
Be sure to use a sharp cutting blade in one. Prices for standard straw saws are quite low, or you can rent them. Many of them are inexpensive and well worth the price. Or you can rent one. But for the money, complex miters and brad greners are too useful and too funny not to control themselves.
Measure the outside width and depth of the curtains, drapes or shades you wish to cover and their distances from the wall. Add 1 inch to determine the dimensions of the inner box. Cut 45 degree bevels at both ends of the front panel and at one end of each end panel. Then reset the saw to 90 degrees and cut the boards to the end.
Curtain rods are classified into two types:
They must be hung on the ceiling and on the wall, respectively.
When choosing a product, you not only rely on your own taste and type of curtains, but also clearly define the place where you are going to install it.
Spread some wood glue on the mites and attach the joint along with six 1-in. Brads, three on each side. Cut the top board to length to fit the front and sides of the box. Each cornice starts in the same way, with cutting and assembling a three-sided, covered box. Then you add the trim of your choice and complete the cornice. The cornice is then ready to be mounted on the wall by screwing it to the 1×2 that is screwed to the wall above the hole.
Start by measuring your curtain and cornice for length, depth, and width. Add an inch or so to the depth and width of the rod of the cornice to make sure the cornice will cover everything. First, cut the ends and the front of the box. It's easiest to square the board, then tilt it to cut a 45 degree bevel for the first end piece, then square it to cut the second end. Myrified corners are glued and nailed together with 1-in. bard. Measure the knot to determine the exact length of the top.
If we compare the aesthetic component, then ceiling cornices look more attractive in appearance than wall-mounted ones. When attached to the ceiling, the curtain closes the window opening completely, all the way to the floor (the length of the curtain, of course, may vary depending on personal preferences). neatly hides the curtain fastening system. Therefore, if you are overcome by doubts and you do not know which cornice to choose, buy a ceiling one.
Using a short test piece, install the end piece and mark it and cut it. Use the template to accurately position the trim when gluing and sticking to the box. Cut the miter off the long front piece of trim, attach it to the first piece, mark its length, then cut and secure. Repeat steps for the other end.
Cut out two end ends of 1 crown, larger than necessary, with opposite 45 degree angles at one end of each piece. Create short fences to support roofing moldings when cut by screwing 1×4 planks onto saw fence through pre-drilled holes in fence. Turn the box upside down and secure the end piece of the crown against the box. Use the other end as a test piece to align the mitters. Mark and cut a piece to length.
But what if the room stretch ceiling? Even the layman will understand that installing any fasteners on him in this case is a utopia. Therefore, when going to the store, consider a number of points.
Spread some glue along the bottom and attach it to the cornice with a pair of 1-in. bard. Test, mark and cut the front of the crown casting to length. Glue and miter nail together, then glue the molding to the cornice box. Cut and install the last end piece of the crown casting.
Cut, attach, glue and glue the bottom trim piece to the box using the same methods you used with the crown molding. When reducing trim for a box, always start by first cutting and installing the end piece, then the long front trim, and finally the other end. In this way, you will be able to test touches on every corner as well. Customize each miter, then write the length of each piece instead of measuring it. It's faster and much more accurate. It's best to cut the pieces a little longer so you can shave them off until they fit perfectly.
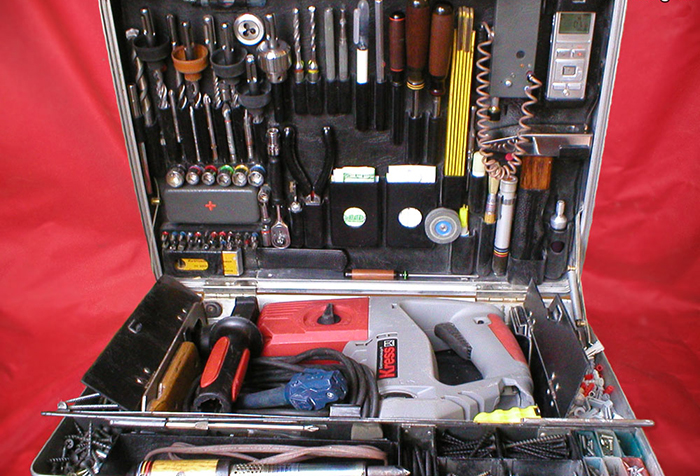
Have you decided to install a curtain rod yourself? Regardless of the mounting system, the set of tools used during the installation process does not change.
Prepare everything necessary tools in advance from the list below.

If you're new to woodworking, it's nice to have a helper by your side to hold the miters together while you're sewing or pinning. The trick to cutting the perfect roofing molding presses is to put the molding upside down and against the bed and fence when cutting 45 degree corners. If you are cutting a wide crown molding, you may need to lengthen the height of the guardrail by screwing a 1×4 length onto the fence saw through the holes in the back. Remember that the long miter point is always top edge.
This will help you remember which way to cut the saw before cutting. To further eliminate the costly disassembly error, angle, draw a light line while you're fitting the piece to indicate the correct angle. Fill nail holes and any gaps in the seams at the joints with wood filler. Sand filling wood fillers and filing files as needed to remove any wood fibers or smooth out mismatches in profiles.
Wipe down the wood and lightly sand it with 150g sandpaper before applying your choice of paint. Fill nail holes and prime before painting. If your cornices have detailed parts such as teeth blocking, you will receive top scores with a few light coats of spray paint instead of brushing. Finish highly detailed natural and painted wood with spray varnish, shellac or polyurethane.
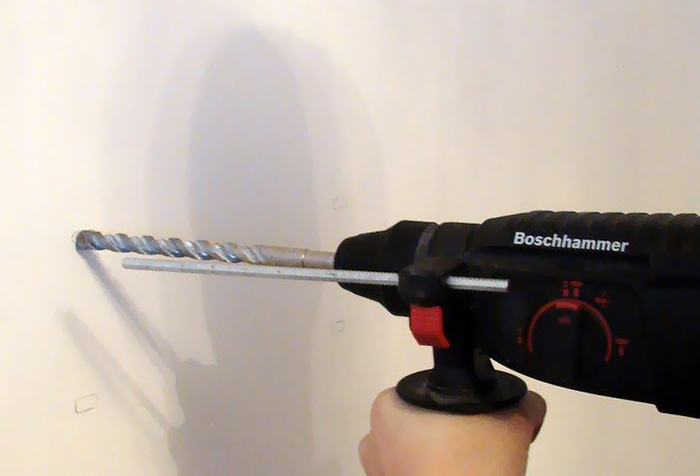
For the installation to succeed, the walls in the room must be even. If so, then the holes are guaranteed to be of high quality. No one forbids making them manually, but why? There are special tools that can handle this with a bang.
If the house is panel, then the walls are reinforced concrete. An ideal tool for such solid walls will be a perforator.
Install a curtain rod over a window
Prepare a 1×2 ledge book to fit the wall before you place it if you think it will show up after the window is in place. Center the cornice over the opening at a height that best covers the cornice and curtain. Then go up and mark the bottom. Remove the cornice and raise the mark 4 feet. level.
Required tools for this project
Cut 1×2 for fastening between the cornice brackets. Bend the holes slightly towards the wall. Hold the ledge tightly against the wall and run 2-in. screws in 1 ×.
Required materials for this project
Avoid last-minute shopping by having all your materials ready ahead of time.
To securely fasten the cornice to the wall, use dowels with a diameter of 6 millimeters and a length of 3 or 4 centimeters.
Eaves boards accent your windows and hide drapery hardware. While traditional boards have a shelf, top part, modern designs and fabric eaves often open, eliminating the need to set the piece with a book or case. To allow for flush-mount installation, most exposed curtain rods have keyhole brackets mounted left and right, a style of hardware requiring precise placement of hanging screws. Careful measuring tape and artist's tape allow you to achieve a perfect fit the first time.
Sometimes it happens that the wall is very strong and the drill heats up. Take a break, cool it for five minutes and repeat the procedure again.

The cornice is fixed to the ceiling according to the same principle, only the brackets are installed not on a vertical, but on a horizontal plane.
What are the types of cornices?
Hold the curtain rod over the window where you want it to be. Set the level to the front edge and adjust if necessary. Using a pencil, draw a vertical line from top to bottom on the right side of the cornice. Lay the curtain rod face down on your work surface. Measure from the bottom edge to the top of the keyhole. On the wall, measure from the bottom of the right vertical line at this distance and mark it with a pencil. Repeat along the left vertical line.
Now all the dots on the "i" are placed, and you have no doubts how to technically fix the cornice. Follow the tips, guidelines, rules and step by step instructions, and then the effect of visual perception will pleasantly surprise you.

With a level, draw a straight horizontal line between the two points. Cut a piece of low-tack tape to the exact width of the eaves board and press it down the back of the board just above the keyholes. Align the top edge of the tape with the top edge of the keyhole. Mark the keyholes on the tape with a marker.
Position it directly below the horizontal line and between the two vertical lines on the wall. Screw or secure anchor nuts into the pilot holes if the holes do not go directly through the stud. While exposed curtain rods are often lightweight, they still pull the wall out when not properly protected.
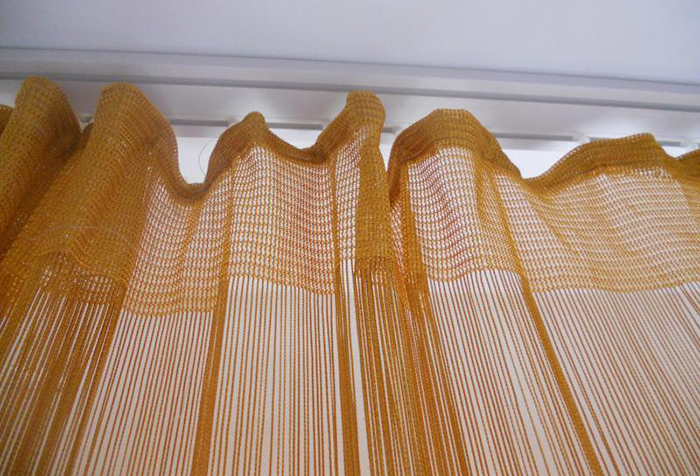
If you entered new apartment or just decided to transform your home, then, in most cases, you will certainly install or change curtains (cornices) for curtains. Curtain rods are an excellent device that allows you not only to hang curtains and move them along a horizontal or vertical line, but also to complement your own appearance room interior. Therefore, before hanging a curtain rod, you should:
Install a screw in each pilot hole, leaving a small portion of the head. Align the keyhole marks on the back of the cornice with the screws and push the cornice against the wall. Slightly move it to fix the eaves. Spirit level Pencil Measuring tape Lightweight duct tape for drawing Marker Drill Plasterboard anchors Eaves. Allow 1 inch clearance between the sides of the eaves and the unit for easy mounting. . Typically, the width in the window dimension describes the distance from left to right across the window, while the length is the distance from the top to the bottom.
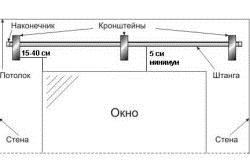
The distance from the top of the window to the curtain should be at least 5 cm.
Hanging it for an experienced master is a matter of 15 minutes, but for a person who has never done this, installation can be a problem. If you want to quickly and efficiently hang any cornice, then you have come to the right place.
Curtains are of two types: ceiling and wall. There is no difference in installation, of course, except that the ceiling one needs to be hung on the ceiling, and the wall one - on the wall. Having bought the necessary, you can proceed with its installation. For proper and aesthetic mounting on the ceiling or wall, it is important to remember that it should be 30-50 cm wider than the window opening. You should also observe a sufficient distance from the top of the window to the curtain, so that in the future the curtain that we will hang does not interfere with the free opening of the window. At least it should be 5 cm. In addition, so that the curtain does not touch the window frame and radiators, if any, it is necessary to take into account the distance from the wall to the curtain, which cannot be less than 10 cm.
This format is also used for blinds, curtains, curtains, draperies, valencias and cornices. The width of the cornice depends on the width of the window; usually the box of your cornice should be 1 to 2 inches wider than the window or cornice. The length of the cornice box is the measurement from the top of the box to the bottom, along the edge of the box. The length of the window is usually proportional to the length of the window or the desired perceived length of the window - usually considered standard at least one-fifth to one-sixth of the total length. In a window that measures 60 inches from top to bottom, a 10-16 inch long cornice box is in good proportion.
The height at which the cornice will be located from the ceiling can be varied, but if you look from the side, the closer to the ceiling, the prettier the curtains will look.
Therefore, the best distance from the eaves to the ceiling is 5-10 cm, depending on how and with what the curtains will be attached.
Back to index
To determine the location of the cornice relative to the window opening, mark the center of the window and measure equal distances from it to the left and right to the brackets (or to the ends of the cornice frame if it is attached directly to the ceiling). It should be noted that the brackets should be placed at some distance from the edges of the window openings (300-400 mm). This is necessary so that when the curtains are assembled, the window opening is completely open.
However, if you want the window to look taller, the length of the window must remain proportional. For example, if you wanted a 60" window to display 72" long, the box would need to be between 12" and 15" long and would be mounted 12" above the window frame. In this case, the longer box will be the best choice because it spans the window frame.
Linda Erlam started writing study guides. Erlam is a graduate of the Sheffield School of Design and is a practicing interior decorator and drapery workshop operator. Made from wood, polystyrene, or foam, carnite boards can create an elegant top to a window when batted and topped with fabric. Most often, boards are installed over curtains or curtains that are left open to draw even more attention to the window. However, the trick finds The best way hang curtains.
To properly hang the curtain, you must first mark the place of fasteners.
To properly hang the curtain. you need to start marking the place of fasteners. To do this, we determine the length of the cornice, assemble it on the floor and measure the distance from the center to the consoles. Above the window, we make a mark in the form of a vertical stroke with a pencil on the wall, then measure the distance from the ceiling on which our curtain will be located, and apply a horizontal mark. From the mark, set aside the distance to the eaves in both directions. At a similar distance from the ceiling, in exactly the same way, we find a place and apply 2 horizontal risks. The intersection of the marks gives us the points at which we will need to drill holes.
To properly install and secure the cornice, you must first mark the place of attachment. To do this, having determined the desired length and cut off the excess with a hacksaw, we collect it on the floor and measure the distance from the center of the eaves to the consoles with a tape measure. The consoles, in turn, are spaced from the ends of the cornice at a distance of 15-20 cm. Above the window in its center, we make a mark on the wall with a vertical stroke with a marker, then we measure the distance from the ceiling at which our cornice will be located, and apply a horizontal risk. From the center mark, set aside the desired distance in one direction and the other. At the same distance from the ceiling, we apply two horizontal risks in the same way. The intersection of the marks will give us the points at which it will be necessary to drill holes.
Note that we set aside all points from the ceiling, since it is parallel to the ceiling, and not the horizon line, that the cornice should be located. This is due to the fact that if the ceiling is sloping, the eaves located along the horizon will appear uneven.
Back to index
For fastening to walls made of fragile material, it is usually sufficient to drill a hole of a larger diameter. So, for walls made of foam concrete or gypsum concrete, in most cases, 12 mm is enough. Since the dowels for such holes are designed for screwing thick and long screws, dowels of a smaller diameter are inserted into the holes of large dowels, driving them in with gentle hammer blows. Such fasteners have another advantage: they allow a large error when drilling holes.
For fastening to walls made of fragile material, it is usually sufficient to drill a hole of a larger diameter.
Sometimes it becomes necessary to choose fasteners for fastening yourself, for example, when hanging a cornice from one place to another or if factory fasteners are lost. A good option in this case is to use purchased anchors with internal threads. To attach the anchors, drill holes of the appropriate diameter, insert them into the holes and hit the punch or punch inserted inside the anchors to wedge them into the holes. Because anchors provide a stronger hold than plugged screws, the number of anchors may be less than the design number of screws.
String cornices are most often placed on the ceiling, although they are also suitable for mounting to walls. The installation order for them is as follows: we determine where it will be placed, then, having attached the mounts to the ceiling, we mark the holes for the screws with a thin pencil. We drill, then we hammer plastic dowels into the holes and screw the fasteners with screws. Then we insert the string, fix it and tighten it with the help of a tensioner, which is located on the mount. In the most common case, the tensioner is a simple tube, which, moving along the thread during rotation, is pulled into a string.
It is good to install a string cornice where, from the point of view of decor, it is undesirable to use a large-sized design of baguette cornices. The string is much less noticeable and creates an effect in which only the texture and color solutions of the curtains are visible. But along with grace, string-type cornices have their drawbacks.
Showcase Potolku Body
http://1popotolku.ru
Description: War Thunder is a next generation military MMO game dedicated to...

"Titan Siege" is a large-scale online game on the theme of Scandinavian and ancient Greek...

Being an avid lover of German tank looks, I spent a lot of time...