Description: War Thunder is a next generation military MMO game dedicated to...

How to sew curtains?
In principle, nothing is impossible. Curtains you can sew yourself. For curtains of this design, a pattern is not needed. Need a meter tape, pins, scissors
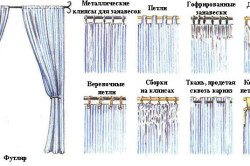
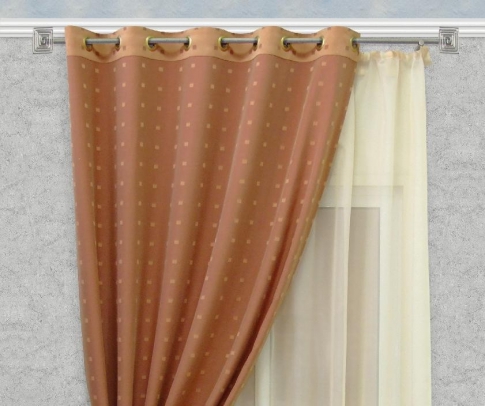
, sewing machine and great desire.Now let's deal with curtains with eyelets , which are worn directly on the rod of the eaves.
Another 5 cm must be added to the length from the floor to the cornice. After all, the cornice will be on the same level with the rings - and a few centimeters of fabric on top. If the curtains are up to the window sill, 10-15 cm are left on the filing. For touching the floor - 20 cm. For lying on the floor - 2-3 cm. This is what design you choose. The fabric width is calculated as follows: multiply the window width by 2 (4m + 3m + 8.8m). You also need folds for beauty.
The stores sell special tapes with rings already punched. They make the task much easier! The number of rings should be even (so that the folds go to the wall).
The length of the ribbon is equal to the length of the fabric minus 10 cm.
Iron the hem of the top of the curtain and place the tape just above the hem. Baste or pin with pins. Then attach to the fabric with two seams: top and bottom. If the fabric is thin, then it is better to make the hem larger, in several layers.
Twist the fabric twice, and sew with a straight stitch, trying to capture the right and left edges of the ribbon with rings.
Then - carefully cut the fabric inside the rings.
Flip to the right side and insert the rings, tucking the edges of the fabric under them.
It remains a little - to process the bottom edge of the curtains. Trust your husband to hang the curtains!
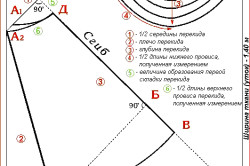
How to sew a pelmet. Lambrequin pattern.
She herself recently pestered acquaintances with the question: how to sew a lambrequin. A friend gave me a pattern. I sewed it, it turned out well. 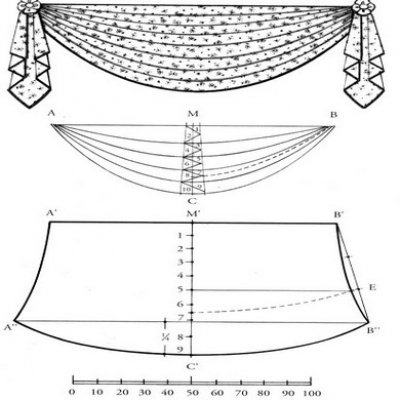
Found cool pattern "svaga".
Everything is clearly lined and written here, for those who are especially gifted, like me =) I think that such a pattern will suit you and you can sew a lambrequin for yourself without any problems. 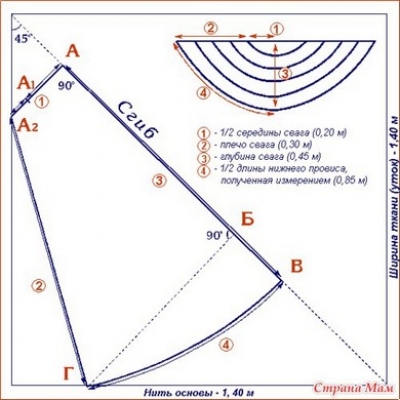
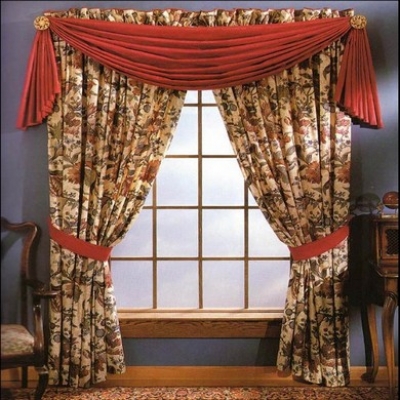
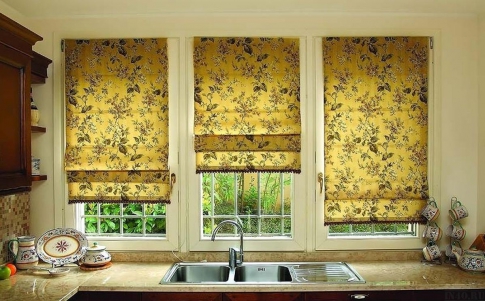
In finished form, such a set of curtains with a lambrequin will come out. Not bad, right?
. You can choose any fabric. In this option, all the details of the curtains and lambrequin are clearly visible.
Where does the process of creating curtains actually begin?
First you need to think about the design of the curtains, and then pick up fabrics for curtains, cornices and decorative ornaments, while taking into account the overall interior of the room. However, for talented people this is unlikely to be an obstacle. So, if you have creativity, design skills or just a great desire to update the interior of your home, as well as a sewing machine, threads, needles and other little things, then you can safely start.
First of all, you need to clearly imagine what kind of future curtains will have, and then make a sketch, you can use a pencil on paper. By the way, in order not to fool yourself with the creation sketch(not everyone has artistic ability) ready-made patterns easy to find for free in a magazine or on sites that specialize in tailoring curtains. After choosing a suitable model, we buy required amount fabrics, and then strictly adhering to the recommendations, we sew curtains. For those who have certain skills, the process is not difficult. However, any creative process is always joy and pleasure.
You can go the other way, that is, do without any patterns. It is enough just to take measurements of the window (length and width), then, taking into account the length of the curtains, calculate the amount of fabric required for sewing.
Although modern fabrics shrink already during the production process, it is still better to verify this personally. Therefore, before starting work with the fabric, it is advisable to wet it, and then, if necessary, carefully iron it.
For cutting curtains, the fabric must be laid out, for example, on the floor, and the front side should be at the top. Then you need to determine the bottom edge of the curtain and align it by drawing a line perpendicular to the side edge of the fabric. Cut the fabric along this line. Next, set aside the length of the curtain determined in advance and cut the fabric along a line perpendicular to the side edge. The second part of the curtain should be cut out in the same way, having previously joined the pattern.
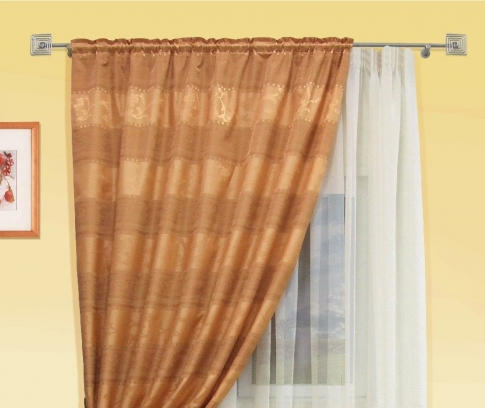
After the two panels are ready, they must be hemmed from below, and to top edge sew a special tape on which there are loops for attaching the curtains to the eaves. In addition, ready-made curtains can be decorated with frills, lace, tassels, and elegant braid.
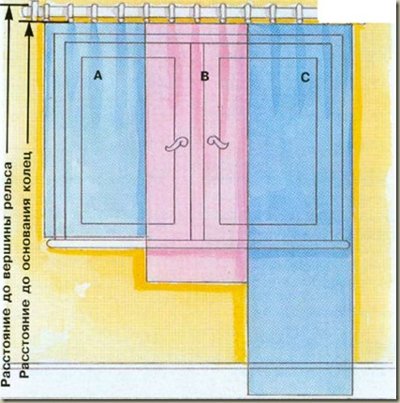
When sewing curtains, there are three main sizes that are crucial for choosing a style and style. The curtain can have three lengths - A, B, C. Length A - to the window sill, length B - 15 cm below the window sill, length C - to the floor level. Therefore, depending on what kind of curtains you plan to sew, it is necessary to accurately and carefully measure the length of the fabric.
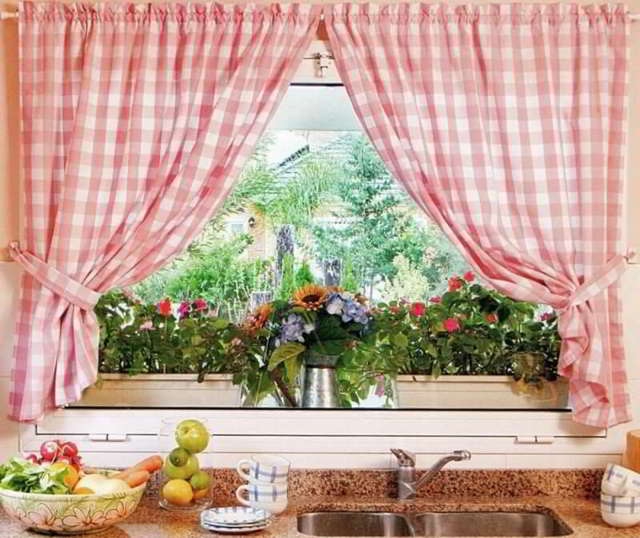
Most simple curtains
are a flat panel of such transparent fabrics as veil, cambric, muslin, cotton. Such curtains are draped with a special braid and hung on a light wooden or metal cornice. The main thing when sewing a thin curtain is to correctly calculate its length. A curtain made of a denser and more opaque fabric can be decorated with a decorative ribbon or border.
If the room for which you decide to sew curtains is decorated in country style, then you can create excellent curtains using the patchwork (patchwork) technique. This is especially convenient for housewives who are engaged in needlework, since multi-colored patches will be needed for sewing curtains. You can also use fabric that has already been used. First, pieces of fabric need to be washed and ironed, then cut out with a stencil, and then sewn together. It is most convenient to work with fabrics of the same type. In patchwork, the pattern, as a rule, consists of parts of the same size and shape, for example, squares, rectangles or other shapes. To make the curtain durable, the patches sewn into the cloth are attached to the lining. Ribbons, braid and cords are used to decorate such curtains.
Art Nouveau fans can easily create suitable curtains that are distinguished by a fairly simple cut. For sewing such curtains, you will need a capron or nylon of bright colors and a metal cornice with tips in the form of an arrow, a cone, etc. The main plot of the design of Art Nouveau curtains is asymmetry, as well as light and sophisticated draperies. The canvas of airy fabric, without being fixed, simply pounces on the cornice, twisting around it like a graceful wave. In addition, an Art Nouveau curtain can be made from an ordinary rectangular piece of light fabric, pulled together with a cord or ribbon at the level of the window sill and secured on either side with a holder.
For creating classic curtains
it will take a lot of attention and work, since such a curtain consists of three components - a thick curtain, a light curtain and
lambrequin. The main task when sewing classic curtains is to make the right pattern, and then follow the sewing recommendations exactly. Although the creation of a complex curtain will take you some free time, but it will be the work of your own hands, which is especially expensive and valuable.
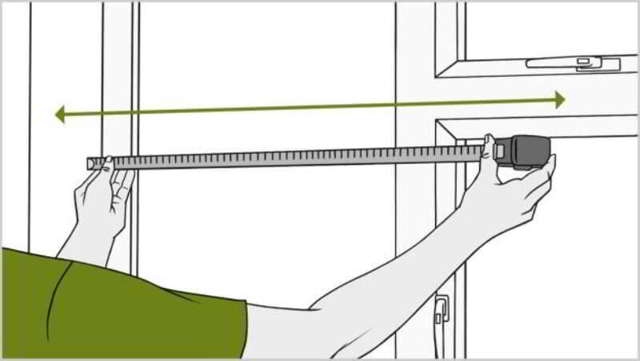
If you decide to sew curtains yourself or you are going to order their tailoring in the salon, but decided not to invite the designer to your house, you need to measure the curtains.
Proper sizing of curtains is extremely important, because even a mistake of 2-3 cm can spoil the whole picture. If you are going to order tailoring of curtains in the salon, keep in mind that when placing an order you will be asked to put your signature in order to certify the correctness of your measurements.
Carefully check that the manager placing the order indicated exactly the dimensions that you named. If the curtains, sewn, according to the sizes indicated in the order form do not suit you, then changing the size of the model will be made out by a separate order and paid separately.
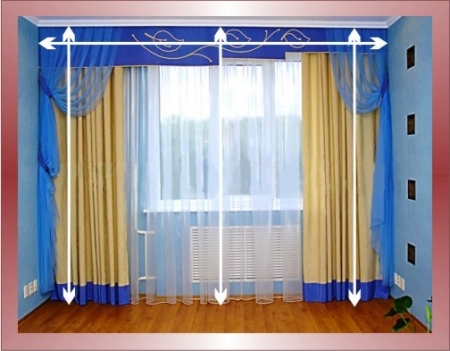
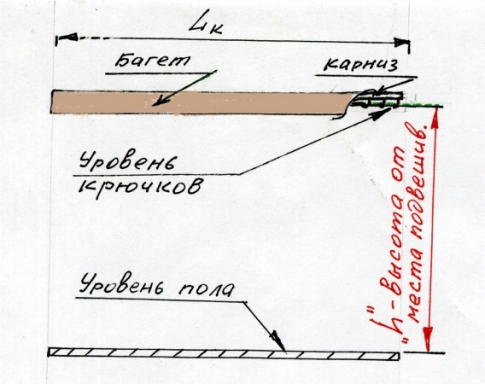
To prevent this from happening, it is enough to know a few simple rules for sizing curtains. First, in order to measure curtains, be sure to install the curtain rod first - accurate measurements can only be obtained when the curtain rod is installed. 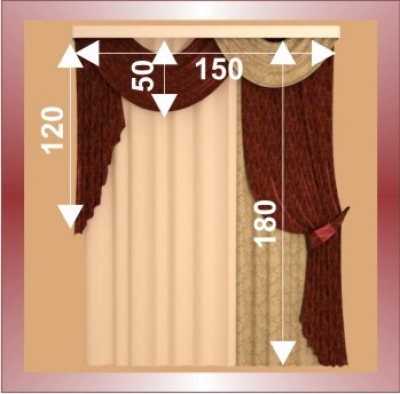
In order to measure the height of the curtains, take measurements from the cornice hook to the floor in three or more places. This is necessary in order to exclude the curvature of the floor and ceiling, if the dimensions are the same, subtract from the result the distance by which the curtains should rise from the floor. To measure the width of curtains, measure the distance between the extreme positions of the curtain rod hooks. If you plan to sew curtains with variable heights (for example, "Arch"), mark two or more height points - a bottom edge point, a top rise point, etc.
If you have an inclined cornice installed above the window (as a rule, this window design option is found on stairs, or country houses and cottages in rooms under the roof), you will need to take the following measurements: the length of the cornice, and the length of the cornice in a straight line.
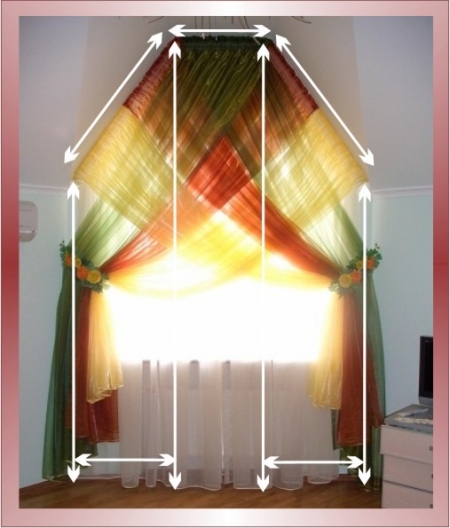
If the cornice itself has the shape of an arch, you will need to remove the pattern.
If you decide to sew curtains yourself, first of all you need to calculate the fabric
To do this, you need to decide on the choice of fabric and clarify its width.
Drapery fabrics and tulle are available in widths of 1.50 m (options from 1.40 to 1.60) or heights of 2.80 (options from 2.70 to 3.20 m). As a rule, designers try to avoid fabrics with a width of 1 ,50 m., because, other things being equal, curtains sewn from a fabric 2.80 m high are more economical. In addition, it is simply impossible to carve out many curtain elements from narrow fabric. Therefore, we will calculate the fabric for curtains based on a height of 2.80 m.
And so, in order to calculate the amount of fabric that will go to the manufacture of curtains, you need to know the width of the cornice. If the fabric is dense enough and has a large pronounced pattern, it is enough to take one and a half widths of the cornice, that is, the width of the cornice must be multiplied by 1.5. For example, the width of the cornice is 3.00 m., 3 x 1.5 = 4.5 m. We will need fabric. Immediately it is worth mentioning that this is the most economical, but far from the most aesthetic option.
A curtain laid in a bow fold or on a special braid will look much more beautiful. The bow pleat can be laid starting from double the width along the eaves, but the most advantageous result is achieved when the width of the cornice is exceeded by 2.5 - 2.7 times. That is, with a cornice width of 3.00 m - 3 x 2.7 = 8.1 m of fabric. If you plan to collect fabric on a special mounting tape, ask the sales assistant how much fabric you need to take for the tape you have chosen. In any case, do not forget to add another 10-20 cm to the footage you received for processing the side seams.
Thus, you can calculate the fabric that will be needed for sewing shadow curtains and inner tulle. In order to make a calculation of the fabric that will go to the lambrequin, you will need to calculate the fabric consumption for each element separately and then sum it up. A standard swag takes 1.5 m of fabric, with a fabric height of 2.80, out of 1.50 m It is possible to carve out two standard swags. To calculate the fabric consumption for de jabot, you need to take a piece of fabric equal to one height and width, taken in three times + allowances for seams. For example, we will have a dejabot 1.20 m high and 0.30 m wide, we will need: 0.3 x 3 + 0.1 = 1.00 m. If we sew from fabric 2.80 m high. - 1 m will be enough for two dejabots.
Calculating fabric consumption for Roman blinds and Japanese panel curtains is much easier. Since the curtains are not pleated, simply take the width (or height, if the fabric is 1.50 m) of the curtain and add seam allowances. But we need to keep in mind one not unimportant point: if we sew panels of fabric with a large, pronounced pattern, 1.50 m wide, we will need to take additional footage to adjust the pattern.
If the model has a rigid lambrequin on a bondo or glued fabric, take the size of the finished lambrequin, add allowances for the seams and add 20 - 30 cm to fit the fabric on the glued fabric. For example, if the lambrequin is 3.00 x 0.50 m wide. 3 + 0.2 + 0.3 = 3.50 m. in height, while leaving a lunge from a height of 2.80 m. - 1.20 m. = 1.60 m.
If you are not embarrassed by the seams on the lambrequin, or they can be closed with other elements, such as a swag, then you can calculate the fabric consumption for a hard lambrequin as follows: 3.00 m x 2: 2.80 m (fabric height) \u003d 2.14 - Round up to the nearest integer - we need 3 lambrequin heights. (0.50 m. + 0.2 m.) x 3 \u003d 2.10 m. of fabric will go to a hard lambrequin with a seam.
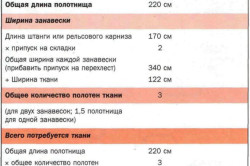
FABRIC CONSUMPTION CALCULATION:
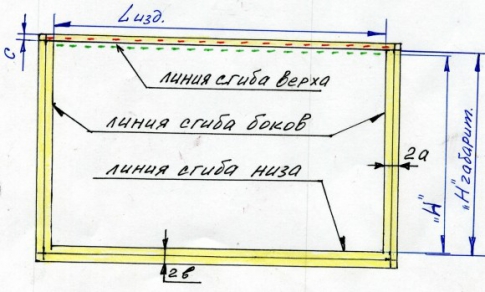
Decide on the length of the curtain: it can be on the floor (do not reach the floor level by 13 mm), be 8 cm below the window sill, or be flush with the window sill (the length is measured from the cornice to the window sill). At this stage, the length does not include a drawstring allowance at the top and a hem allowance along the bottom line.
WIDTH
Measured along the side borders of the eaves. Lay the allowance for the entry of the canvases in the center. If the window is close to the corner, then the width is measured taking into account the distance from the window to the corner. If it is less than 20 cm, then you will not have enough space between the wall and the window to open the curtains normally, so think about the option when one panel hangs on the other side.
CURTAINS:
The fluffiness of the curtain is determined by the density of the fabric and the type of upper drawstring. For example, deep narrow pleats will require 3-3.5 fabric widths, while inverted-V pleats will require 2 ¼ widths.
The general rule is: dense fabrics have a splendor ratio of 2:1. medium density fabrics - 2.5:1, light fabrics - 3:1.
CONNECTION OF CURTAIN PANELS BY LENGTH
Sometimes sewing curtains involves connecting several canvases along the length. When you make calculations, round up the value. For example, if the window is 220 cm wide and you want 2 ¼ fluff, you will need 495 cm of fabric divided into two 248 cm strips. With a fabric width of 140 cm, the required width for each canvas would be 1.8 panels.
Rounding up, we get 2 panels per canvas (in this amount we can include allowances for side hem and connecting seams).
CURTAINS ON THE CURTAINS, HIM, REPEAT THE PATTERN
Before determining the right amount of fabric for sewing curtains, you will have to take into account such factors as pattern repetition, the type of drawstring on the top of the curtains and the hem allowance. The size of the pattern is determined by the boundaries beyond which the pattern is repeated. The size of the pattern is either calculated independently, or indicated on the coupon-description of the fabric. Add a pattern size for each desired length to get the desired panel size.
Drawstring on the top of the product. Add double the width of the drawstring (it varies from 2.5 cm to 20 cm). The inverted-V drawstring width is 10 cm, so the total amount of material used will be 20 cm. The length of the drawstring will be equal to the total width of the product plus 15 cm for hem.
Curtains are a symbol of comfort and decoration of the window of any home. The modern curtain market is represented by a variety of models and fabrics. Skillful housewives are quite capable of sewing tulle on their own.
Curtains will help complete the style direction of the room design and set the overall mood of the interior.
How to sew curtains? To get started, you need to correctly calculate the amount of fabric and familiarize yourself with the features of the cut. Sewing curtains yourself is not difficult if you follow the sequence of work and take into account the characteristics of the fabric.
The range of fabrics for window decoration is replete with variety: from sheer chiffon to stately brocade and velveteen.
When choosing a fabric, it is necessary to be guided by the characteristics of its strength. The material must be strong, dense and fire resistant. The fabric should be able to withstand washing and heat treatment with an iron.
Since the curtains are located directly at the window, they must be resistant to ultraviolet rays. A rag burnt out on the window will not add beauty to the interior.
The width of the curtain should be 1.5-3 times the width of the cornice, taking into account allowances for hemming the edges. For organza tulle, the amount of fabric should be 2-3 times more so that soft air folds form; for tight shorts, material 1.5 times the width of the cornice is sufficient.
To start cutting, you must perform the following steps:
For an example of calculating an organza curtain, let's take a window 130 cm wide. The cornice for such an opening will be 150 cm in size. We multiply this size by 2 and add 10 cm for allowances. Thus, for this window with an assembly factor of ½, 310 cm of fabric and 350 cm of curtain tape are needed. This calculation is also suitable for two-piece curtains, but in this case an allowance must be added of 15-20 cm.
If the fabric of the curtains has a pattern, then when purchasing, you should take the material with a margin, since you will have to combine the ornament. The stock of fabric is calculated as follows: the width of the pattern report is multiplied by the number of panels that will be combined.
There are fabrics in which the pattern also has a direction, that is, reports form rows: upper, lower, diagonal. This fact should also be taken into account in order to sew curtains with your own hands.
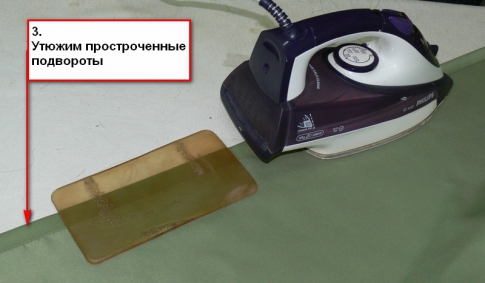
Before cutting the material, it must be washed and ironed. This is necessary in order to avoid stretching and shrinking of the curtains. In this case, the fabric must be ironed in a wet state. When the material dries, it is necessary to check it for the integrity and quality of the structure.
The cut of the fabric should be made according to the following sequence:
To properly cut and sew curtains with your own hands, you will need the following tools:
Sewing curtains with your own hands is not only the right cutting, but also the competent setting of the sewing machine.
Organza, tulle and drape fabrics require a specific thread tension setting and appropriate needles.
For thin organza, set the stitch length to medium so that the stitching does not pull the fabric. In this case, the thread tension and presser foot pressure should be weak.
Some housewives sew curtains, pulling the fabric with their own hands to avoid unwanted wrinkles. However, this is an erroneous technique, as it can lead to needle breakage and excessive stretching of the tissue.
Many curtain fabrics cannot be stitched twice, as they leave traces of needle punctures.
To avoid such possible consequences, you should take a piece of material and try to stitch it. The results of such an experiment will prompt the necessary parameters for adjusting the machine.
When sewing curtains, the following materials are needed:
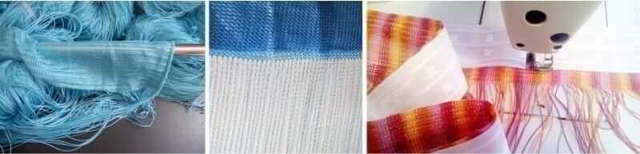
When all the details are cut out, sewing materials are purchased and the machine is set up, you can start sewing curtains with your own hands. First you need to process the edges of the fabric so that it does not crumble.
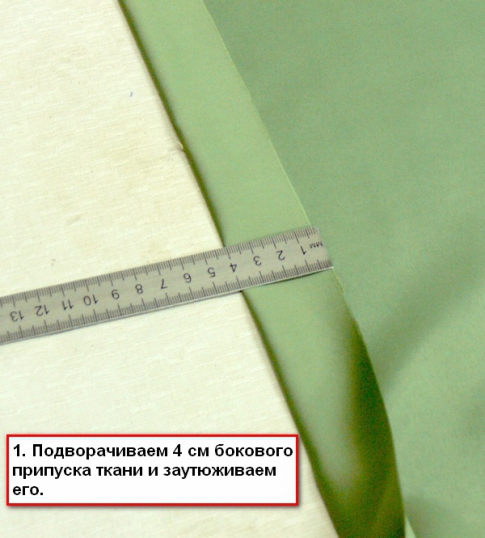
Side cuts are processed into a hem or with the help of an oblique inlay. The process technology looks like this:
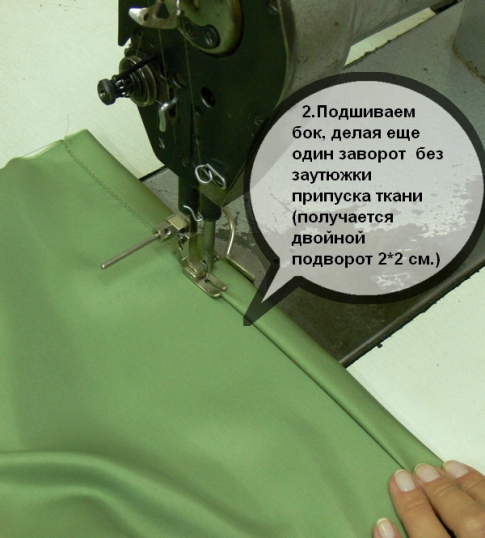
Next, proceed to bending the bottom. Curtains look more solid with a double wide hem of 5 cm, which is 10 cm in total.
The top hem of 2 cm is simply ironed and basted. Sewn to the folded edge curtain tape.
On curtains, the pleats are laid either by hand and the braid is sewn over the folds, or formed by tightening the braid cords. The braid should also be with a margin.
It is necessary to cut the fabric so that the pattern does not turn out to be torn off. Therefore, it is necessary to take into account the stock of fabric when buying.
To sew curtains with your own hands, it is important not only to do the job well, but also to choose the right color scheme material. The curtain should fit into the interior of the room and look harmonious with all the objects in it.
Julia Friday
Are your windows too big to fit standard store curtains? Dont be upset! Better stock up on tips on how to sew curtains at home to get unique decor items that are right for your home.
Despite the fact that there is one basic principle on how to sew curtains, their methods differ somewhat depending on how they are attached to the eaves.
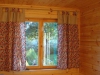
A classic look for curtains that are easier to sew than others.
All you need is to prepare a piece of fabric of the desired size and process it along the edges.
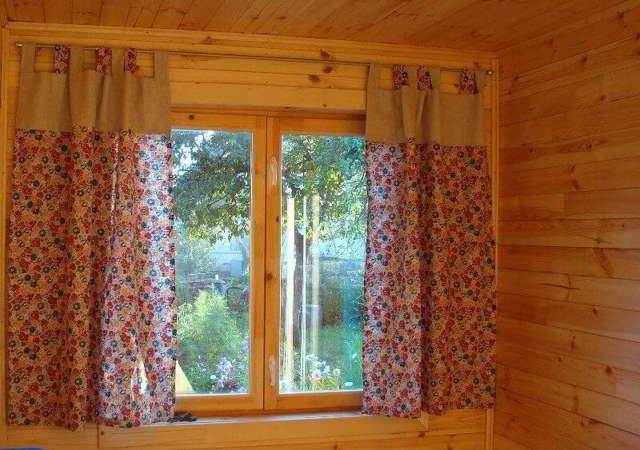
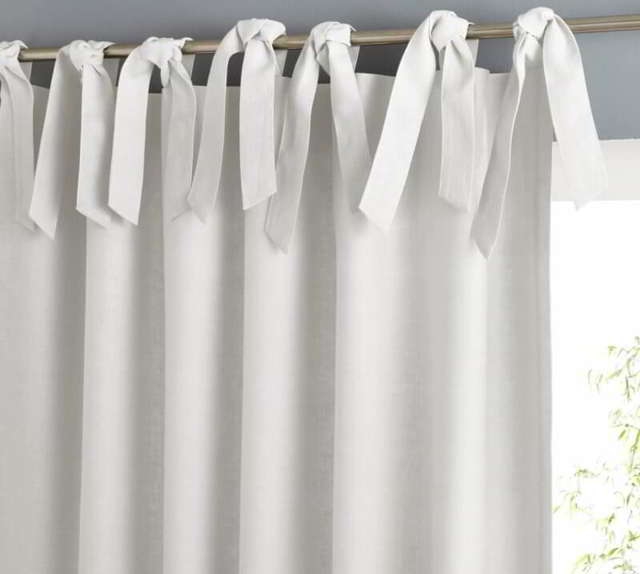
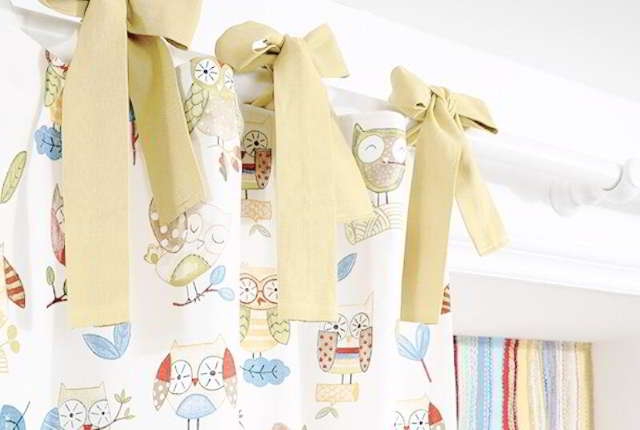
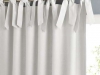
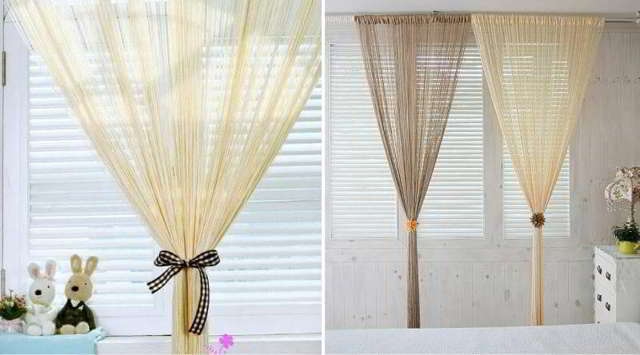
Making a curtain with loops and ties is as easy as sewing a classic one.

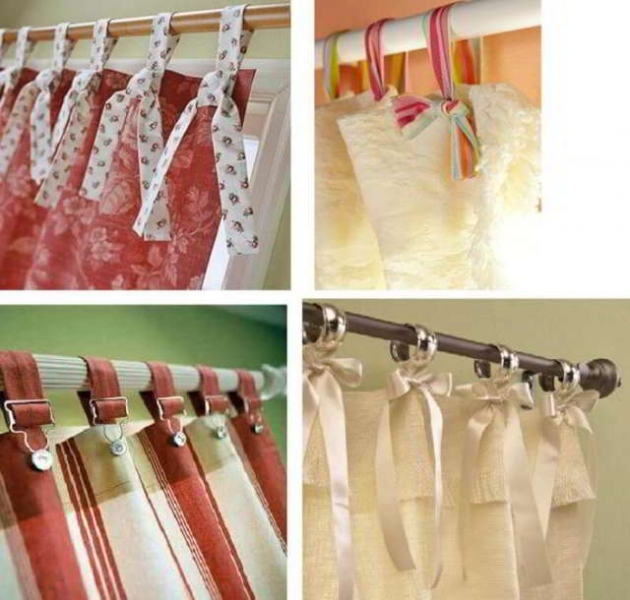
If you want the product to stay on the cornice and not fall off, sew loops along the upper edge, both with Velcro and solid. But the curtain on decorative ties is easier to attach and remove.
An interesting design solution allows you to firmly hook the curtain onto the rod and protect it from falling - especially if you have cats at home.
Bend the top edge of the product, forming a wide loop along the entire length, and sew. With clips, the curtain can be hung in place.
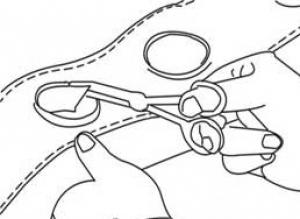
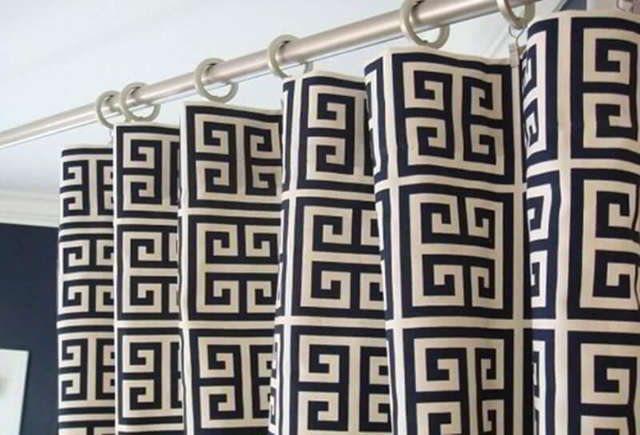
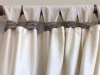
Thanks to this method of fastening, the product acquires soft waves. Punch several holes at the top of the curtain at the same distance from each other. Process them on a typewriter or insert metal rings.
Now you can pick up any clips that suit your interior for fastening.
Before you start sewing simple curtains, learn how to correctly determine the size of a future product.
The diagram shows the parameters for matter: the length of the curtains corresponds to the length of the cornice. The width of the canvas should be equal to the length of the future product from the place of fastening (cornice or hooks on it).
Depending on your author's idea, curtains can be sewn to the window sill, just below the window sill, to the floor and 5-10 centimeters longer than the floor, so that the fabric gathers in soft folds at the bottom.

At this stage, the product can already be used by hanging it with special clips or clothespins. If you want to attach the curtain with hooks, sew on the top of the product curtain tape with pre-cut holes.
To learn how to sew classic curtains with loops, watch the following video tutorial.
Depending on your wishes, the buttonholes can be sewn solid with both ends sewn in or with a Velcro fastener at one end. These curtains can decorate windows, doorways or be used as a screen when delimiting the space of small bedrooms.
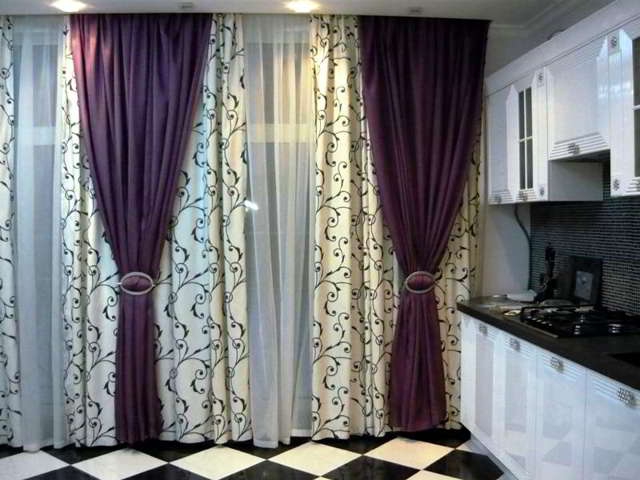
This type of curtain is perfect for decorating windows in the kitchen, living room or bathroom of a private house, as well as an office.
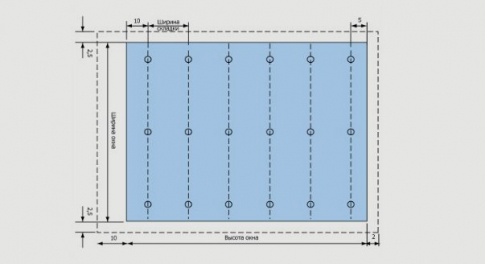
To sew Roman curtains, you will need materials such as duct tape, 7-8 twigs made of wood, metal about 3 centimeters shorter than the width of the product, plastic rings - 3 for each pin, 3 long identical cords, 2 strips - for hanging and weighting, hooks, nails.
![]()
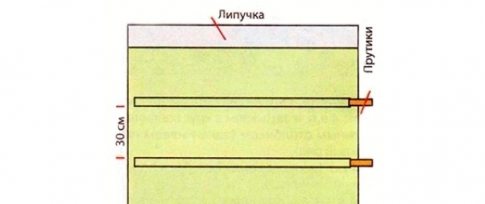
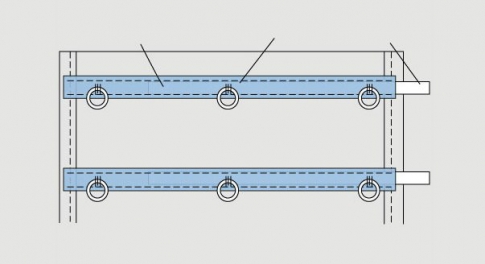
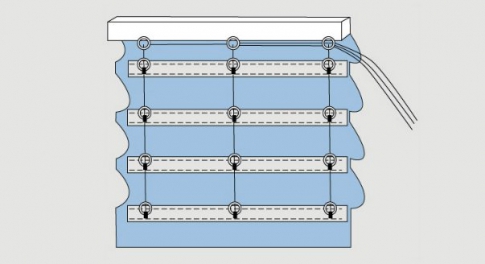
The curtain should hang in a fully extended state, only then you can tie a knot of 3 cords at the top. Fasten the lifting mechanism piece to the window frame or opening, wind the cord around it and tie the knot again. Cut off the uneven ends of the cord. With it, you will adjust the height of the rise and the size of the folds of the Roman blind.
To learn more about how to sew this type of product, watch the video.
Remember that all twigs must be removed before washing the curtains, otherwise the material from which they are made will deteriorate: iron oxidizes in water, and wood swells.
To learn how to sew quality curtains, how to real professional, use the secrets of the work of experienced professionals. They will reveal to you the little tricks of pattern, design and tailoring.
Curtains can be assembled by draping with folds, using clips, hairpins and clothespins. Make such a clip with your own hands, decorating it with an artificial flower made of cold porcelain, paper, beads.
Take it, tell your friends!
Read also on our website:
show more
I decided to summarize a lot of my advice, master classes, photos and videos on the topic "How to sew curtains with your own hands."
The fact is that the other day I went into the Yandex search engine and typed the above question, to which he gave me an answer from a variety of sites, and on the first pages in the issue were sites that were completely unrelated to learning to sew curtains and lambrequins, the articles of which consisted of simple dialing words and photos that do not reveal the essence of this request at all.
And the purpose of writing these articles is not the desire to teach users how to sew curtains, but to promote their sites on the first page of search engine results and break into the first places in terms of traffic. And those sites that really teach how to sew curtains and lambrequins are not visible at all for any basic user requests.
On my site, there are a lot of practical photos of master classes and videos, after viewing which you can not only answer the question: “how to sew curtains with your own hands”, but also learn how to do it in practice. You can get acquainted with them.
It is unlikely that it will be possible to answer the question: how to sew curtains with your own hands in one article, since the curtains are different in style, sewing technology and drapery.
However, there is some rule for sewing straight curtains.
First you need to decant the fabric. That is, steam it with an iron, and then let it lie down to dry for a while (for example, overnight) so that it shrinks.
Then we measure the size of the window, adding allowances on the edges for their processing.
After that, we process the curtains with machine stitching.
Watch this video on how to sew a curtain with your own hands.
This technique is applicable for tailoring the manufacture of almost all types of curtains in the form of simple straight canvases.

Video: curtain manufacturing technology:
This technology is suitable for such curtains, the photo of which I posted below:

You can see all the photos of simple curtains in this gallery.
To enlarge a photo, click on it, and then just scroll through the gallery:
The only difference in the processing of all these curtains is the processing of the top edge.
So, if you have to bring the product to a simple or ceiling cornice with hooks, then processing the upper edge with mounting tape is required.
If you want to hang a sewn curtain on a round cornice, then this processing not required.
But also, to hang the curtain on a round cornice, you can make a drawstring, or sew fabric loops to the upper edge.
In the same way, you can also lengthen already sewn curtains.

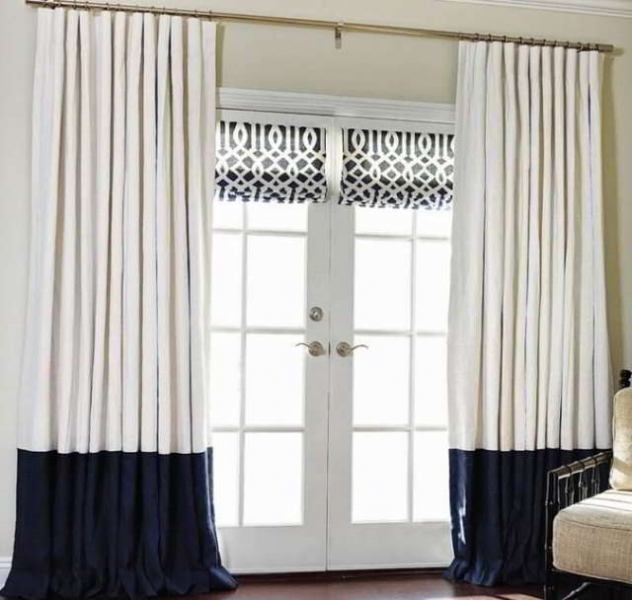
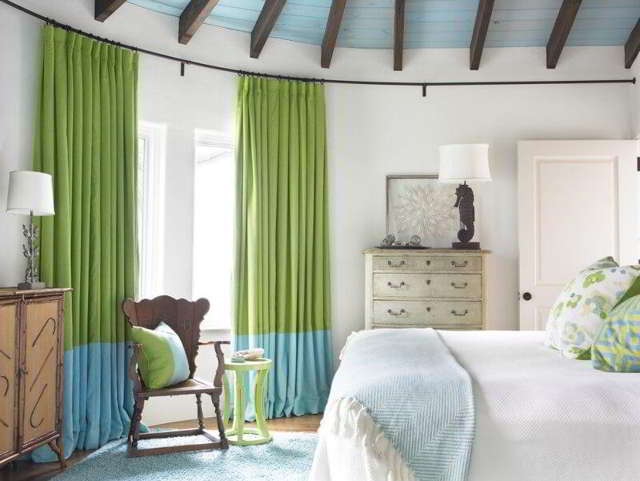
Another way to lengthen them is to insert a piece of fabric in a contrasting color:
See how the hinged curtains look original:


I repeat that all of the above and the curtains shown in the photo are sewn and processed using the same technology shown in the video about the curtain.
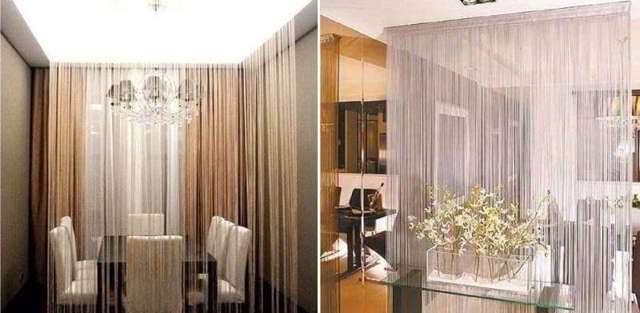
If you do not want to bother processing and cutting fabric curtains, then you can make filament curtains. But this process, in my opinion, is more difficult.
In addition, you are unlikely to be able to save on self-made kisei.
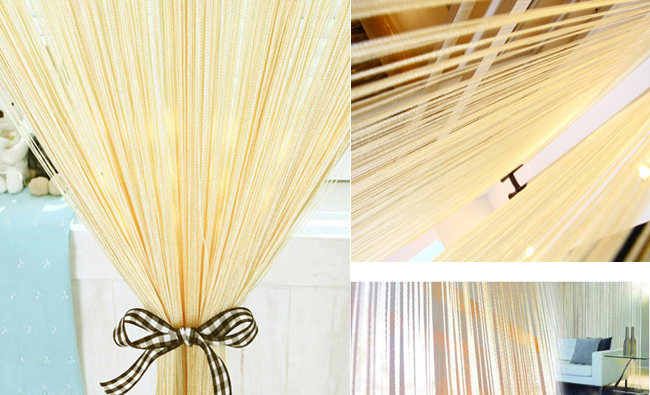
How to sew filament curtains yourself, see my detailed photo master class.
You can purchase ready-made filament curtains by sewing a curtain tape to their upper edge so that they can be hung on a cornice:
You can cut the muslin to the length you need with ordinary scissors:
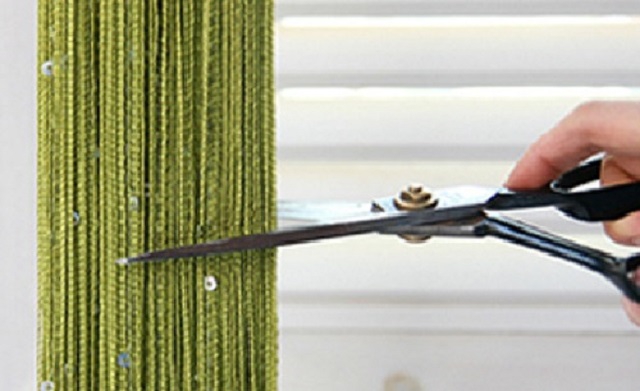
Photo of filament curtains.
Kisei can be combined in different shades on one window.
![]()
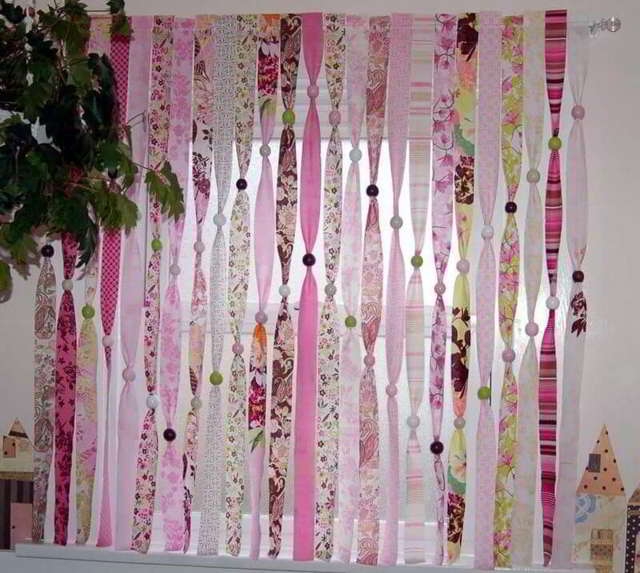
And you can imitate filament curtains by making them from multi-colored ribbons:
But there are curtains, the tailoring of which is much more difficult: these are Roman, Venetian, London, marquise, or french curtains etc.
You will learn how to sew Roman curtains if you look at the photo master class.

A detailed photo master class on making Venetian curtains, you can see
This video is a master class on how to make Japanese panels:
From the remnants of the curtain fabric, you can sew original ties and decorative pillows.
When sewing or ordering curtains, you should know that textiles, their colors and textures must be in harmony and fit into the interior of your room, home.
In this case, your home will be cozy and harmonious.
Many needlewomen prefer to equip their home with their own hands, but at first they don’t know how to sew curtains or lambrequins correctly.
If you want to learn all the secrets and technology for making curtains and lambrequins, then my author's video course will help you with this:
Sewing curtains and lambrequins with your own hands. From simple to complex"

I will be glad to answer your questions.

Curtains are a room design item that will give your renovation a finished look. The whole interior will depend on the quality of the curtains, their style and colors. Original curtains will help create a unique atmosphere of comfort and warmth in your home. How to sew curtains for the kitchen on your own, and is this option possible for inexperienced housewives? It is worth taking a responsible approach to this difficult matter, and then everything will work out for sure. First of all, you need to decide on a suitable fabric for a given room and a specific type of window. It is important to make the right pattern, not to make mistakes in the calculations. Our article will help you sew beautiful curtains.
It is best to start with the simplest patterns, which do not require complex patterns and long hours at the sewing machine. simple curtains, even without additional decorations, will look great in your kitchen. Let us consider in detail the main techniques that craftswomen use. This experience will help you tackle more complex models later.
Highly important question when sewing curtains, this is keeping a certain style of your kitchen:
By turning on your imagination, you can create such a masterpiece that can match the overall design of the room, cause delight among guests and pride of the hostess.
When choosing a fabric to sew curtains for the kitchen, you should take into account all the features of this room. It must be remembered that the kitchen is a room where food is regularly prepared, which means that the likelihood of rapid contamination of matter increases.
Important! fabrics bright colors more prone to fading and fading in the sun. Therefore, they are better suited for windows that do not face the sunny side, but the shady side of the house.
In order to make the right calculations, you need to carefully consider the length and style of the curtains. Do you prefer short curtains to decorate the window? Or do you want floor-length models? There are also options for curtains “lying” on the floor.
Anyway:
Important! This indicator usually does not affect the consumption of fabric, because the width of the curtain fabric is often greater than the required height of the curtain.
Important! Be careful: you need to measure the length of the cornice, and not the window itself.
Important! If you want to make two curtains on big window, then you need to additionally add 20-25, and not 10 centimeters.
To sew curtains for the kitchen without special trouble and difficulties, be sure to set the machine to the desired type of fabric from which you are going to make curtains. In order to make the correct cutting of curtains, you need a flat and flat surface. It is best to use a table for this, but you can also do it on the floor.
You will also need:
In the simplest version, a curtain pattern is one or two rectangular pieces of fabric:
The main difficulty that arises in the independent manufacture of Roman blinds is the width of the fold. But any hostess can sew such curtains on her own.
Important! Remember that the lines of the folds should be parallel to each other, and the folds themselves should be the same in width.
Important! Remember that you will need to pull out these pins before each wash, so the "pockets" should be closed, but not sewn up.
At first glance, it seems that such beautiful curtains impossible to make at home. But this is not the case, and installing eyelets is not such a difficult process. You just need to calculate the fabric correctly to get smooth folds.
Important! The number of eyelets must be even. Only in this case you can get uniform and beautiful waves.
So, how to sew curtains in the kitchen so that they are attached to the grommets? - Act in accordance with the following rules:
Important! It is advisable to use special tools, but regular scissors will do just fine.
Luxurious curtains with decorative massive elements will look more than pretentious in the kitchen. But still, some housewives dream of such a window decoration in this room. It is also possible to sew curtains for the kitchen with your own hands of this kind. To begin with, it is better to use the simplest schemes and patterns.
We offer you a variant of the most familiar and organically fitting into any kitchen lambrequin. To make it you will need:
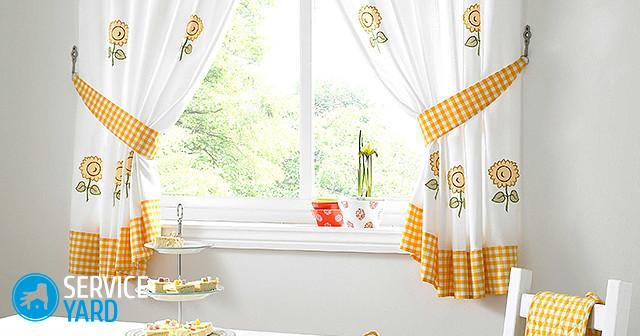
There is a common misconception that curtains and curtains are one and the same piece of furniture, which is simply called by different words. Many also confuse curtains with curtains. In fact, curtains have a lot in common with curtains, but they can only be made of transparent material that allows light to pass through. This makes them ideal for kitchen windows that overlook the shady side of the house.
It is quite easy to sew such a curtain for the kitchen. You will need fabric and curtain tape:
Austrian curtains are distinguished by the fact that they combine all the advantages of Roman and French models. So, even in the lowered state, the matter is collected in stylish scallops, which attracts attention.
Important! It is better to hang such curtains in the bedroom or living room, they are not advised to be placed in the kitchen, as the risk of contamination is high, and the care of such curtains is rather problematic.
But to decorate the interior of the kitchen, you can make sacrifices. If you still decide to make Austrian curtains yourself, then you will need:
We will tell you about the easy way creating Austrian curtains. Using these tips, you can sew short curtains for the kitchen with your own hands:
Important! Immediately decide how lush the scallops you want to make.
Important! Be sure to leave allowances at the bottom and sides for a double collar.
Important! If you want to change the decoration of windows from time to time, you should carefully hide the ends of the cords so that they do not peek out.
As you have seen, sewing curtains for the kitchen with your own hands is not an easy task, but any housewife, if desired, can easily cope with it. By hanging new curtains, and thus changing just one detail of the interior, you will transform your kitchen beyond recognition. First you need to decide on the most suitable type of curtains. It is important not to forget that different models have their own advantages and disadvantages. To sew curtains for the kitchen with your own hands, use the useful recommendations from this article, and this business will not seem too difficult for you.
Description: War Thunder is a next generation military MMO game dedicated to...

"Titan Siege" is a large-scale online game on the theme of Scandinavian and ancient Greek...

Being an avid lover of German tank looks, I spent a lot of time...