Description: War Thunder is a next generation military MMO game dedicated to...

Probably everyone at least once tried to solve the Rubik's Cube 3x3 - a simple-looking, but actually tricky puzzle. The Land of the Soviets will tell you how to fold it using special schemes and assembly algorithms that will be understandable even to beginners.
The Rubik's Cube (other names - Rubik's Cube, Magic Cube) is a well-known mechanical puzzle. In 1974, it was invented by the Hungarian sculptor and architecture teacher Erno Rubik, and in 1975 he patented his invention.
The classic puzzle consists of 26 smaller multi-colored cubes (size - 3x3x3). They can be rotated around axes invisible from the outside. The task is to assemble the “toy” so that each of its faces consists of squares of the same color.
Assembling a 3x3 Rubik's Cube for beginners seems difficult, but quite amenable to mastering.
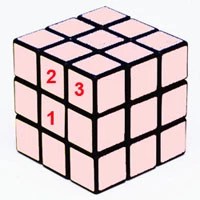
To begin with, let's define the terminology and give each cube a name. The central cube (center) in the figure is indicated by number 1, the side cube (side) - by number 2, the corner cube (corner) - by number three.
Important! The main assembly rule is that the front side (front) should not change!

Try to assemble the first belt yourself - the first side is assembled as you like, you can show your imagination. After that, by exchanging the dice of the first side, the first belt is collected.
Here are a couple of tips for collecting the first side:
First, make sure that the first side has the correct cross from the sides, then collect the corners.
To assemble the second belt, you may need two formulas.
Rubik's Cube Scheme - Formula 1 Rubik's Cube Scheme - Formula 2
These formulas are easy to understand. For example, rotation 1 of formula 1 is a clockwise rotation of the top side. And rotation 7 of formula 1 is the rotation of the front side counterclockwise. The turn is always 90°.

In the scheme for assembling the second belt of the Rubik's Cube 3x3 completely assembled side with the first belt - the invisible part to your left. Remember: the central cube is always one color, the side is two, and the corner is three. Front side - 4.
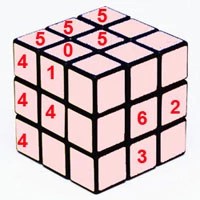
First, change side 2 to die 0-1. In this case, the color of planes 2 and 4 must match. The invisible color of the sidewall 2 when assembled according to the first formula is 5.
Squares 2 and 3 are on the third belt, not yet assembled. That is, you need to find on the side opposite to the one already assembled, the sides without color 6, and by rotating the 3rd belt, the color visible on side 6 is opposite the corresponding color of the first belt.
If the color of square 3 matches the color of square 5, assemble according to formula 2: side 3 is placed in place of 0-1.

To assemble the third belt (last side), you will need three formulas.
How to put together a puzzle: formula 3 How to put together a puzzle: formula 4 How to put together a puzzle: formula 5 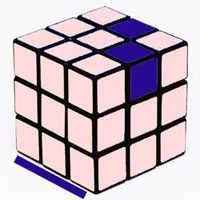
First you need to assemble the correct cross on the last side - so the sides will take desired position. The cube must be oriented relative to the sides indicated in blue in the figure. In this diagram, the front side is underlined in blue, fully assembled - the lower invisible side. In order to collect the correct cross, repeat formula 3 several times. The cross will turn out when the far cube is located correctly, and the near one is not.
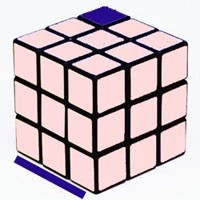
After that, only the corner squares should remain unassembled. If they are in their places, but oriented incorrectly, do not follow the next formula. The blue cube in the picture is in its place. If you do not have any, the front side can be any. After 2-3 repetitions of formula 4, the corners should fall into place.

To correctly orient the corners, use formula 5. In order for the blue-colored corner to stand correctly, it must be rotated several times. The most important thing is not to change the front side until the cube is completely completed - even if it seems to you that nothing comes out. If the corner did not fit correctly the first time, run the formula again. To substitute the next angle, the first step would be:

To better understand the presented schemes and visualize the process of assembling the Rubik's Cube, take the cube in your hands and watch the video tutorial. Try to repeat what you have learned. We are sure that now you will be able to easily assemble this puzzle!
You have mastered the scheme of how to correctly and quickly assemble this most famous puzzle. Of course, there are many more formulas for assembling it in a 3x3 format, we have described only a few, but after a little practice you can quickly figure it out without an assembly diagram.

You've been scratching your head over this puzzle for a week. And now, finally, it is assembled! .. You will never understand the joy of a person who has collected a Rubik's cube until you try to do it yourself.
For an inexperienced layman, collecting a Rubik's cube is not an easy task. Of course, on the Internet you can find both videos and instructions with where there is detailed description step by step assembly. But not all methods lend themselves to successful application in practice.
Let's figure out what the 3x3 Rubik's cube consists of and how it can be twisted (although, most likely, it will twist you at first!).
The cube has a frame - a cross, on which the central details of each side are fixed. These details are motionless, and the rest of the "brotherhood" revolves around them.
Now take the cube, turn one of the sides towards you (at your discretion) and carefully consider:

B - top side
H ─ bottom side,
L ─ left side,
P ─ right side,
Ф - frontal (front) side,
Z ─ back side.
And, accordingly, it is important to learn combinations of turns:
F, Z, V, N, L, P - rotation clockwise (or away from you) by 90 degrees;
Ф ', З ', V ', N ', L ', P ' - counterclockwise rotation (or - towards yourself) by 90 degrees;
F”, Z”, V”, N”, L ″, P ”- rotation by 180 degrees.
The simplest scheme for assembling a 3x3 Rubik's Cube consists of seven consecutive steps.
Choose the side that will be the top. We will collect the "correct" cross. This means that on the top side, the center will be surrounded by details of the same color, and on the side faces, the stickers on the top cube and the central one will be different, but also the same color.
To get this result, the easiest way is to use one of the above rotations to move the cube we are interested in down, combine it with the center of the same color and move it back up.
When you have collected several edges in this way, and the next one is so that, lowering it, you will break the top, the combination P ', N ', P comes to your aid, allowing you to return everything to its place.
It is easiest to start from those corners that are at the bottom. We twist the bottom so that the desired angle becomes under the place assigned to it, as in the picture below. Then we move it up with one of the turns, most likely breaking the upper cross, so we fix the corner by turning it completely in the opposite direction, put the center in place and return the corner. For example, for the case shown in Figure 4, we use a combination of P, F ', P ', F.
The principle is based on the fact that we “knock out” others with some cubes. If the corner is on top, then it is better to move it down, for example, by turning П′, and then put it in its place
Expected Result:
First, turn the cube so that the assembled side is at the bottom. Now you can arrange the four edges of the middle layer in their places. Three combinations are possible here:
1. It is necessary to transfer the cube from the top right to the front face. We turn B ', F ', B, F, B, P, B ', P '.
2. You can move to the right using a combination of B, P, B ', P ', B ', F ', B, F.
3. To turn an edge that is in the right place, but on the wrong side: П, В', П', В', Ф', В, Ф, В', П, В', П', В', F', V, F.

Result:
The goal is to reach the variant with fig. 10, assemble the "white cross":
1) a combination of F, P, V, P ', V ', F ";
2) F, V, P, V’, P’, F’;
3) any of the proposed combinations twice.
Rotate the top layer until any two edges match in color with the centers from the middle layer. There are two cases here:
1. In their places - two opposite edges, the other two need to be swapped. We use a combination of P, V, P ', V, P, V ”, P '.
2. Two assembled edges are at an angle, the other two need to be swapped with a combination of P, B ”, P ', B ', P, B ', P '. You may need to repeat this combination several times.
Result:
To carry out this step, use one of the suggested combinations:
1) P’, F’, L, F, P, F’, L’, F;
2) F’, L, F, P’, F’, L’, F, P.
We hold the cube towards us with one side so that the “wrong” angle is on the top right. With a combination of P ', N ', P, N, we twist the cube until the corner is right. Next, scroll the top to the next wrong turned corner and set it correctly with the same combination. We do not change the working side!
During these actions, the design of the cube may be broken. But that's how it's written in the script. So don't worry!
Finally, you can unfold all four corners the right sides– the rest of the elements of the cube also fall into place! Be proud of yourself - you did it! Congratulations on a successful result!
Photo: kak-sobrat-kubik-rubika.praya.ru, speedcubing.com.ua, ru.gde-fon.com.
Pardon in the text? You saw її, push Shift+Enter or click.
Surely everyone has known since childhood the famous puzzle, named after its creator - Erno Rubik. Pretty quickly, she gained popularity and reached the most remote corners of the planet.
Without proper skill, it will not work to put together a puzzle, even after doing a hundred manipulations, but relatively recently, specialists from Inc. learned how to solve a rubik's cube in 20 moves. They managed to achieve this phenomenal result with the help of a computer, which was given the task of analyzing all possible combinations.
Back in 1974, the Hungarian architect and teacher at the Academy of Applied Arts Erno Rubik thought about the best way to learn
He wanted a new invention to help students explore the world, and one day he had a sensational idea - to create a puzzle. The task, it would seem, is elementary - to rotate the rows of the cube until each of the sides becomes the same color. But the scheme for assembling a Rubik's Cube is not so simple and can take even several hours in time, without giving a result. The students appreciated and got carried away with the new toy. At that moment, the creator did not even suspect that after many years scientists would puzzle over solving the puzzle until they figured out how to solve a Rubik's cube in 20 moves.
At first, the original toy was not popular with investors. It was believed that its production would not be profitable, since the assembly of the Rubik's cube could be of interest only to intellectuals. Nevertheless, one small company decided to invest in this unusual project, and the puzzle began to conquer Budapest.

A few years later, Tibor Lakzi, an intermediary of one of the German firms, arrived in the city and became interested in the original puzzle, which at that time was very popular among the townspeople. Realizing that the distribution of an amazing invention around the world could bring huge profits, he decided to promote the Rubik's Cube. For novice businessmen Lakzi and Rubik, the main difficulty was the search for investors. But thanks to Tibor's economic education and his commercial flair, the owner of Seven Towns Ltd, Tom Kremer, was soon involved in the project. He undertook large-scale production and distribution, which helped the cube become popular all over the world.
Since 1982, competitions have been regularly held in many countries, in which the main task of the participants is the speed assembly of the Rubik's Cube. In order to solve the puzzle as quickly as possible, it is not enough just to have good dexterity and ingenuity. A person should know the optimal scheme for assembling the Rubik's cube, which allows you to expend as little effort as possible. The minimum number of steps required to solve the problem is the "God's Algorithm".

Many learned minds and simple amateurs have tried to find a solution. At one time it was believed that the minimum number of steps from any position was 18, but later this theory was refuted. Many years have been spent searching for the optimal sequence, and only in 2010, scientists managed to find out how to solve a Rubik's Cube in 20 moves, regardless of the position of the puzzle before the assembly began. This is currently an absolute record.
On the this moment Colin Burns, an American schoolboy, is the fastest person ever to solve a puzzle in less than 5.5 seconds. And the robot, assembled by British engineers from parts of the EV3 designer, coped with this task in 3.253 seconds. The advantage of the mechanism is not only that the work of all its parts is more coordinated than the actions of a person. Scientists gave him as many as 4 hands, which allow you to perform all operations 2 times faster.
There is more than one standard Rubik's cube scheme that allows you to learn how to solve this original puzzle in a short time. Various systems assemblies allow you to approach the issue in different ways. Which one to choose is up to you. Of course, it is unlikely that without the computer power of Google you will learn how to solve a Rubik's cube in 20 moves, but you will learn how to find simple solutions in a short time. The main thing is that you have enough perseverance. No technique will help solve the puzzle without problems if you are not ready to spend your precious time learning.
But you should not give all your time to this toy. Doctors have noted an increase in the number of patients in psychiatric clinics after the appearance of the Rubik's Cube. And traumatologists began to regularly encounter symptoms, later called "Rubik's syndrome." It appears as sharp
There are several schemes that allow beginners to quickly learn how to add a Rubik's cube. Attached to this article is one of them:


Now you can learn how to solve one of the most popular puzzles in the world. The universal Rubik's cube scheme will help you with this.
749 1 750 854 0
Numerous attempts to solve the Rubik's Cube failed? All the presented instructions on the Internet are written by professionals, but for the "dummies" the solution seems very confusing? Do you think that solving this puzzle is impossible? Following our step by step instructions, you will not only be able to fully assemble the most popular puzzle in the world without formulas, but also understand how you did it.
You will need:
So, your goal is to complete the Rubik's Cube. To do this without knowing how it works, what it consists of and how it functions, will not work.
The standard 3x3 Rubik's Cube is a mechanical 3D cube with each face painted a different color.
The traditional version is blue, green, white, yellow, red and orange. Edges:

In total, there are 20 movable elements in the Rubik's cube (12 edges and 8 corners) and the solution depends directly on knowing how they can change their position.
As we rotate one side, we see that the center pieces stay in place, the edge moves to where the edges should be, and the corner takes place in the corner.
It follows from this that each element has a certain type, which does not change after rotation (the edge remains the edge, the center remains the center).
What should be a Rubik's Cube?
If you are not going to participate in competitions, you can take any cube. It is better for young people and children to buy a puzzle from Chinese manufacturers. When choosing, consider the following:
- It is better to take the cube of the latest models, it provides for the shortcomings of previous versions, and it is more improved.
- The right cube should spin easily, while cutting corners well.
- Cubes for professionals can be disassembled and adjusted.
How many edges does a rubik have?
The classic Cube consists of 12 two-color side or edge elements (12 "ribs").
How many rubik's cube puzzles?
There are many ways to build a Cube. There are those that allow you to assemble a couple of formulas, but in a couple of hours. Others, by memorizing a couple of hundred formulas, allow you to solve a cube in 1 minute or even 20 seconds.
Our goal is to put all the elements in the right places. To determine the direction in which to rotate and the “correct place” of a particular square, you need to pay all your attention to the central elements, because, as we have already said, they have a fixed position.

For example, the edge that is located between the red and green center, respectively, is red-green, so you need to focus on placing an edge of the same color near the green center, and a red edge near the red central element.
The corner is always three-color, so care must be taken to place it between the center elements of the corresponding colors.
The first thing you need to do is choose a color to start with. In this example, the main color is yellow, it will be presented in all schemes. Everyone is free to choose the option that he likes best and start with it.
So, if the upper central element is yellow, then the bottom, respectively, is white (it is located on the opposite side in almost all models of the Rubik's cube).
In order to solve a 3x3 Rubik's Cube, you must first fold a cross on its upper face - put all the edges of the selected color (in our case, yellow) in the appropriate positions around the central element.
You need to do this in a certain order so that the second color of the edge matches the nearby center element.

This step is the hardest to explain to those who don't know how to solve a Rubik's Cube. This task is easier to solve on your own and you will undoubtedly succeed in doing it after a short training.
It is at this step that most beginners stop - they collect a cross, then one face - further, unfortunately, few people advance.
For those who cannot do this, below is a diagram of how to assemble the cross. Keep in mind you will have to repeat this step 4 times - one for each side.

a) Yellow "looks" down

b) Yellow looks ahead

c) Rib in the intermediate layer

Note: if the yellow square is on the top layer, but it is not properly positioned and oriented in relation to the nearby center, change its position by putting another element in its place.
After that, the edge will be in one of the three positions described above. Using the diagram, put it in the "correct" place. Repeat all the steps for each yellow edge and collect the cross on the top layer of the Rubik's cube.
If you were able to fold the cross, then it is worth collecting the entire top layer, that is, putting the corners into place one by one. We cannot put them as we want, because each corner has a place specially reserved for it, which is determined by the colors of which it consists.

Just like in the previous step, there are several solutions that we will follow.
Remember that you will have to repeat all the steps 4 times - one for each corner.

a) yellow looks to the left

b) yellow looks to the right

c) yellow is on the bottom

note
: if the yellow corner is not in the bottom layer of the Rubik's cube, then it means that it is in the top layer, but not in its place.You need to put any corner from the bottom layer up (following the first solution, for example). This way you will get a yellow corner in the bottom layer.
Repeat for each corner until the top layer is complete.
We want to build the second layer of the cube. Remember that the central elements are fixed, so there is no need to swap them and think about how to place them. Keep in mind that you will have to repeat the steps below 4 times - one for each edge.
There are a few options:
1) The edge should move to the right from where it is.

2) The edge should move to the left from where it is now.

Note: If the top layer doesn't have an edge element without white on either side, it means they're in the middle layer but out of place.
Put any other edge from the top layer in its place. In this way, you will get the edge in the top layer without the white square and you can move it, in accordance with the instructions above.
Repeat this step 4 times - one for each edge.
So, we have collected the first 2 layers of the Rubik's Cube. Now we need to ensure that the 4 outermost elements of the top layer are white, forming a cross. At this stage, we will focus only on the edge elements, not paying attention to the corners.
The top face of a cube can have four white edges, or two, or none. If all four white edges are on the top side, then you can skip this step and go to the next one. If there are two edges, then one of the following options should be used, depending on how they are located relative to each other: side by side or opposite.
1) Adjacent edges

2) Opposite edges are white

3) None of the white squares are right
If there was not a single white square in the top layer, do one of the two options described above and you will get 2 white squares in the top layer. After that, do the necessary sequence of actions, depending on the situation.

Thus, we have laid down the second cross.
In the previous step, we folded the second cross. In this step, we will make the sides of the cross match in color with the central elements of the corresponding faces. We will only focus on the white edges of the cube, ignoring the corners.
a) adjacent edges

b) opposite edges

Thus, we have placed the second cross of the Rubik's cube correctly.
We have already put in place all the elements of the Rubik's Cube, except for the corner parts of the last layer.
The goal of the penultimate step is to place the corners correctly, regardless of their orientation. Thus, you need to know exactly when the corner took the correct position.
So, the corner is placed correctly if the nearby center elements match in color with the 3 parts of the corner.
Let's look at a few examples of when the corners are placed incorrectly and when they are in the correct position in order to complete the Rubik's Cube.

It is possible that all 4 corners will be in place from the very beginning (feel free to the next step), or only 1 corner is placed correctly, or none. If only one corner is in place, follow one of the examples below, choosing the one that will allow you to place all the elements in their places.
1) 3 corners out of position (a)

2) 3 corners out of position (b)

3-4) No corner placed correctly
If none of the 4 corners are in "their" place, do one of the above examples - this way you will be able to put one of them in place. Then follow the steps depending on what you got.


Thus, we have completed a 3x3 Rubik's cube, putting the corners in their positions. The last step - by rotating the corners of the last layer, we will solve the puzzle completely.
In the previous step, we put all the elements in their places. It remains only to rotate the corners to solve the Rubik's cube and solve it completely. At this stage, there may be two, three or four misdirected corners in the last layer.
If there are 2 incorrectly oriented corners, follow one of the examples below, depending on the situation that has arisen.
Be sure to read this before rotating the faces of the cube.
Very important! This step is not as easy as the others, but also a lot more difficult. Before you get started, there are a few things to know. Option 1 has several sub-options, so the first thing to do is figure out which one is right for you. To solve this step, do the first sequence of actions. After that, take the necessary steps, depending on the version of the red table that you received.
Option 1. Two corners are not correctly oriented. Please note that the "neighboring" corner - needs to be rotated clockwise.

Option 2-3. Three corners are incorrectly oriented.
If 2 corners are not correctly oriented, solve the Rubik's Cube following the first example - this way you will get only 2 incorrectly oriented corners. Finally, do the sequence of actions, depending on the situation that you have.


Option 4. All corners are not correctly oriented.
If none of the 4 corners are correctly oriented, follow the first example given. Then choose the solution that suits your situation.

If you did everything right and followed our instructions so far, then congratulations! You solved the Rubik's Cube by yourself!
And other logic games.

And here, by the way, there is something to show yourself:
We hope we inspired you and helped you understand how to solve the Rubik's Cube. If you are interested in thinking games and puzzles, you will probably be interested in learning the secrets of playing dominoes. A mixture of options 1 and 2 is suitable for us, in extreme cases, option 2.
If lubricated very liquid, its sides will start to adhere to each other too much. Thick takes away the speed of rotation. If you mix two types of lubricant, it is this consistency that is optimal.
Can't solve rubik's cube...
Many people ask the question: "How to solve a Rubik's cube, if I took it apart, I can't put it back together?". Most often this happens on the last layer. You may not be following the algorithms exactly. But if you follow the diagrams exactly, then it should come together. If not, the problem may be as follows - Chinese manufacturers make dice of different quality - from professional to falling apart in the hands at the first spins. If the cube fell apart, it must be assembled correctly.
On a cube with two layers assembled, pry off the cover of the central cube of the third layer with a flat screwdriver or a knife, remove it, unscrew the screw with a small Phillips screwdriver (do not lose the spring on the screw). Gently pull out the corner and side cubes of the third layer and insert them correctly color by color. At the end, insert and screw the previously unscrewed central cube (do not overtighten). Rotate the third layer. If it's tight, loosen the screw, if it's too easy, tighten it. It is necessary that all faces spin with the same force. After that, close the lid of the central cube.
The human intellect needs constant training no less than the body in physical activity. The best way to develop, expand the abilities of this quality of the psyche - to solve crossword puzzles and solve puzzles, the most famous of which, of course, is the Rubik's Cube. However, not everyone manages to collect it. Knowledge of the schemes and formulas for solving the assembly of this intricate toy will help to cope with this task.
Mechanical cube made of plastic, the outer faces of which consist of small cubes. The size of the toy is determined by the number of small elements:
Any of the small cubes can rotate in three directions along the axes, represented as protrusions of a fragment of one of the three cylinders of the large cube. So the design has the ability to rotate freely, but at the same time, small parts do not fall out, but hold on to each other.
Each side of the toy includes 9 elements, painted in one of six colors, opposite each other in pairs. The classic combination of shades is:
However, modern versions may be colored in other combinations.
Today you can find Rubik's cubes of different colors and shapes.
It is interesting. The Rubik's Cube even exists in a version for the blind. There, instead of color squares, there is a relief surface.
The goal of assembling the puzzle is to arrange the small squares so that they form the face of a large cube of the same color.
The idea of creation belongs to the Hungarian architect Erne Rubik, who, in fact, did not create a toy, but a visual aid for his students. So interesting way the resourceful teacher planned to explain the theory of mathematical groups (algebraic structures). It happened in 1974, and a year later the invention was patented as a puzzle toy - future architects (and not only them) got so attached to the intricate and bright manual.
The release of the first series of the puzzle was timed to coincide with the new year 1978, but the toy entered the world thanks to the entrepreneurs Tibor Lakzi and Tom Kremer.
It is interesting. Since the appearance of the Rubik's Cube ("magic cube", "magic cube"), about 350 million copies have been sold worldwide, which puts the puzzle in first place in popularity among toys. Not to mention dozens computer games based on this assembly principle.

The Rubik's Cube is an iconic toy for many generations
In the 80s, the inhabitants of the USSR met the Rubik's Cube, and in 1982, the first world championship in assembling a puzzle for speed, speedcubing, was organized in Hungary. Then best result was 22.95 seconds (for comparison: in 2017 a new world record was set: 4.69 seconds).
It is interesting. Fans of assembling a multi-colored puzzle are so attached to the toy that they find it not enough for them to assemble for speed alone. Therefore, in last years there were championships for solving puzzles with closed eyes, one hand, legs.
Collecting a magic cube means arranging all the little details so that you get a whole face of the same color, you need to use God's algorithm. This term refers to a set of minimum actions that will solve a puzzle that has a finite number of moves and combinations.
It is interesting. In addition to the Rubik's Cube, God's algorithm is applied to puzzles such as Meffert's pyramid, Taken, Tower of Hanoi, etc.
Since the Rubik's magic cube was created as a mathematical aid, its assembly is decomposed according to formulas.

The assembly of the Rubik's cube is based on the use of special formulas
In order to learn how to understand the schemes for solving the puzzle, you need to get acquainted with the names of its parts.
It should be noted that the assembly formulas are written in Latin - these are the schemes that are widely represented in various manuals for the puzzle. But there are also Russified versions. The list below shows both options.
To clarify the notation in the formulas, we use the Russian version - this will be more understandable for beginners, but for those who want to move to the professional level of speedcubing without the international notation on English language not enough.
It is interesting. International system designation adopted the World Association cube (World Cube Association, WCA).
Recording the process (F "P") N 2 (PF) means: rotate the front face counterclockwise by 90 °, the same - the right side, rotate the bottom face twice (that is, by 180 °), rotate the right side by 90 ° along clockwise, rotate the front face 90° clockwise.
unknownhttp://dedfoma.ru/kubikrubika/kak-sobrat-kubik-rubika-3x3x3.htm

It is important for beginners to learn to understand the formulas
As a rule, instructions for building a puzzle in classic colors recommend holding the puzzle with the yellow center up. This advice is especially important for beginners.
It is interesting. There are websites that visualize formulas. Moreover, the speed of the assembly process can be set independently. For example, alg.cubing.net
There are two types of schemas:
Their difference is in the complexity of the formulas, as well as the assembly speed. For beginners, of course, instructions appropriate to their level of knowledge of the puzzle will be more useful. But even they, after training, after a while will be able to fold the toy in 2-3 minutes.
Let's start by building a classic 3 x 3 Rubik's Cube using a 7-step pattern.
The classic version of the puzzle is the Rubik's Cube 3 x 3
It is interesting. The reverse process used to solve certain irregularly placed cubes is the reverse sequence of the action described by the formula. That is, the formula must be read from right to left, and the layers must be rotated counterclockwise if direct movement was indicated, and vice versa: direct if the opposite is described.

We collect the cross of the upper line

Choosing the top layer

We find the desired cube and bring it down to the front face

It is important to check the orientation of the cubes at this stage

The result of this stage will be an assembled cross

Corner cubes sit in their places

Possible errors are shown with dots
Formulas for correcting the placement of cubes can be shown like this.

Formulas for Correcting Misaligned Cubes in the Last Step
There are several ways to assemble the puzzle, but one of the most memorable is the one developed by Jessica Friedrich, a professor at the University of Binghamton, New York, who develops techniques for hiding data in digital images. While still a teenager, Jessica became so fascinated with the cube that in 1982 she became the world champion in speed cubing and subsequently did not leave her hobby, developing formulas for quickly assembling the "magic cube". One of the most popular cube folding options is called CFOP - according to the first letters four assembly steps.
Instruction:
The speedcubers liked the method proposed by Jessica Friedrich so much that the most advanced amateurs develop their own methods to speed up the assembly of each of the stages proposed by the author.
The 2 x 2 Rubik's Cube or mini Rubik's Cube is also stacked in layers, starting from the bottom level.

The mini-dice is a lighter version of the classic puzzle
Formulas for rotating angles:
To rotate three corners at once:
These include toys with a number of parts from 4 x 4 and up to 17 x 17.

Models of a cube for many elements usually have rounded corners for ease of manipulation with a toy
It is interesting. The 19 x 19 version is currently under development.
At the same time, it should be remembered that they were created on the basis of a 3 x 3 cube, therefore the assembly is built in two directions.
This version is called "Rubik's Revenge".
Instruction:

The assembly of models 5 x 5, 6 x 6 and 7 x 7 is similar to the previous one, only we take more cubes as the basis for the center.
This cube is rather inconvenient to work with: a large number of small parts requires special attention. Therefore, we will divide the video instructions into four parts: for each assembly step.
This puzzle is mistakenly considered a variation of the Rubik's Cube. But in fact, Meffert's toy, which is also called the "Japanese tetrahedron" or "Moldovan pyramid", appeared several years earlier than the visual aid of the teacher-architect.

Meffert's pyramid is mistakenly called a Rubik's puzzle.
To work with this puzzle, it is important to know its structure, because the mechanism of work plays a key role in the assembly. The Japanese tetrahedron consists of:
Each part of the axis has small triangles facing three adjacent faces. That is, each element can be rotated without the threat of falling out of the structure.
It is interesting. There are 75,582,720 options for the arrangement of the elements of the pyramid. Unlike the Rubik's Cube, it's not that much. The classic version of the puzzle has 43,252,003,489,856,000 possible configurations.

Using formulas and applying speed-up methods for children who are just starting to get acquainted with the puzzle will be too difficult. Therefore, the task of adults is to simplify the explanation as much as possible.

The Rubik's Cube is not only an opportunity to engage a child in a useful and interesting activity, but also a way to develop patience and perseverance
It is interesting. It is better to start teaching children with the 3 x 3 model.
Instructions (cube 3 x 3):
Solving the Rubik's cube in any of its variations is a great exercise for the mind, a way to relieve stress and distract yourself. Even a child can learn how to solve a puzzle using an age-friendly explanation. Gradually, you can master more intricate assembly methods, improve your own time indicators, and then it’s not far from speedcubing competitions. The main thing is perseverance and patience.
Share with friends!
Description: War Thunder is a next generation military MMO game dedicated to...

"Titan Siege" is a large-scale online game on the theme of Scandinavian and ancient Greek...

Being an avid lover of German tank looks, I spent a lot of time...