Description: War Thunder is a next generation military MMO game dedicated to...

Probably everyone has taken a photo at least once in their life. Nowadays, a camera is not uncommon. If you do not have one, then most likely you are the lucky owner of a smartphone or tablet, which also has a built-in camera. Today, capturing your favorite shots is as easy as shelling pears. A photo of a friendly party, a snapshot or your baby taking his first steps - all this bright moments lives that you want to capture in memory, and photography - a great opportunity to do this. Gone are the days when photographers were chosen. Now everyone can take pictures! Perhaps you have tried yourself in the image of a photo artist, then, undoubtedly, you received a lot of joy from this.
However, perhaps it happened to you that you could not pick up the angle for a long time? Or maybe you don't like yourself in the photos? Are there techniques that can help a beginner photographer improve their skills? How to learn to take professional photos for free? If you are looking for answers to these questions, then you have come to the right place.
Of course, it is worth starting, and it is worth starting, of course, with the choice of a camera. If you want to learn how to take high-quality professional photos and do not just have a fleeting desire, but are ready to make extra efforts, then this can be done with a mid-range digital camera or an advanced smartphone. However, if you are more likely to be attributed to a lazy person, or it is important for you to achieve the most clear and high-quality photographs, then you will have to get a SLR. In both cases, there are certain points that are very important to pay attention to if you want to learn how to become a professional photographer.
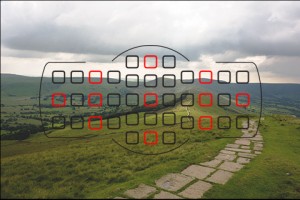
To choose the camera that suits you personally, let's decide on the types of viewfinder. On the this moment There are at least four types of cameras: electronic, optical, SLR and mirrorless.
Although the optical type of viewfinder is the most common, it should not be recommended. Despite their low cost, optical cameras tend to distort images a lot. To make masterpieces using such a unit can only be a real specialist in his field. If we have a little money to spare and you want to quickly figure out how to become a professional photographer, then this option is definitely not for us.
Here is an electronic viewfinder - this is something you can work with. Thanks to the liquid crystal display, you will immediately see what you want to photograph. The highest class of cameras are SLR and mirrorless lenses. Let's talk about them further.
And of course, a SLR camera - thanks to which we will be able to regulate, have fast focusing at our disposal and shoot with pleasure in dimly lit places. Mirrorless cameras are the latest trendy cameras that are inferior in quality only when shooting in a dark room.
We are sure that thanks to these tips you have decided on a camera, which means you are ready to learn how to learn how to take professional photographs. It's not as difficult as it might seem. By learning all the principles below, you can learn how to take pictures with a DSLR or any other type of lens.
The color scheme is what you immediately need to pay attention to. If you want to take a photo of the whole family, then it is good if the colors of their clothes match (as in the photo below). At the same time, one should not forget that dark tones fit full, and light - thin. Appearance also has great importance: if you are looking for a sloppy haircut, then the camera will do it for you. When photographing women, pay attention to whether the image is superimposed.
![]()
If there is someone wearing glasses in the picture, then you can ask him to turn his head so that there is no glare on the glasses. However, if he lowers his head too much, then the photo may come out with so be careful. Learning shooting techniques is also important if you want to learn how to become a professional DSLR photographer.

Also, the background is important. If the subject of photography is standing against the background of poles or electric wires, then a good shot will not work. The background should be chosen so that all attention is riveted on the subject. This means that the person being photographed must be in contrast with the background. In a closed room, you can try to take a picture of a person in the background indoor plants or engaged in some ordinary activity. A light wall surface will also work. If there is no suitable background, then you can practice as in this case it will turn out to make the background blurry. You can also use a special focus mode if your camera has one.
In the event that a person has very rounded facial features, you can choose such an angle so that the lighting falls on only half of the face. To the camera lens, turn the part on which less light. In addition, very often novice amateur photographers make one mistake related to incorrect hand placement. If the arms are placed along the body, then it does not look very nice. It is better to keep the hands in the usual position for a person.
Today, the question of how to learn to professionally photograph with a SLR is very relevant. If you carefully read the material above and try to put it into practice, then using a SLR camera will be much easier for you. Good luck!
The path of a professional photographer is to constantly learn new skills and apply the acquired knowledge in practice. The result of non-stop development will be pictures that can touch something in every person.
You will need professional camera. Visit shops selling photographic equipment. Surely you will see a huge number of cameras of different brands with different functionality. Give preference to a model with a large number of megapixels and optical zoom (the increase will be better). Pay attention to the number of manual settings (white balance must be mandatory). The more settings provided in the technique, the more professional it is. When you choose the right model, read the instructions well to master the technical side. To work out, take simple amateur pictures. At the first stage, it is very important to master the ISO value (matrix light sensitivity). Remember that a beautiful landscape cannot be captured at high ISO values \u200b\u200b- noise will occur. When shooting at night, professionals recommend taking pictures from a tripod or stop. If you are photographing a subject in motion, raise the ISO a little so that the frame does not turn out blurry.


In order not to get lost among amateurs, constantly learn something new. Don't be discouraged if your pictures don't turn out very well at first. Regular training will help you "fill your hand" and understand all the intricacies of shooting different objects.
A reflex camera can take amazing pictures in its beauty. However, without knowledge of the basics of photography, the chance of creating a real masterpiece is small. Practice and theoretical foundations will allow you to learn how to take pictures with a SLR camera in the shortest possible time from absolute zero.
Autofocus can work in two modes: selective and automatic mode. It usually has three to nine focus points. In different modes, shooting is also done in different ways:
There are three types of creative modes: Aperture Priority, Shutter Priority, and Manual. They make life much easier for the photographer, but only if the person knows how to use them correctly:
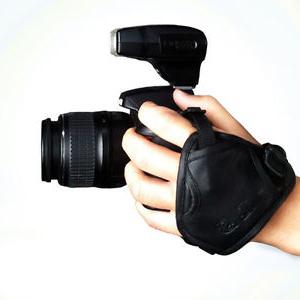
For those who are just learning to photograph with a SLR camera with a flash, the following 3 tricks will be of interest:
If you know the theoretical foundations, you can save a lot of time that you don’t have to spend on understanding and correcting your mistakes. Do not try to scrupulously learn all the recommendations. Information is better absorbed if it is constantly used in practice.
With this article we open new project "I'm a photographer", in which we will share with you the experience of photographing. New lessons about all aspects of photography will be released weekly. Lessons will be focused on different levels of the reader: from a beginner to an advanced photographer. I will lead this project Konstantin Voronov, professional photographer and photography teacher.
Of course, each of us at least once shot with a phone or a simple “soap box”. However, many people want to not only take pictures for memory, but also get beautiful, high-quality photographs, enjoy the process of photographing, and when posting photos on the Internet, have a lot of “likes” under them.
How to become a photographer? Where to begin? Many people ask this question every day. To begin with, I will give a few general advice, which will help you avoid common mistakes at the start, and dispel a few common misconceptions about photography.
Nikon D810/ 70.0-200.0mm f/4.0 SETTINGS: ISO 100, F4, 1/80 s, 95.0 mm equiv., 1.0 MB
Let's start with delusions.
This is not true. Good photos are not taken by the camera, but by the photographer. Many people before they start taking pictures on their own think that professional photographers get good, high-quality shots due to the use of expensive equipment. However, the camera is only a tool. How to use it, decides its owner.
If a person who does not know how to draw is given the best, most expensive brushes and paints, the result will be absolutely the same as when using the simplest and cheapest. Good brushes and paints will show all their capabilities only in skillful hands. It's the same with photography.
While working with students, I often came across beginners who had the most expensive, most professional cameras in existence. Did such students make shots better than others? No. On the contrary, their pictures were worse because they could not understand the complex photographic equipment designed for experienced professionals.
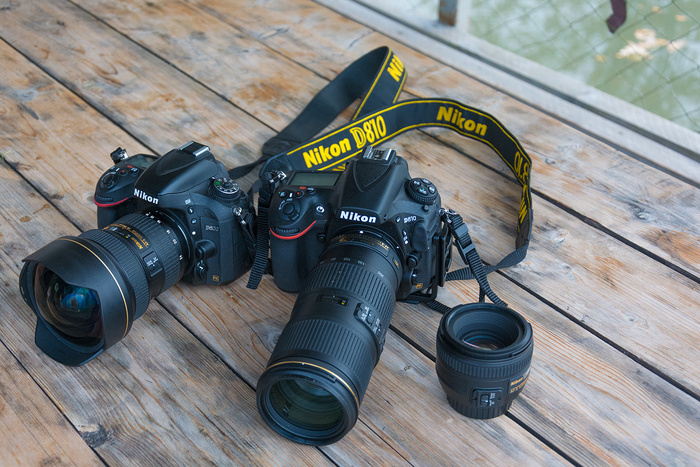
It is best to choose a camera not by its belonging to the professional class or the highest price category, but by how it suits your level of training and your tasks. For example, many expensive professional cameras, such as the Nikon D810, do not have automatic mode and scene programs at all (portrait, landscape, macro, etc.), which makes them incredibly difficult for beginner photographers to work with. : You have to dig into unknown settings for a long time. At the same time, many entry-level cameras, such as Nikon D5300 or Nikon D3300, are able to take great pictures on full auto: the photographer can only choose the most interesting subjects, without thinking about the technical side of the issue.
How to choose a camera? Choose not “the best professional camera”, but the model that suits your skills and your tasks. To do right choice, it is enough to understand how seriously you want to take photography, whether you are going to learn photography or just want to take pictures for memory.
Like many creative pursuits, photography seems like a very simple thing until you do it yourself. For example, like playing musical instruments, dancing, singing… You look at a professional dancer and think: “how simple and natural everything turns out for him! It seems that there is nothing difficult in this! I can do the same!” But when you try to do at least a couple of dance moves on your own, it turns out that it’s not so easy: at least you need special training.
It's the same with photography: despite the seeming simplicity, taking good pictures is quite difficult. After all, it requires a lot of knowledge and skills. Moreover, both technical (how to set up the camera, for example) and creative (how to compose a shot, how to choose the right lighting). Sometimes we are talking about issues that seem to be indirectly related to photography. For example, how to plan a tourist trip to get a lot of good shots; how to make a child sit still while being photographed… By the way, we will cover all these topics within the framework of this project. Stay tuned!

On the other hand, when you have the necessary experience, photography is really easy and enjoyable. The camera does not interfere with getting good shots, and the composition is built intuitively. But for this you need to train, learn, gain experience.
Shooting technique and parameters are only part of the necessary skills. And by the way, the part is the easiest. How to set the exposure? How to control focus? What is white balance? - all these issues of a technical nature are solved easily and simply, and with regular training they are fixed and remain with the photographer forever. This is the arithmetic of photography, two plus two. But photography is first and foremost art. But the creative component is much more complicated and not so unambiguous. How to compose a frame? What to show in the photo? What subject should be photographed? Photographers constantly suffer from these and many other creative questions and solve them with varying degrees of success. Of course, it is worth starting photography training from the basics, from technology. But it's too early to end there.
 NIKON D5200 / 18.0-105.0mm f/3.5-5.6 SETTINGS: ISO 1100, F4.5, 1/60s, 38.0mm equiv., 1.0MB
The main problem of most novice photographers is not the lack of good photographic equipment or even a lack of some special skills. the main problem- lack of artistic taste. Build yourself a good artistic taste! See photos of famous photographers, visit exhibitions. By the way, when was the last time you were in the Hermitage and Tretyakov Gallery? Analyze the work of real masters: why did the artist or photographer decide to show this and that? How is the composition structured? How did the author work with light?
Visiting exhibitions, viewing galleries of famous photographers and artists on the Internet is what will give you good luggage for your personal creativity. And vice versa: it is better not to watch bad, mediocre things.
Why is it important? Imagine what happens if a person who has never seen a single picture is given brushes and paints in his hands? Most likely, he will not understand what to do with them; at best, he will depict something in the spirit of rock art. For example, some isolated African tribes are unable not only to perceive an image on a plane, but even to distinguish colors that are not responsible for their survival, are not found in their environment. Because no one taught them this, they do not have the necessary experience for this. It is natural for a person to use what he has seen, accumulated experience in his life and work. This experience is a must. As photographers say, “you need to be seen”.
As we know, lying on the couch at home, good photos you won't! Get your camera out! Travel, walk, visit interesting places: exhibitions, festivals, sports events. Thus, you will witness interesting scenes for shooting, gain the experience necessary for shooting in various conditions. If we talk about landscape photography, then it is generally unthinkable without travel. By the way, as well as portrait: after all, often to shoot a good portrait you need to choose beautiful place, a good background, and only then take a beautiful picture of the model.
There is clean psychological aspect: on a journey, regardless of its distance, a person gains impressions, inspiration, and is charged with creative energy.
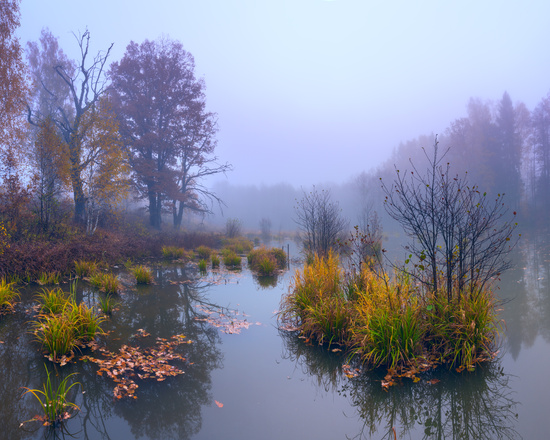
d810 iso f4.5 src="https://assets.prophotos.ru/data/articles/0001/6201/95209/thumb_700.jpg" width="700" height="467" itemprop="thumbnail"> Nikon D810/ 70.0-200.0mm f/4.0 SETTINGS: ISO 400, F4.5, 1/200 s, 200.0 mm equiv., 16.0 MB
In order for there to be progress in your photography classes, and the number of beautiful shots to increase, you need to be critical of your work. You should not rest on your laurels, be able to see flaws in your work, even if everyone praises them.
For example, the toughest critic of my work is myself. I know better than any critic what and where the mistakes in my pictures lie. Analyzing my photos, I realize that I could have shot even better. And the next time I shoot, I try to do it. Believe me, you will get great pleasure from correcting your own shortcomings, and your pictures will become more and more beautiful!
Any creativity begins with the technical foundations. Photography is no exception. To write books, you need to learn the alphabet, grammar, spelling of the language. Of course, modern cameras have excellent automation, which will allow you to get good shots at the touch of a single button, without thinking about any settings.
However, those who shoot in auto mode know that automatics often make mistakes: either the brightness of the picture is not the same, then the colors are not the same, then the sharpness is not there. But you really want to tell the camera how to do it! In order to fully control the shooting process and not depend on the quirks of automation, it is worth learning the fairly simple technical basics of photography. How is an image formed in a camera? What is exposure? What is white balance? How does focus work? Understanding how everything works and knowing how to set up your camera will allow you to take high quality pictures and have full control of the shooting process “from and to”. By the way, in the next lessons we will talk about these technical basics.
Many people buy the most advanced, professional tool as their first camera. However, one must understand that a professional tool requires professional skills. If I, without any preparation, stand up for lathe(which I never stood behind), I most likely not only will not produce a single detail, but I will also get injured. Fortunately, a professional camera does not injure anyone, but it is designed for trained users. For beginner photographers, it is better to look at models that are easier to learn.
We will touch on the topic of choosing a camera more than once, but for now the most important thing is that in order to more or less seriously engage in photography and become a real photographer, you should master the technique of photography and be able to adjust the shooting settings on the camera. This can only be done on cameras that have manual shooting modes. These cameras include all SLR cameras. It should be said right away that the optimal types of cameras for photographers today are SLR cameras and compact cameras with interchangeable lenses - mirrorless cameras. Ordinary compacts ("soap dishes") often do not have all the necessary settings, which makes them unsuitable for serious photographers. We will talk more about what cameras are and how they are arranged in the next lesson.
Hello readers! I'm in touch with you, Timur Mustaev. Almost everyone has a camera these days. But when you buy a camera, can you now consider yourself a professional photographer? Most likely not, I think so. You can clearly see how the pictures of amateurs are far from the excellent shots of specialists in their field. Therefore, today the time has come to figure out how to learn to photograph professionally and stop being an amateur.
Technology can provide a lot of possibilities. But it is important to remember that, whatever they are, it will not replace your mind, the ability to generate incredible ideas and your own vision of the world. The camera will help to realize all this, no more. What you shoot your photos on matters, because the camera can be of different levels.
However, you can create a professional image with both a phone and a SLR camera. You can impress the viewer with a picture not only in terms of its brightness, clarity, detail, but also with its composition and interesting plot.
Do you want to take pictures in such a way that your pictures are simply breathtaking? Don't know where to start and how to get there? This article is at your service. Not always, in order to do something well and professionally, you should study at a university, applying a certain amount of effort and wasting your time, you can do it yourself.
To master the SLR camera, of course, it takes more time. It has a complex device, but also a lot of room for growth as a person as a photographer.
I would like to draw your attention to the following points:

In practice, you should study:

Since in the case of photographing on a phone, the resolution and image quality will be relatively low, it means that the emphasis will have to be on the content of the frame. And here are some tips:

Compact cameras are also different, but if we talk specifically about simple amateur soap dishes, then we usually have a low price and a limited set of functions. In the case of such cameras, not only the above points will be true, but one more is added - working with parallax.
Its influence on the picture is quite significant, so you need to remember about it and build the frame accordingly. It consists in a certain percentage of discrepancy between what the viewfinder sees and the lens itself. I remind you that on soap dishes these two parts of the camera are one, and only in expensive models optics are interchangeable.
Let's not talk about sad things! After all, soap dishes are still considered cameras and, unlike phones, you can play with them in different modes. Check them out, they might come in handy. Most often they are the same as on a SLR camera. But I do not advise you to shoot in manual mode.
In my experience, building all the settings yourself on a simple photographic equipment is a very difficult task - a perfect exposed picture cannot be achieved in any case. It is better not to suffer, but you can slightly improve the image after in a graphics editor. There will be more opportunities in this regard than changing a photo taken on a phone.
On this beautiful note, I will end my fascinating story. I hope you get my idea. Take more pictures, more practice, do not forget my recommendations and you will feel the result in the near future!
For a more detailed and in-depth study of the basics of photography and the camera, the course “ Digital SLR for beginners 2.0". He has absorbed all the most necessary and useful for development. I recommend it to all beginner photographers as a desktop encyclopedia into the world of professional photography.
Goodbye readers! New photo articles coming soon! Check out my blog, subscribe yourself and invite your friends!
All the best to you, Timur Mustaev.
Description: War Thunder is a next generation military MMO game dedicated to...

"Titan Siege" is a large-scale online game on the theme of Scandinavian and ancient Greek...

Being an avid lover of German tank looks, I spent a lot of time...