Description: War Thunder is a next generation military MMO game dedicated to...

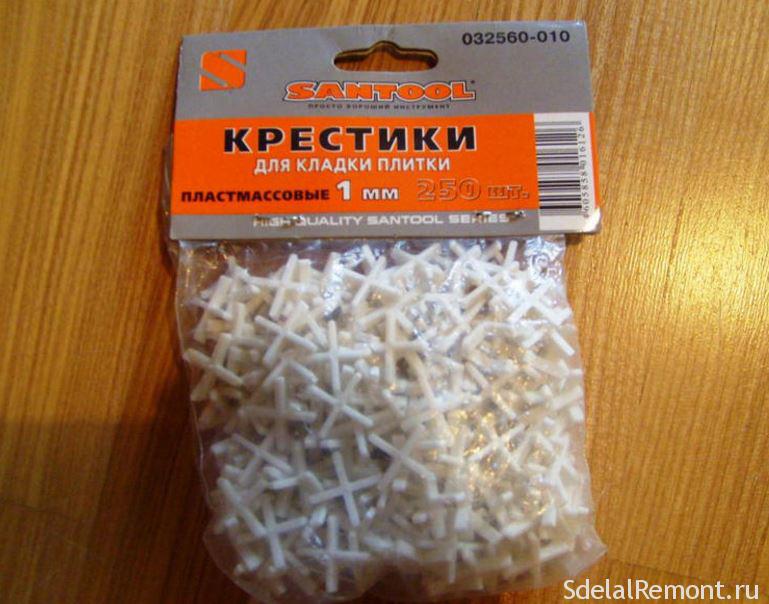
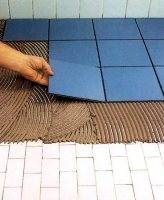
As everyone who has already encountered tile laying knows, it is impossible without the use of crosses or floor leveling systems. AT this case refers to additional devices that help create a seam of floor tiles.
For the most part, of course, tiled crosses are used, since this is a more economical way, especially for self-laying, and not professional.
The crosses themselves are small plastic devices that help to carry out such a creative process with high quality -.
Yes, this process is really creative, because it involves the transformation of a gray concrete floor (not necessarily concrete, it can be wooden or already covered with tiles, see how to lay tiles on tiles in a separate article), almost into a work of art. And the created seam of the floor tiles helps to make the surface really shiny (and we are not talking about its brilliance, but about beauty). It is thanks to them that the colors of the tiles successfully shimmer, complementing the surrounding atmosphere.
In the question of what seam between the tiles should be done, it will help to understand, first of all, its purpose. And it should be noted that the seams themselves perform a number of functions, respectively, certain requirements are put forward for them. Among these:
These are the minimum rules that must be followed in order not to end up disappointed in the poor quality of the coating. It is to help in this seemingly difficult task that crosses are needed.
Thanks to their use, it will be possible to make the seams perfect. Applying them correctly, you will get evenly laid tiles, and in addition, the same size seams parallel to each other (which is actually the main requirement). 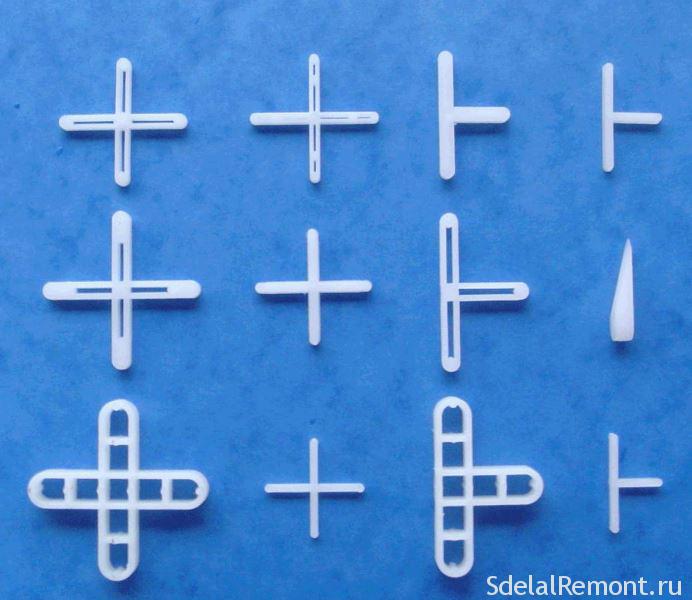
In most cases, the answer to the question of what kind of seam between tiles is needed becomes - the thinner the better. Quite often, this is exactly the case, since thin seams give the coating an elegance and make it more beautiful. But do not forget that it is also necessary to focus on the size of the tile itself.
Depending on where the tile is laid, its different sizes are used, respectively, different dimensions of the seams are also allowed. Thus, if we are talking about which seam for the tiles on the wall, there may be the following options:
It is not recommended to make a seam between the tiles on the wall more than 2 mm. Even with a tile size of 60 centimeters, it will not look good, and will simply ruin the appearance of the room.
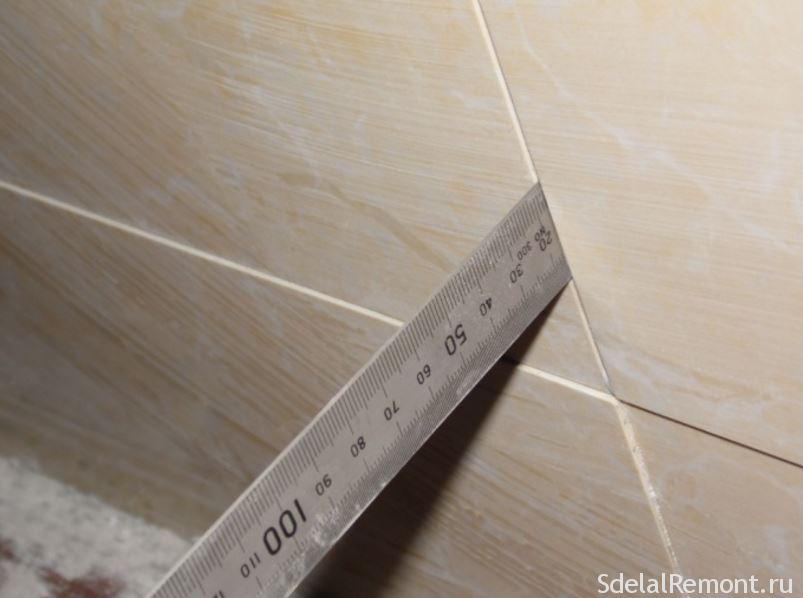
But in the case of a floor covering, here you can already look at a larger size. In this case, the following dimensions apply:
Also, in some cases, crosses up to 5 millimeters in size are used. But it is recommended to do this only in the case of working with porcelain stoneware or other large-sized tiles in public buildings.
But we note that even in this case, when it comes to laying tiles even with dimensions of 60 * 40 centimeters, experts do not expand the seams to such an extent. Thus, for floor tiles, the maximum joint size becomes 3 mm.
If the "specialist" you hired to lay the tiles claims that a joint larger than 3 millimeters is better, we advise you to find another, since only amateurs resort to this solution, unable to lay tiles evenly around the entire perimeter with a normal joint.
This is due to the fact that a wider seam gives less styling irregularities, while with a small one they immediately catch the eye.
You can use this method of hiding defects only on your own, in the absence of experience with tiles. Thus, by expanding the distance between the material itself, you successfully mask the discrepancy.
Let's move a little away from the question of which seams between tiles are better, and return to our crosses. If you happen to have a couple lying around at home, take one in your hands and carefully examine it.
You may not see anything special at first glance. But look again, well, let's not wait too long and reveal the secret. Looking closely, you can see that the cross itself, or rather its sides in thickness, are made in the form of a trapezoid. Those. we can see that the top plane is slightly narrower than the bottom one.
This is done to make them easier to use. In addition, you can also notice the bevel on the side faces, which makes it easier to immerse the cross between the tiles.
In addition, such bevels suggest a difference in tile size, i.e. the tile itself has different sizes in the back and front. More specifically, it can be noted that the front part is a fraction of a millimeter narrower than the back, for which such bevels in the crosses are provided.
That is why, when working with such devices, pay attention to which side you insert them. In particular, to obtain a uniform coating, it is necessary to equip the narrower side inward. Otherwise, if you neglect this, the coverage will turn out to be far from ideal.
When wondering what the seams between the tiles should be, it is important to immediately calculate the amount of consumables to create the seams themselves. And it's pretty easy to calculate.
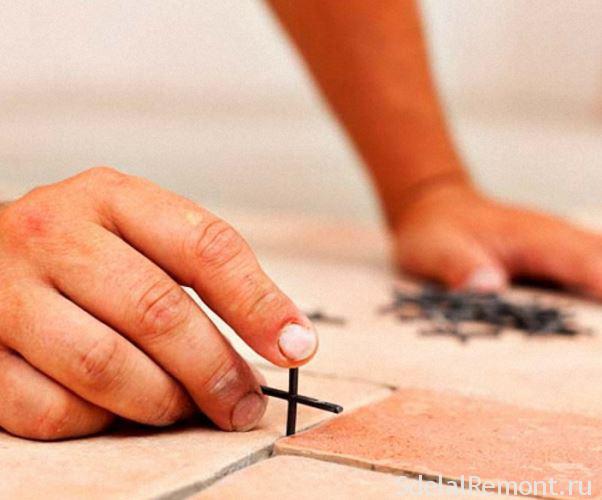
Depending on how you insert the crosses, their number will depend. Thus, equipping them at intersections, in the same plane with the tile itself, you will need about the same number of them as the tile itself (it is advisable to take a few dozen in reserve).
But in the event that it is planned to equip them perpendicular to the seam, then the number will increase four times, i.e. for each tile you will need 4 crosses (it is better to take four, since this leaves a small margin).
And we note that although for the first case the crosses themselves need a little less, it will be much more difficult to remove them. Thus, in order to prepare the tiles for grouting, you will need a special tool.
This is called a gaff. It is designed specifically for working with tiles and removing crosses after laying. Thus, after their removal, grouting will be carried out.
On this question, what should be the seams between the tiles can be considered closed. Along with this, since there was interest in the distance between the tiles themselves, it is planned to lay them, so we advise you to read our other articles, in particular on, as well. Also on the site you will find a lot of interesting and useful material.
P.S. As always, in conclusion, a few videos about tile seams. We hope the information was useful to you. If you have any questions, we are waiting for them in the comments.
Video: Minimum seam between tiles.
Video: How to choose the size of crosses for tiles
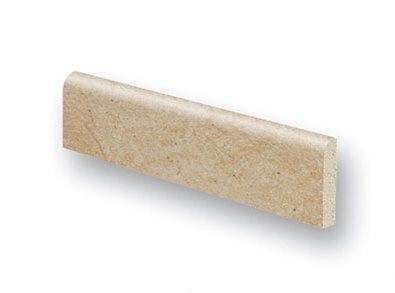
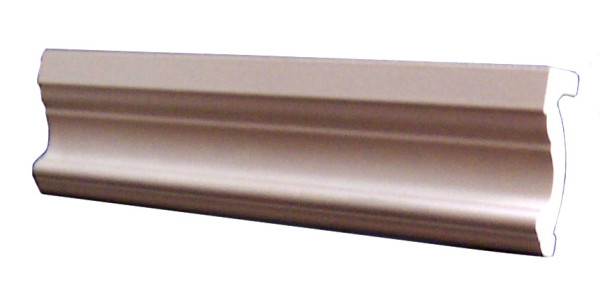
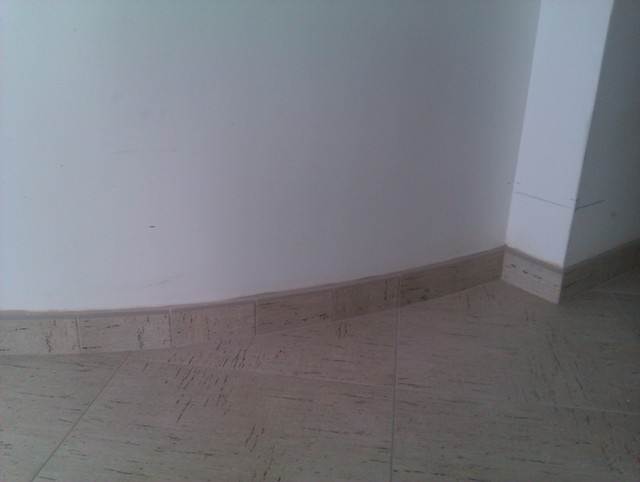
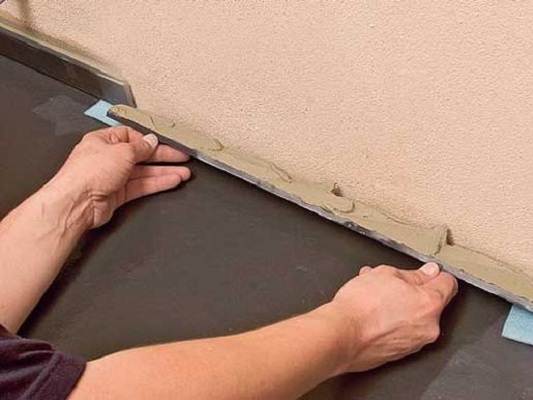
A tile skirting board is used to give the cladding a finished look by closing the gap between the wall and the floor. Sometimes, instead of special plinth ceramic tiles, ordinary floor tiles are used, which are cut into pieces, but the quality of such material cannot be called satisfactory.
Currently, plinth tiles are produced by almost all manufacturers that produce ceramic facing products. Usually, for each such decor, corresponding ceramic skirting boards and corners are also made.
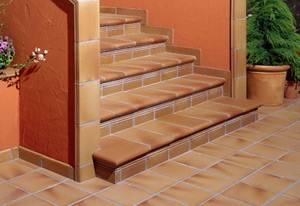
A tiled floor skirting board is used to make a connection between a horizontal floor surface and a vertical wall surface that is lined with decorative materials such as ceramic tiles. For facing the corners of cornices and skirting boards, special shaped inserts are used.

Manufacturers produce such products of this group:
Important!
When purchasing facing products, it is necessary to ensure that they are from the same batch, since the technical regulations of most manufacturers allow deviations in the length of the edges up to 1.5 mm.
At the same time, in one batch, this deviation can be either positive or negative, which facilitates high-quality cladding.
Floor tiles must meet the following requirements:
Most often, ceramic tiles are used to cover the floor in the bathroom and bathrooms. In this case, the walls, as a rule, are also tiled with tiles, which do not differ in thickness and color from the floor tiles.
Therefore, for pairing such surfaces, the plinth can not be used. If the joint is made neat, then its additional design is optional.
However, in recent times ceramic floors are also installed in other rooms, for example, in the kitchen, in the corridor, and sometimes in living rooms. If in the kitchen for wall decoration the use of tiles is frequent, then in other rooms the walls are usually lined with other materials.
In this case, the joint between the tiled floor surface and the wall, which is covered with an alternative decorative material, needs to be elegantly designed all around.
It is in this case that the use is highly desirable. In this situation, it can quite harmoniously fit into the interior of any room. But for this you yourself will have to decide which skirting board fits under the tile.
ceramic plinth is highly desirable. In this situation, it can quite harmoniously fit into the interior of any room. But for this you yourself will have to decide which skirting board fits under the tile.
In addition to purely aesthetic functions, this decorative finishing material performs the task of facilitating care flooring from tiles, protecting the wall from traces of wet cleaning. in this case is seriously inferior to the ceramic material.
But in this case, the use is highly desirable. In this situation, it can quite harmoniously fit into the interior of any room. But for this you yourself will have to decide which skirting board fits under the tile.
In addition to exclusively aesthetic functions, this decorative finishing material performs the task of facilitating the maintenance of tile flooring, protecting the wall from traces of wet cleaning. in this case is seriously inferior to the ceramic material.
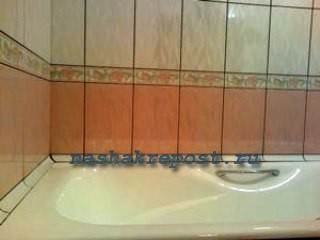
Ceramic plinth in the bathroom
To decorate the joint between surfaces in the bathroom, ceramic plinth is used not only between the floor and the wall. This decorative element is even more often used to seal the joint between the edge of the bathtub (or sink and the wall surface).
It should be noted that the bathtub is placed close to the wall only in the post-Soviet space (due to the lack of space in the bathrooms). In Europe or America, the bath is usually located on a low elevation (podium) in the middle of the bathroom.

It should be noted that a bathtub is placed close to the wall only in the post-Soviet space (due to the lack of space in the bathrooms). In Europe or America, the bath is usually located on a low elevation (podium) in the middle of the bathroom.
The plinth on the bathtub on the tiles in domestic small bathrooms is attached not only as a decorative element, but also as a protective one (protects against water ingress).
Advice!
The plinth between the bathroom and the tile should not be made in a handicraft way, since it will not work to get a smooth edge on the tile even using the most modern cutting tools.
In addition, it is unprofitable from the point of view of economy, because. it is necessary to use expensive ceramic material, while a high percentage of waste remains during the installation of the skirting board in the form of inevitable damage to the material during cutting.
When purchasing ceramic tiles, it is necessary to take into account the availability of appropriate additional accessories (skirting boards, corners, cornices, endings, etc.). Why is it important to do it right away?
The fact is that (as previously noted) tile manufacturers now, as a rule, produce an appropriate decor for each collection. And here it is important not only a suitable color scheme, ornament or pattern.
Manufacturers of these products try to customize all these elements in size. Thus, you can easily achieve high-quality cladding in a room with a tile floor.
Tiles and plinth with the appropriate pattern, ornament or special color scheme (sometimes these elements can contrast with each other) will emphasize the geometry of the room and make the interior harmonious and strict.
Important!
When buying, you must immediately purchase a complete set of all accessories, such as skirting boards, as well as cornices, external and internal corners, endings, etc.
The plinth on the tile can be installed in three ways:
Mounting skirting boards with sealants is used, as a rule, for bathtubs, sinks and other plumbing fixtures. The instruction does not allow the use of other options for making joints in plumbing.
This method requires more skill, since the quality here is more dependent on the accuracy of the mating of the surfaces on which the plinth is laid. For installation between a wall and a floor, this method is used less frequently, since strict perpendicularity in this case is not a frequent phenomenon, and when used for sealant fastening, gaps will remain.
The use of tile adhesive or cement mortar with sealing additives allows you to smooth out geometric inconsistencies (which are usually associated with a flaw during the preparatory work).
Such material well masks cracks and irregularities. In this case, it is necessary to use a special grout for the joints, which is selected to match the base material. From time to time, the grout will need to be updated, as it tends to crumble.
Mechanical methods of fastening the plinth are used extremely rarely.
Difficulties begin at the preliminary stage. This is due to the peculiarity of the material from which the ceramic plinth is made.
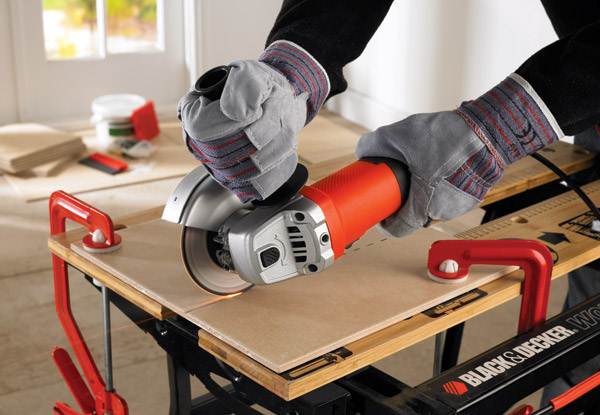
If both a diamond glass cutter and a special manual cutting guide can be used to cut ordinary sheet tiles, then it will be impossible to cut the plinth in this way.
You can only cut a ceramic plinth with a grinder with a thin diamond wheel.
Before you do this, the element needs to:
This is the only way to ensure a truly even cut. If it is impossible to provide such conditions at the place of repair, then better material prepare in another suitable place, and then deliver it to the place of repair.
Since all the elements are adjusted quite accurately to each other, then the installation itself will not be difficult to perform, and it will take a little time for this. In this case, each element must first be placed in its place without glue or sealant and make sure that the dimensions are observed.
After that, you should already apply glue or sealant to the surface and press the element into place with one movement. Excess sealant is removed immediately, and glue after some hardening.
Do-it-yourself installation of these decorative materials is quite possible with some skills and following the tips given. In the presented video in this article you will find Additional information on this topic." width="640" height="360" frameborder="0" allowfullscreen="allowfullscreen">
Ceramic plinths should be used when tiles are used to cover the floor or to finish the joint between the wall and the edge of a bathtub, sink or other plumbing fixture.
Do-it-yourself installation of these decorative materials is quite possible with some skills and following the tips given. In the presented video in this article you will find additional information on this topic.
There is no need to turn to the services of expensive masters for laying tiles. With the right approach and preparation, cladding costs can be minimized. Given the average cost of laying tiles, the savings can be significant. It is necessary to strictly adhere to the rules if it is planned to lay tiles with your own hands, in order for the result to be the most attractive, functional and durable. So, laying tiles involves the following steps:
Tiling tools
The tool required for surface preparation is selected depending on the required operations and work execution technologies. Directly for installation you will need the following:
Calculate the amount of materials!
In order to properly evaluate required amount tiles, you should not only measure the square of the surface for cladding, but also estimate the number of tiles to be cut into pieces. It all depends on the complexity of the walls and floor and the presence of all kinds of obstacles in the form of pipes, corners, protrusions in the wall, etc. Approximately, on top of the calculated number of square meters, take more tiles sufficient for laying two rows along two adjacent walls.
For gluing tiles, it is best to use specialized adhesives. This is especially true for bathroom and kitchen cladding, where moisture-resistant compounds are required. Moreover, with proper surface preparation, the consumption of mortar is minimal, and the cost of laying is significantly reduced.
Read more about the calculation of materials for tile work in a separate article.
Step 1. Surface preparation
In order for the tiled surface to be perfectly flat and durable, it is necessary to properly prepare the surface. In no case should you rely on the fact that small irregularities in the floor or wall can be closed by using more mortar under the tile. A high-quality result can only be achieved when the entire material is laid on a uniformly small layer of adhesive.
Before laying tiles on the floor, a screed must be formed. In the bathroom and toilet, a waterproofing layer is necessarily formed. The screed can be made both dry and wet, adhering to the appropriate technologies. It is best to lay tiles on a concrete base, that is, on a wet screed. If the old coating is being replaced, then it is completely dismantled and the surface is leveled with cement mortar.
In order to tile the walls with tiles, it is necessary to get rid of all the old coating and plaster the walls with the obligatory reinforcement with construction mesh. The best way to do this is with beacons. It is not worth using putty, as well as achieving a perfectly smooth surface, this can impair the adhesion of the adhesive.
All skirting boards, trims on the doorway and sills are dismantled. The prepared surface must be cleaned of dust, dirt and primed.
If you are confident in the reliability of the layer of old tiles or just want to save time, check out the technology for replacing tiles without removing the existing coating. But in any case, this practice is only suitable for notorious lazy people.
Step 2. Layout and installation of supports 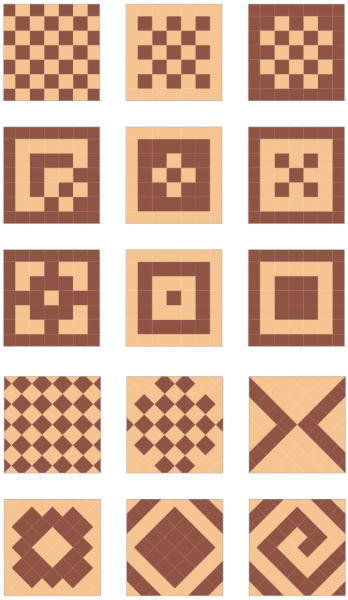
options for non-standard laying of floor coverings
Before laying, it is necessary to prepare the markings and stops for the first row, along which the tiles will be installed.
At the very bottom, a plastic corner or a wooden rail is fixed, on which the first row will rest. Using a plumb line, a line is drawn to control the verticality of the installation. In the case of using multi-colored tiles or various types mosaic laying, it is best to mark with marks the places of laying other than the mass of tiles.
The line of the spaced edge of the tiles of the first row is drawn. The locations of the tiles are marked, which will differ from the main mass when the pattern is formed. Laying floor tiles starts from the far corner. In this case, if necessary, shift the location of the first tile so that a solid fragment is laid at the entrance without the need to trim it. The calculations take into account the size of not only the tiles, but also the gap between them.
Step 3. Laying solid tiles 
traditional tiling schemes
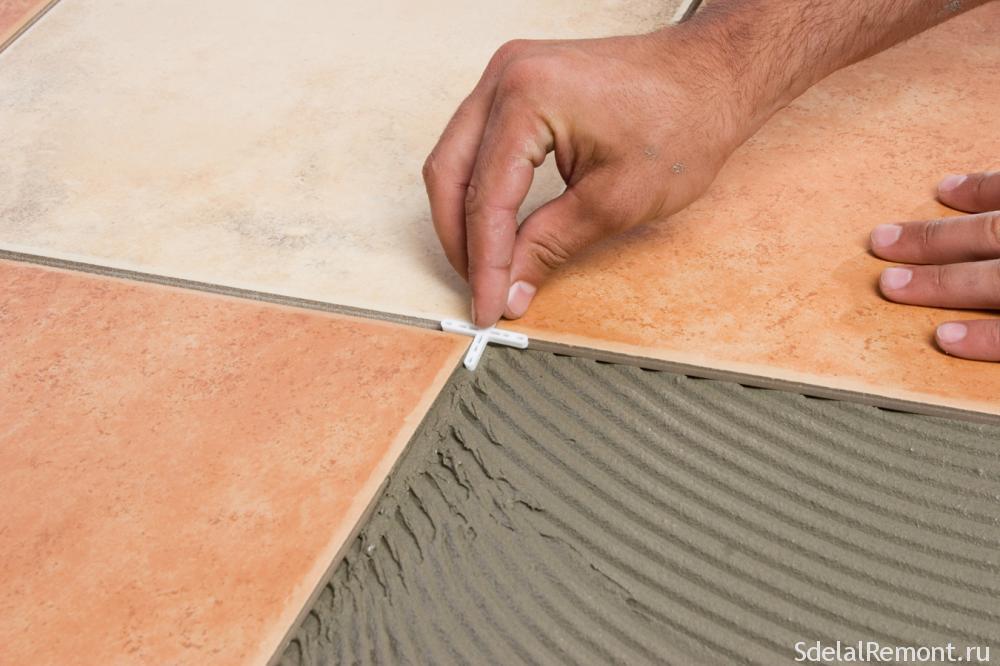
Having prepared the markup and landmarks, you can start laying. To do this, the tile adhesive solution is applied to the wall with a notched trowel as thick as the depth of the teeth. The tile leans first on the support or on the crosses below, after which you need to carefully place the tile with your own hands on the mortar. It is not necessary to press it. Slightly turning the tile along the axis with light movements achieves maximum adhesion of the product with the mortar.
Remember that it will be problematic to remove the tile from the surface after laying it on the mortar, so you should immediately place it as correctly as possible. You can only slightly move it to the sides. Check the correctness of the installation using a level in all directions and in relation to the already laid rows. If it is necessary to deepen the tile somewhat, a rubber mallet is used. Crosses are located in the corners to maintain gaps. After that, you can proceed to further installation.
It is impossible to press the tile strongly so that the solution protrudes along the edges. All gaps between them should be as clean as possible. In the future, grout will be used, which will prevent moisture and dirt from getting under the tile and give an aesthetic appearance to the entire surface.
When the hand is already full, you can apply the mortar, taking into account the laying of several tiles at a time. In this case, after the distribution of the solution, the tile is installed in its place and sits on the solution with small circular movements. After that, the crosses are quickly distributed into the gaps and, with the help of the level, the entire stacked row is pressed in various directions, adjusting it to the general level.
After completing the filling of the first row, it is best to wait until the glue under it seizes normally. After that, it will be much easier to lay subsequent tiles on the wall. It is important to remember that if, after laying the next row, it is decided to take a break in work, then all the mortar that is not under the tile, but along the edges, must be removed. If this is not done, and it dries up, then before continuing the work, the frozen solution will have to be chipped off, which will affect the strength of the connection of the already laid tiles. Also, all excess mortar is removed in places that are left for laying cut tiles.
Step 4. Filling in the Remaining Areas
Having laid out the entire space where solid tiles are used, you can start cutting the missing pieces and installing them. You can also cut ceramics with a glass cutter, but it is better to use a manual, machine or electric tile cutter, in extreme cases, a grinder is also suitable. The latter option will have a lot of dust, so pruning is best done outdoors. The marking of the tiles is made taking into account the gaps on all sides.
In order to form an uneven cut, either a manual tile cutter-nippers or an electric machine with a diamond wheel are used. More details on how to do this are written below.
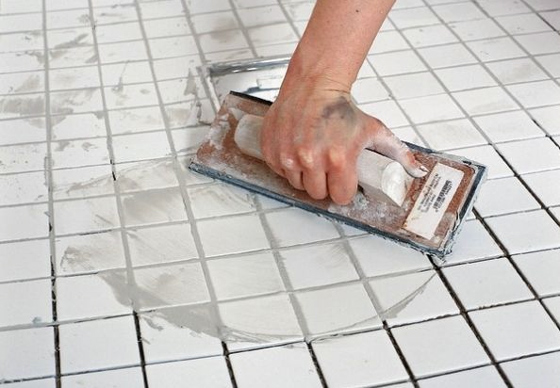
Step 5. Grout (jointing)
After fully laying the tiles on the wall or floor, you should wait for the adhesive solution to dry. After that, all the crosses between the tiles are removed, and the seams are jointed. To do this, you can use cement-based grout, silicone or epoxy. It is first of all necessary to select a suitable grout according to the color design of the selected coating itself. In terms of characteristics, they differ little from each other, except for the method of preparation and use. Cementitious grout is distributed dry and must be diluted with water immediately before use. Silicone and epoxy grouts are sold ready-to-use in sealed packages.
Before jointing, it is necessary to completely clean the surface of the tiles and the seams between them. It is better to use a vacuum cleaner for this purpose. After that, if silicone or epoxy grout is used, the edges of the tile are additionally glued with masking tape. If this is not done, then the dried mixture will be difficult to clean off the glazed surface of the tile.
Next, using a rubber spatula, a small amount of grout is applied over the seam and pressed inward. Putting a rubber spatula across the seam, and swiping it with pressure, the excess is removed. In this case, the seam deepens a little and is compared.
Masking tape and grout residues should be removed after it has completely dried. Having cleaned and washed the entire tiled surface, the work can be considered completed.
Note: ceramic tiles are laid in a similar way. Differences partly relate only to the nuances in the ways of cutting tiles.
A bit about cutting tiles
Virtually no tiling job is complete without the need for trimming. You can make it yourself different ways: starting from the glass cutter and ending with modern machines with a diamond cutting wheel. If a mechanical hand tool is used, then the process is similar to cutting glass. In this case, the cutting wheel draws a line along the markings on the glazed side of the tile. After that, demolition is performed. Floor tiles are more massive and cannot be cut beautifully with a glass cutter. For all types of tile cutters, the cutting wheel has a significantly larger diameter of 1.6 cm to form a deeper cut.
For example, consider the option of cutting using a mechanical machine tile cutter:
The difficult moment is not a straight cut and not diagonally, but figured cutouts with a semicircular shape or several bends for the output of wires, bypassing sockets or the exit of water pipes. In this case, a cutout shape is outlined on the glazed side, and the line is carefully drawn with a cutting wheel of a manual tile cutter. After that, you can bite off the unnecessary part of the tile in pieces until only the part that is necessary in shape remains. The resulting edge will turn out to be quite uneven; a file or sandpaper is used to solve this problem.
When using an electric machine, the entire part that should be removed on the tile before marking is cut into thin strips and bit off, the edge is also compared with a file.
Read and watch the full article and videos about all the ways to cut tiles here.
Helpful Hints
Video: laying tiles on the floor
Video: laying tiles on the wall
In this article, we want to touch on a topic that is very rarely described or discussed anywhere, namely, the junction between two types of tiles. It would seem that there is nothing to discuss here, this is a tile, so you just need to cut it off correctly, then lay it evenly and process the joints with grout in a quality manner, but this is not the only one possible variant in this case. Since the topic of the joint is most often discussed due to the fact that it is necessary to connect the laminate and another coating, we will not talk about other types of materials.
The floor covering can be made of very different materials which have different properties and characteristics. Most types of tiles are very similar to each other, their properties can differ only because of the materials from which they are made. It is necessary to connect two types of tiles if you need to do original design or the properties of one tile are needed in a certain place in the room, and another tile is used in the same room. There are several ways to connect, which are selected according to the preferences of the owner of the apartment or house and what needs to be obtained as a result in the room.
What is this article about
Since the floor or wall covering is far from always homogeneous, the materials must be organically combined with each other. For example, a large tile can be joined with a small one to make an original accent in the interior of the room. Everything will be quite simple until such a moment as the tile elements are made of similar materials and approximately the same size, height level. If you need to connect two tiles, one of which is made of natural stone and the other of plastic, then there may already be problems with transitions, since it will be impossible to do everything smoothly. It is better not to combine such different materials on the same surface at all, since practically nothing beautiful and expedient can be obtained from this.
If you need to connect porcelain stoneware tiles, for example, a larger one, and a simple ceramic coating on one base, then there will be nothing difficult, if, of course, they are of the same height. Docking different types of coatings is most often used in the bathroom or kitchen, since there you need to make an apron that will withstand temperature extremes and high humidity and easy to clean up dirt. In the bathroom, it is necessary to protect other rooms from getting into them the water that is in the bathroom.
Remember that tiles and tiles are docked where you need to use tiles to create a coating, but with different properties, from different materials and for slightly different purposes. You can create an apron of the same kitchen from moisture-resistant tiles using special glue, and dock the rest of the area with it using the methods that we will describe below. Let's make a reservation right away that joining tiles is not very difficult, since this is a coating that is most often made of very similar materials and has similar properties and sizes. But if you use very different types tiles, it is unlikely that they will be able to beautifully connect them, so you will have to consider other design solutions.
These types include standard coatings made of ceramics, plastic, glass and even metal. Stone tiles most often connect very poorly with other coatings, so in this case it is better not to use them at all if it is not possible to mark them on the surface without creating a joint with other types of tiles.
Most often, a joint is created in the following situations:
As a result, we can conclude that such a design solution is used quite rarely, but still it sometimes becomes necessary to carry it out. And already in this case, you need to find out the methods by which this very joint is created. They are not much different from those that create a joint between tiles and laminate. But in this case, there is still a slight difference. You can also use thresholds, expansion joints and moldings to create a connection, but tiles, if their dimensions and all conditions allow, can be joined simply by precise fitting and the use of sealant. It’s another matter if you need to highlight this joint with something bright, in this case you will already need to use a threshold.
You can take for this in the hardware store a special threshold, which is made from different materials. A wooden threshold is used quite often, as it is considered with many coating materials. A metal threshold - molding is not used so often. It does not have the most versatile look, so its use is somewhat limited. It also does not bend well, so it can only be used for straight joints. But in the bathroom, it is the metal molding that will look especially good and effective, since it will not be exposed to its harmful effects.
You can also highlight quite popular plastic sills that can bend in any direction, so you can use them to make a joint of absolutely any shape. Also, the thresholds differ in the place of application, they can equalize the height, make it the necessary transition, they can mask the joint. Which one you need, you will determine for yourself, based on your preferences and the characteristics of the room, the current situation. The most important thing to understand is that you need to use the nut in order to make the transition accentuated, to attract attention, as the nut is made in a wide variety of colors and designs.
If you need to make the transition less noticeable and accentuated, then use the following method, which is quite rarely used, but it is quite stupid, as it is very effective with almost any coating. It's also pretty versatile.

Butt tiles can simply be inserted with an expansion joint, which can be adjusted in height and length. In addition, it can be bent as you like and need to fit the shape of the tile joint. The advantage of using a compensator is that it is able to withstand changes in temperature and climate in the room, since the glue almost always expands and contracts. The compensator is also able to compress, due to which it will leave the entire coating intact, without blisters and rises. It will play the role of a deformation seam, only very inconspicuous. The compensator is made of cork wood or other materials.

This method will be appropriate in cases where the connected tiles are quite similar in size, texture and material of manufacture. If you decide to join the tiles in this way, then keep in mind that you will have to adjust their size very accurately and accurately, since you will need to make an even seam along its entire length. Sealants or grout will need to fill the joint completely. If you want to create a bright transition, highlight it, then you can choose a sealant bright color. But most often they will change this method if you need to make the transition generally invisible and smooth.
You just have to choose from these options the one that suits all the parameters. Easy work and quality results!
Description: War Thunder is a next generation military MMO game dedicated to...

"Titan Siege" is a large-scale online game on the theme of Scandinavian and ancient Greek...

Being an avid lover of German tank looks, I spent a lot of time...