Description: War Thunder is a next generation military MMO game dedicated to...

Manicure- cosmetic procedure for decorating and processing nails on the fingers. Every girl wants to decorate her life a little, and a manicure is a good choice. In this guide, we will tell you how to do a manicure at home.
There are many different ways to do a manicure using different tools. We will talk about this in our instructions.
Many women believe that you can just paint your nails and be done with it - this is a wrong opinion. After all, a manicure is not only a decoration, but also hand hygiene. If you decide to do a manicure at home, clearly follow the sequence of steps so that there are no problems in the future.
How to do your own manicure:
Give the shape of the nail that suits you;
- Steam your nails before manicure;
- remove cuticles;
- massage using nourishing creams;
- decorate nails;
- increase artificial nails.
Tools for the job:
Special nail file;
- manicure nippers;
- cuticle softener, bath salt;
- varnish;
- cotton wool, cotton swabs, napkins;
- nail scissors;
- decorative ornaments;
- nail spatula in the form of a spatula.
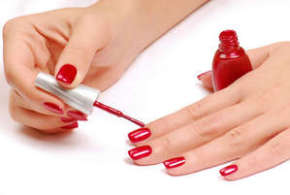
1. With cotton (cotton swab) and nail polish remover, remove the old coating from the nail.

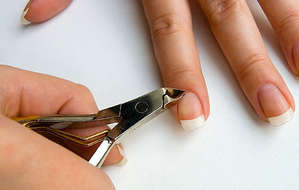
2. We give the desired shape and length with a nail file and scissors. Often they make an almond-shaped, rounded or square shape.

3. Remove cuticles. To make it painless to the maximum - soften them by dipping your hands in hot water for 5-10 minutes. You can add sea salt to the water, or special softening agents. When removing cuticles, adhere to the following rules: use scissors with rounded ends, when cutting, start from the side and move smoothly to the base of the nail, then the same way on the other side.
4. Let's start processing the side rollers. Try to cut off the delicate skin closest to the nail plate as carefully as possible. Use tweezers or nippers for this.
5. We prepare nails for painting. It is required to dry well and grind with a special nail file, if necessary.
6. Before applying the varnish, it should be mixed. We apply varnish on the nails, adhering to several rules - do not collect a lot of varnish on the brush, cover the entire surface of the nails with gentle movements.
Gel manicure- application of a special gel on the surface of the nail. The purpose of the gel is to nourish and protect the surface of the nail, and it also helps to make a very unusual and beautiful manicure.
1. Degrease and remove moisture from the surface of the nail.
2. Apply a primer to the free edge of the nail.
3. Apply the base layer of the gel. If you want to lengthen your nails, use fiberglass or silk.
4. We apply a modeling gel, which we fix with the final layer.
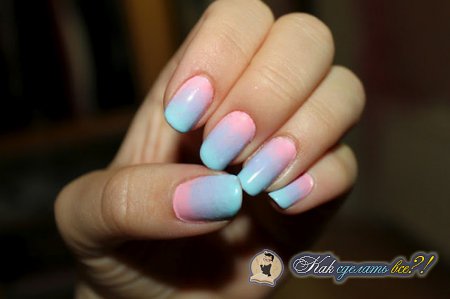
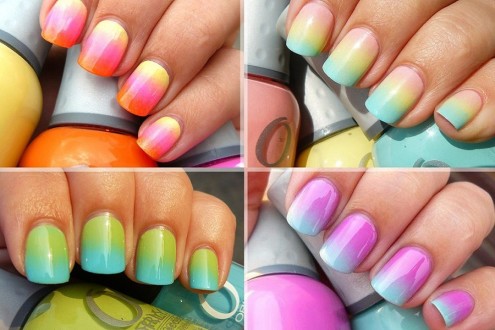
ombre- smooth transition of one color to another (gradient).
What do you need for a fade/gradient manicure?
Nail polish of different colors, two, three or more;
- a piece of sponge and a couple of toothpicks for mixing varnish;
- colorless nail polish or coating.
Instruction.
1. Pour two types of varnish into a small bowl.
2. Stir only the edges of the puddles with a toothpick.
3. Dip the sponge and apply to the nail.
4. Remove excess polish with nail polish remover. Use a cotton swab for this.
5. Apply a colorless coating on top.
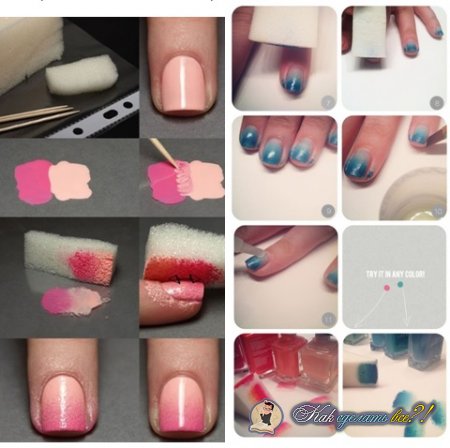
As you already understood, with the help of a sponge you can do a manicure very quickly and easily. Fantasize, create different colors, your hands will always attract attention. You can use from one to several colors.
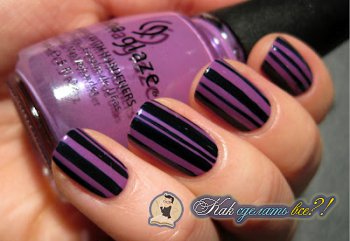
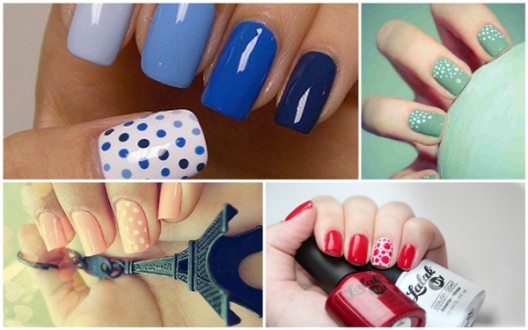
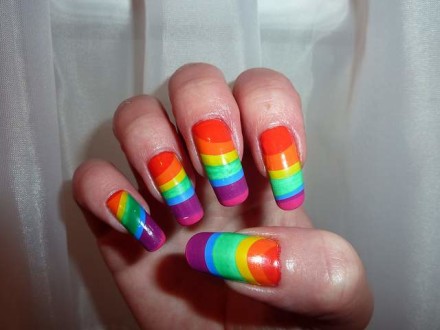
Manicure with stripes- stylish, bright, perfect for some of your outfits.
What will be needed?
Lacquer of two or more colors
- adhesive tape for nails (thickness 1 mm)
Instruction.
1. Apply the base color of the varnish over the entire surface of the nail. Wait for it to dry.
2. Stick the tape along or across the nail (your choice). Try to keep the distance between the stickers the same, as well as symmetry on all nails.
3. We apply the second color of varnish. Make sure that the varnish is on the entire surface we need.
4. Remove the tape immediately after applying the second layer.
5. Apply a protective layer of clear varnish.
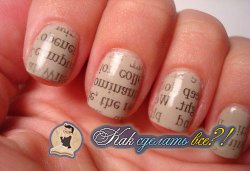
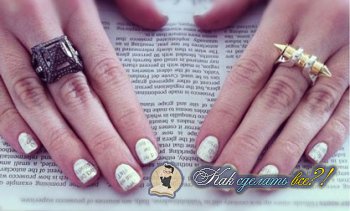
“Newspaper” is called a manicure, where part of the newspaper is used as a pattern on the nails. Often a unique pattern is obtained on each nail.
What will be required?
Newspaper
- varnish, fixative
- nail polish remover
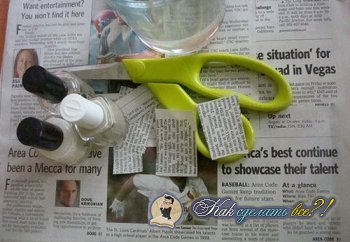
1. We prepare nails for manicure: remove the old varnish, cut off the cuticles, give the nails the desired shape.
2. Cut out ten pieces of the same size with text from the newspaper. Each leaf should be larger than a fingernail.
3. We cover one nail with a colorless varnish. Without waiting for the varnish to dry, we take a piece of newspaper, drip a little nail polish remover on it and immediately attach it to the nail. Press well. Make no mistake - moving the paper over the nail, otherwise the letters from the newspaper will not translate clearly.
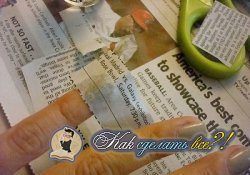
4. After a couple of minutes, remove the paper, some of the paper may remain on the surface of the nail.
5. We cover the nail with a protective, colorless varnish. Do the same for the rest of the fingers.
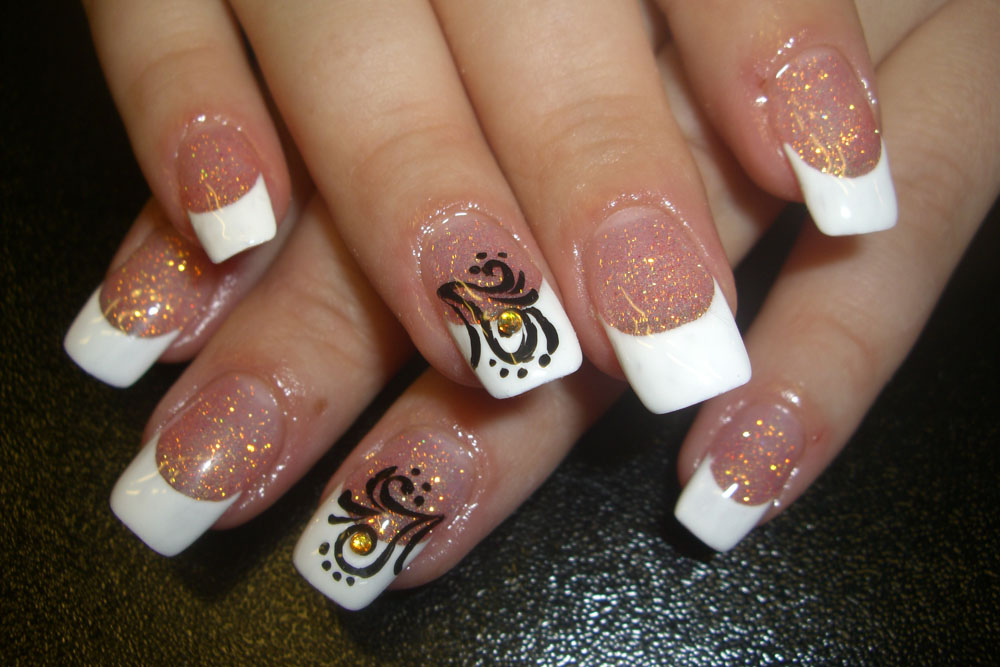
Nail art (manicure with a needle) - every year it is gaining more and more popularity. Girls love to be unique, and such a manicure fulfills this task, because you can depict any pattern on your nails.
With each generation, the secrets of preserving and maintaining external attractiveness are passed from mother to daughter. In past centuries, only a few women could afford the services of those who, by occupation, knew how to do a manicure. Most of the beautiful half of humanity looked after themselves on their own, guided by the experience of past generations. Fortunately, in the 21st century, nail services have become widely available. Nevertheless, many girls strive to master manicure at home, because such a skill is very valuable.
Firstly, the ability to take care of your own nails saves a lot of time. Perhaps, at first, while you master all the subtleties of manicure, the procedure will take you about an hour, but with the acquisition of experience, the period will be halved. Secondly, a useful skill is useful in situations where going to the salon is impossible. It can be long trips or holidays in the country, when you need to look at least well-groomed. The third advantage, of course, is the cost savings. family budget. Having learned how to do a manicure yourself at home, you will receive not only a positive charge of emotions, but also a valuable skill that can make your life easier.
Today, there are many ways and technologies for self-care of nails. The choice in favor of one method or another will depend only on your preferences and capabilities. To make the learning process easy and simple, the article is filled with useful video tutorials and photos that remain relevant in 2014. You will learn how to perform the correct manicure step by step at home.
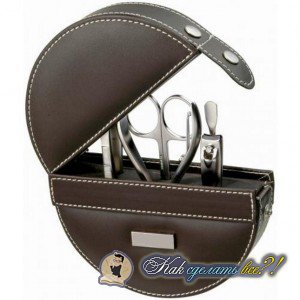
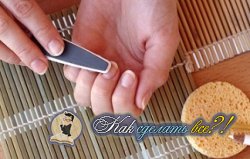
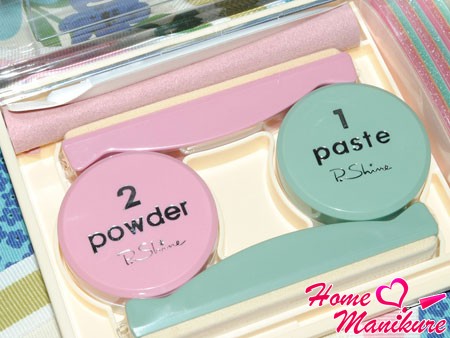
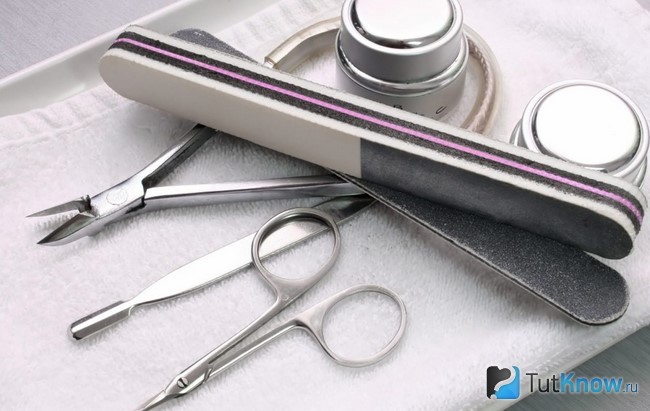
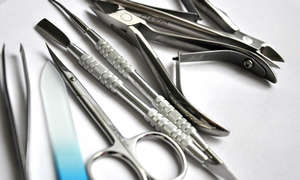
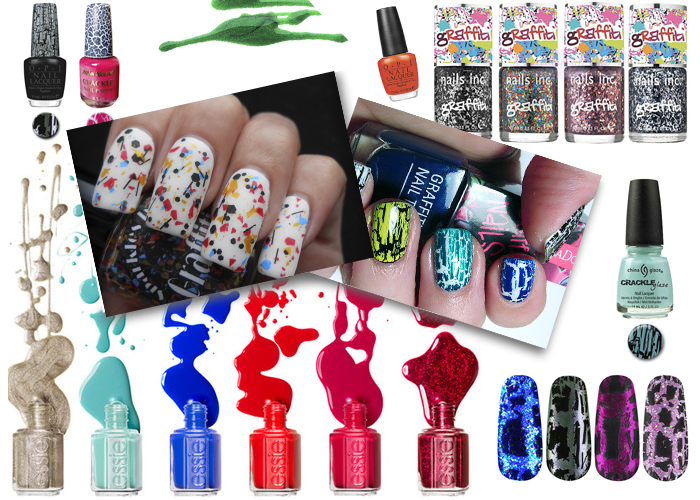
Quality tools and materials are a must proper care behind the nails. What do you need in your home arsenal?
The photo shows samples of the above tools with which you can carry out high-quality manicure at home.
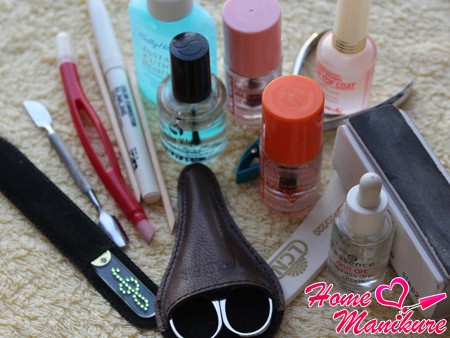
When choosing a nail file for a manicure, you need to pay attention not to fashionable pictures, but to the degree of its abrasiveness, which should not be lower than 180 grit. Give preference to glass or plastic models, as a metal tool often causes nail delamination. A polishing buff or file-grinder should have an abrasiveness of 400 grit and above. When choosing nail scissors and nippers, it is better to give preference to professional models with manual sharpening. The main condition: the tool must be selected individually for you, so that a regular home manicure is a pleasure, and you feel comfortable doing it yourself.
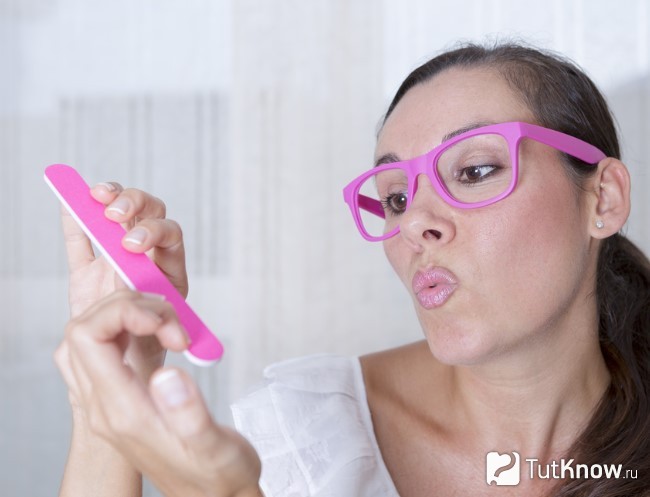
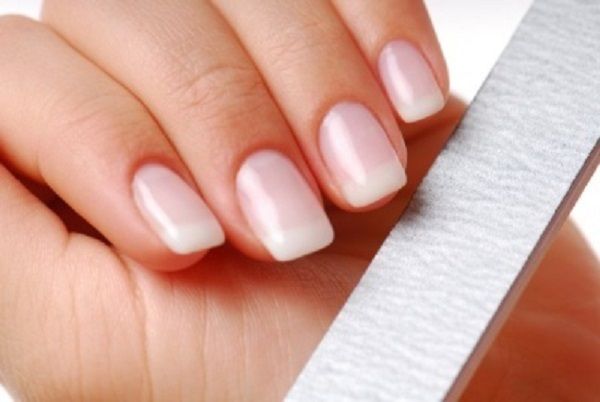
Girls who decide to acquire a useful skill often wonder where to start? Before you learn how to do a manicure at home, you need to master one of the most important stages of nail care. We will talk about the correction of the length and shape of the tips. Most often, a nail file is used for these purposes, but in some cases, when performing a home manicure, it is necessary to use scissors. A short list of recommendations will help you cut your nails correctly and without harm to health.
More detailed instructions how to cut nails is presented on the pages of our site. In the topical articles you will find informative video tutorials that will help you learn this procedure step by step. Along with trimming, nail filing also occupies a significant place. Often girls do not pay due attention to this stage, and their condition largely depends on how accurately the tip correction technology is observed. Therefore, it is so important before you do a manicure at home, to remember and practice the basic rules for filing nails.
Slightly different rules apply to the polishing procedure. To make grinding at home efficiently and without harm to health, follow the general recommendations.
Now you know how often you need to do a manicure in terms of filing and polishing your nails. To get a clear idea of the technique of performing a manicure, namely, the correction of tips with your own hands, we suggest you look helpful video lesson. In the video, the main points of the correct work with a nail file are revealed step by step.
After the correction of the tips, you can begin to process the cuticle. Depending on how it is removed, classic and European manicures are distinguished. In the first case, when performing a home procedure, the cuticle is trimmed with nippers. The skin is pre-steamed in a warm bath or treated with emollient oils.
The European version is more suitable for those who want to make themselves a neat manicure at home. The unedged cuticle removal method is less traumatic and, as a rule, does not require special tool skills. When performing a manicure, the skin dissolves under the influence of special oils and gels, after which it is peeled off with an orange stick. There are other methods of gentle cuticle removal, which you can read about on our website. The European version of manicure at home, as a rule, does not require preliminary softening with the help of trays.
The two main ways to remove the cuticle in 2014 are no longer exclusive. Today, there are several other methods of skin treatment and nail care. All of them are mostly salon options, but if desired, they can be used at home. You may already be familiar with some of them and you can easily do a manicure yourself, having studied their execution technology.
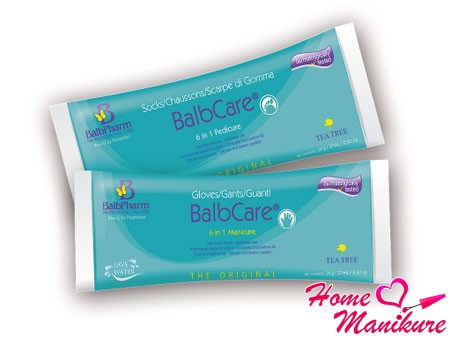
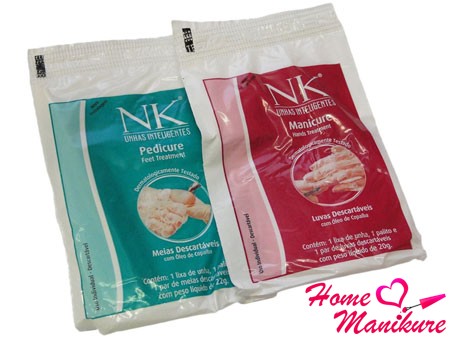
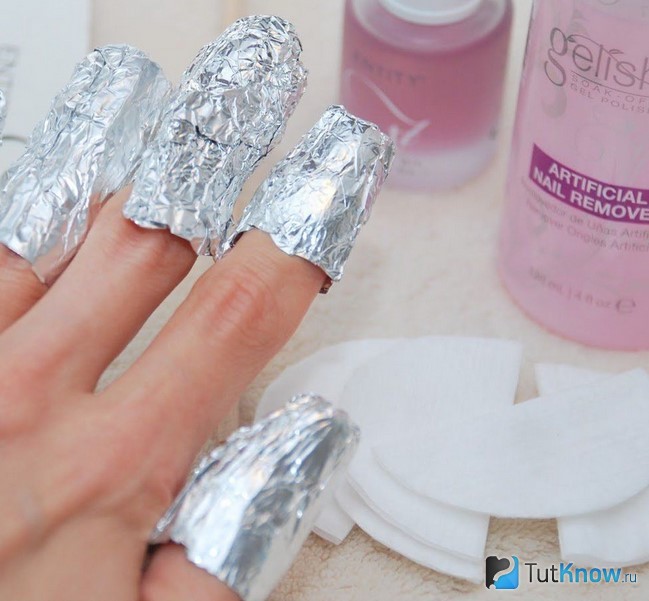
Suitable for girls with limited time. Gloves impregnated with a special cream are put on the hands. After 5-7 minutes, the film on each of the fingers is gradually removed and cut off, after which the cuticle is peeled off with an orange stick. The advantage of this method is that ready-made kits are sold for homemade Brazilian manicure. To give you an idea of how they look, we bring to your attention samples of the kits shown in the photo.
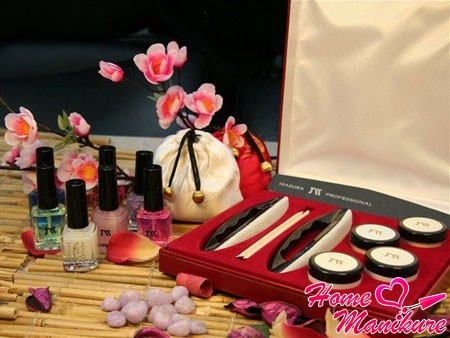
Connoisseurs of oriental beauty will love it. It will require a one-time, but significant financial outlay to purchase the complete set. Before you learn how to do a manicure according to the Japanese system at home, we recommend that you carry out this procedure in a salon. The execution technology is quite complicated, but quite feasible. Exhaustive photo, video materials and step-by-step instruction, presented on our website, will help you in mastering Japanese manicure.
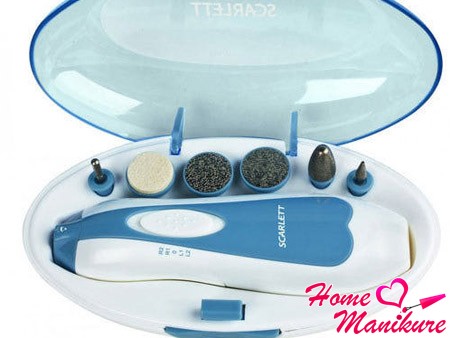
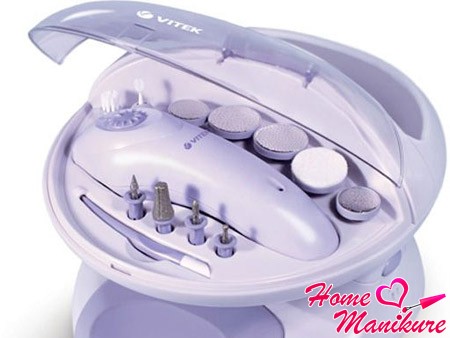
If you are uncomfortable working with wire cutters and a nail file, try mechanizing the process. From an excellent point of view, he has proven himself. Until recently, this technology was available only to clients of the salon. Today you can buy kits for every taste and do your own manicure at home. Doing it is not at all difficult even with your own hands. Samples of sets for hardware manicure are shown in the photo.
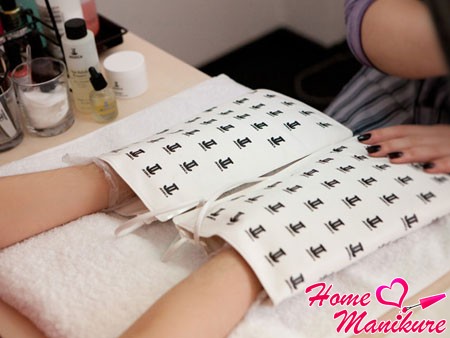
In 2014, you can often hear about another way to care for your nails. Jessica's manicure is famous for its relaxing effect on the skin and joints. The essence of the procedure lies in the fact that at a certain stage the hands are immersed in thermal mittens. Due to the thermal effect, the skin is perfectly softened and perfectly amenable to processing. After the procedure, the nails are covered with Jessica varnish, while the step-by-step manicure technique does not differ from the well-known one. When painting, you can choose the coating of any company you like.
You already know how to properly manicure in terms of hygienic nail treatment. It remains to study only the subtleties of applying varnish. The process is not difficult and, if desired, quickly mastered. Following our recommendations, you can gradually make a manicure that is not inferior in quality to salon nail art.
More detailed information about how to paint your own nails, you will find on our website in the relevant topic. To get acquainted with the process of applying varnish with your own eyes, we suggest you watch an interesting video.
Along with the question of how to do a neat manicure at home, girls are also interested in what nails are in trend today. First of all, it is worth talking about their form. Trends for 2014 point to short nails with "correct oval" tips that follow the natural smile line. Comfortable and practical manicure is easy to wear and easy to do. For lovers of long nails, it is advisable to decorate the tips in an almond shape.
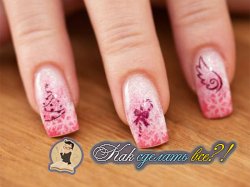
As for color and design in general, solid pastel colors are in trend. As before, noble wine shades do not give up their positions, which make the manicure especially luxurious. A monotone coating is very convenient to apply with your own hands at home, but if you wish, you can try something more colorful. To look stylish and fashionable in 2014, do a manicure with stripes or lace more often. Today, everyone's favorite jacket and moon nail art are still popular. The articles of our site are filled with beautiful photos to help you choose the best design for you.
As you know, wizards are not born, they become through hard work. If you want to learn how to make a beautiful and neat manicure with your own hands, you will need a lot of strength and patience. You learned a lot of information and, undoubtedly, deserved a rest. We invite you to enjoy watching interesting video a lesson in which you will be shown how to make a manicure quickly and very efficiently. In the meantime, dream about how you can apply what you learned at home. Be always the most beautiful and elegant for everyone around you!
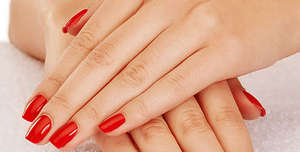
Beautiful and well-groomed hands can tell a lot about their mistress, so it is useful for every girl to know how to do a manicure on her own.
The content of the article:
Majority modern girls and women are accustomed to regularly visit a beautician, hairdresser and manicurist. At first, it is very interesting and exciting, but soon such procedures begin to greatly deplete the wallet, so the question arises of how to make a beautiful manicure at home, which will last not a few days, but much longer.
For this purpose, you can use such a cosmetic novelty as gel polish, which has earned the respect of many girls, because now there is no need to paint nails every 2-3 days. A stylish and beautiful manicure with gel polish will last 1.5–3 weeks, depending on the rate of nail growth and the work performed.
Today it is quite possible to do your own manicure at home with gel polish. This procedure has a number of advantages and advantages that every girl should know about:
When purchasing gel polish, you need to read the instructions for working with this material in detail, since the technologies of each manufacturer may have certain differences. For example, varnishes belonging to the latest generation will not form a sticky layer, and for other types, a primer must be applied before applying the base. Separate manufacturers in one tool produce top and base.
Over time, each step will be performed automatically, but not a single item can be skipped, otherwise the created manicure will not last too long and soon the varnish layer will begin to separate.

If you correctly carry out each stage of creating a gel polish manicure at home, it will last about 3 weeks. For owners of porous and thin nails, the coating can chip off much faster. It will be useful to conduct a special wellness course for nails using restorative and caring cosmetic procedures. The durability of a manicure directly depends on the quality of the products used.
It is strictly forbidden to tear off the gel polish, as such actions will result in serious damage to the keratin layer and the nails will become very brittle and thin. And the next manicure can be done in a few weeks, until the nail plate recovers.
Learn how to make a beautiful and neat manicure at home from this video tutorial:
LadyVeka.ru » the beauty » Nail care » Manicure and pedicure »
In order for your hands, especially nails, to always look well-groomed, you need to know how to properly manicure. This procedure should be resorted to once every seven days. You can do everything you need neatly and quickly in a beauty salon. If you do not have the desire or the opportunity to visit it, then you can do a manicure yourself at home and no worse than the one offered to you for money.
 Answering the question of how to do a manicure correctly, it should be noted that there are a huge number of them. However, most often a cut, unedged or classic suits a woman. The main thing is to choose and decide.
The classic manicure procedure involves removing the cuticle using small metal tweezers or sharp nail scissors.
 Recommended for those with thick and rough cuticles. Pretty traumatic. Due to negligence or inexperience, you can get hurt by cutting too much skin. As a result, this injury can provoke inflammation, due to which the cuticle will harden even more and begin to grow more intensively.
 This type of manicure also involves the removal of the cuticle, but with the use of special means, developed on the basis of mild acids, namely fruit and lactic. An unedged or European manicure is preferable for women with delicate and thin skin on their hands. The process of removing the cuticle comes down to its painless and delicate dissolution.
The European manicure procedure takes much less time than the classic one.
However, this method of removing the cuticle is contraindicated for women with sensitive skin, since the components of the product can provoke an allergic reaction.
 Manicure is created using twelve necessary tools. Therefore, if you are really interested in the right manicure, they should always be in your women's arsenal. In particular, we are talking about:
Only if all the steps are followed, during the manicure, your nails will always look healthy and beautiful, and you will receive an answer to the question of how to do a manicure correctly.
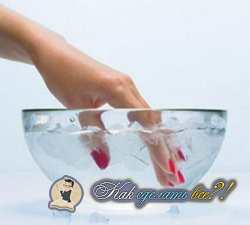
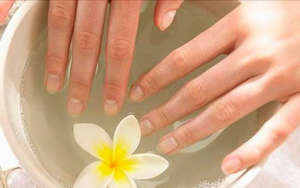 Having decided on a home manicure, it is necessary to make a bath for the nails in order to soften the cuticle and remove it further without any injury.
So, it is necessary to pour hot water into the bowl to such a level that all the fingers of both hands can be completely immersed in it. In the liquid, you must also first add two or three tablespoons of olive oil, two tablespoons of colorless sea salt and a few drops of essential oil(e.g. lemon).
The oil will not only soften your skin, but also nourish your nails with valuable vitamins, and colorless sea salt will make them strong.
The fingers are immersed in this solution for about ten minutes. As soon as you notice that the cuticle has become soft, feel free to proceed with its removal.
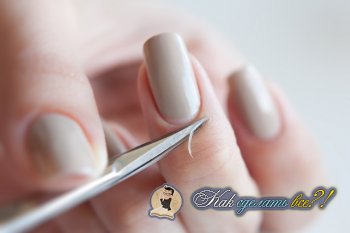
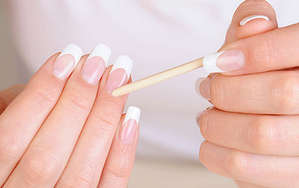 Taking the fingers out of the bath one at a time, use a stick or spatula to move the cuticle to the base of the nail. It is necessary to act carefully, but with sufficient effort. You have to be careful not to overdo it all the time. After all, there is a risk of damage to the base of the nail.
Using the sharp side of a stick or spatula, clean the remaining skin from under the cuticle. Remove the remaining notches with tweezers. The skin must not be torn off, but bitten off to avoid cuts. When applying an unedged manicure, the cuticle is removed by using a special product from the "cuticle remover" series.
AT this case gel is applied around the nail, not forgetting the area under the nail. As a result, carefully, using a stick or spatula, the product is removed along with the dissolved cuticle.
It is better not to apply this tool on all fingers at the same time, since the remover dries out quickly enough. Professionals recommend treating two nails each.
Many manicure masters recommend applying a cuticle remover to those nails that are still covered with old varnish. Since the agent used has a rather aggressive composition that destroys the nail plate.
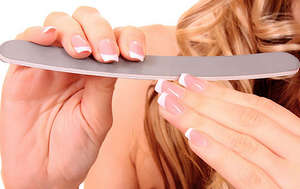 To do a manicure correctly, you need to remember that if you want to shorten your nails as much as possible, you need to use nail scissors, and all movements must be single and confident. If the nails are filed, then it is necessary to direct the file only in one direction so that the nails do not begin to exfoliate. You also need to make sure that all the nails have the same length.
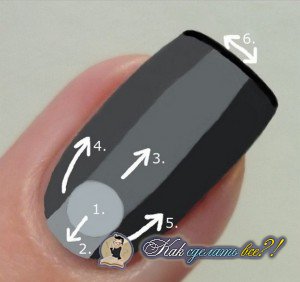
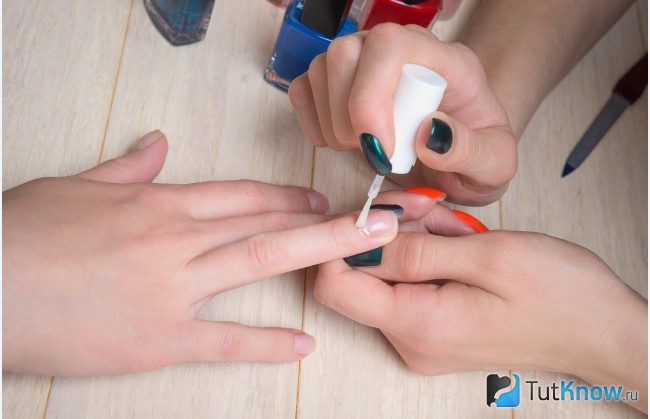
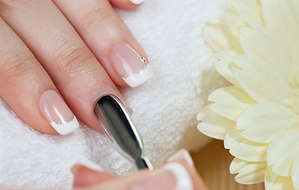
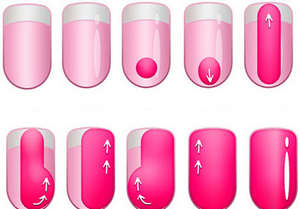 In order to evenly lay the varnish on the nail plate, it is necessary to ensure that it does not go beyond the borders of the nail, as shown in this instruction. Pay attention to the photo.
Now let's try to apply the varnish on our own correctly:
Now you know how to do a manicure in a cozy home environment without the participation of an expensive beauty salon in this process. The main thing to understand is that every woman by nature is an innate craftsman in all matters of beauty.
Previous: Basic rules of driver behavior vehicle
Next: How to develop logic outside of templates?
Manicure at home is a procedure that is available to every girl who wants to save a decent amount from her personal budget. It will also allow you to avoid wasting time, which is so lacking for the inhabitants of the modern metropolis.
Knowing how to perform a manicure with her own hands, the girl saves herself from the hassle associated with making an appointment with the right master and visiting the salon itself. Not always the time appointed by the manicurist is convenient for the client herself. We have to urgently review the list of urgent cases, cancel appointments ...
Possessing the skills of performing a manicure, any girl will be able to put her nails in order at a convenient time and in any place. This is especially true when obtaining the services of a professional master is impossible due to being in long trip or at the cottage.
How to do a manicure at home? To do this, you need to purchase special tools and a whole set of cosmetics. Let's talk about each of these points in more detail.
Kits for home manicure are:
Both those and other manicure sets must be of high quality. In order not to make a mistake, you need to purchase them only in specialized stores that sell certified products from bona fide manufacturers.
The minimum set for a manicure should consist of:
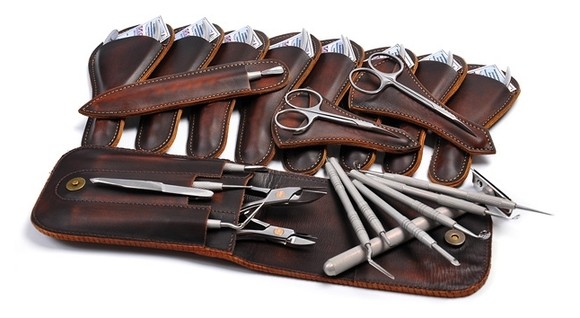
There are kits that include several varieties of each of these tools, but for beginner craftswomen, the aforementioned minimum is enough. Good manufacturers put manicure sets in convenient cases, which, if necessary, you can take with you when going on a long journey.
If manicure scissors and nippers are purchased separately, it is better to opt for professional models with manual sharpening.
From metal nail files, often provoking stratification of nails, it is better to refuse initially. It is recommended to choose a nail file with a cardboard or rubber base.
The main component of such a set is a device equipped with a set of special nozzles and powered by batteries or mains. Nozzles perform the functions of tools included in the usual one: they can move and trim the cuticle, file and grind nails. Previously used only in a professional salon, today the manicure device has become available for beginners.

To make a simple manicure with your own hands, you need to purchase a set of cosmetics, consisting of:
To perform a simple manicure at home, you need to purchase a special hand bath, a set of cotton pads, cotton buds, several sponges, strips of paper tape, special stickers or stencils for nails and the finest brush for nail art.
To properly make an unedged manicure at home, you must follow a certain sequence of manipulations. Here is a guide that describes each step step by step.
How to make a beautiful manicure at home? There are many interesting techniques and ideas for creating a decorative coating on the nail plates. We will consider some of them step by step in this section of our article.
Here is a very simple method that allows you to create a very effective manicure at home.
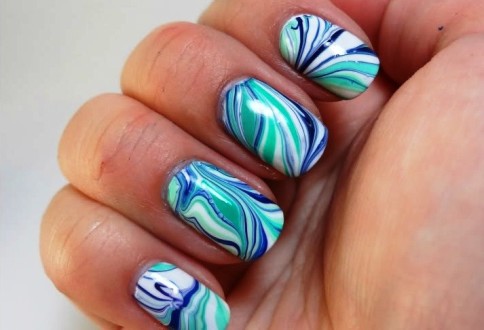
How to make an original water manicure with your own hands? For beginners, this method may seem too complicated, but this is only at first glance.
It is very showy and at the same time easy a way to create a beautiful pattern with a smooth transition from color to color.
This version of the decorative coating of marigolds is available even for beginners. How to make it yourself?
How to make a beautiful manicure at home? You can stop at the option of creating a marble pattern. Its implementation does not require any special skills. To create a manicure in this technique, you need a bottle of white and two or three pastel shades of colored varnish, a top coat (colorless varnish) and a transparent plastic film (you can use a file).
How to make this original and bright decor on your nails? For its implementation, you need to stock up:
Execution Method:
French manicure (French) has been extremely popular for several decades. This is primarily due to its versatility, because the jacket is appropriate in any situation and is compatible with any outfit. It can be demonstrated with equal success by a student, a business woman, and a future mother.
To perform a jacket, a girl will need pink or nude varnish, top coat and a roll of paper tape.
Let's agree that all the preliminary procedures have already been done and each nail is covered with a colorless base polish.
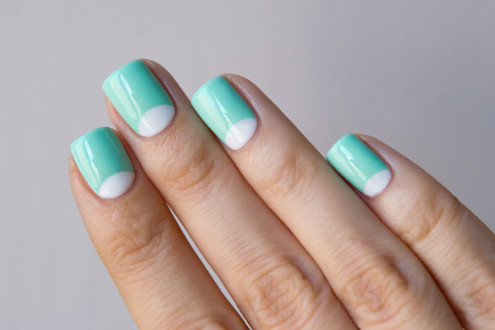
Lunar manicure is often called a reverse jacket. Beginners can use ready-made stencils to create it, which are sold in all departments selling goods for nail art.
Our version of the moon manicure can be created using a matte nude polish, a bottle of silver polish (metallic), a nail art brush and a top coat.
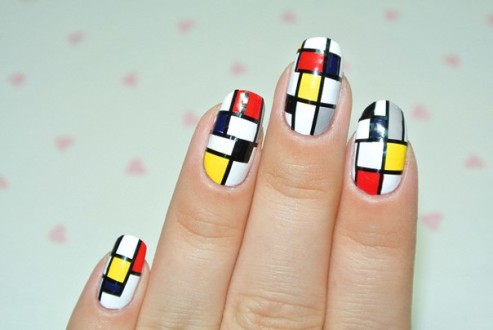
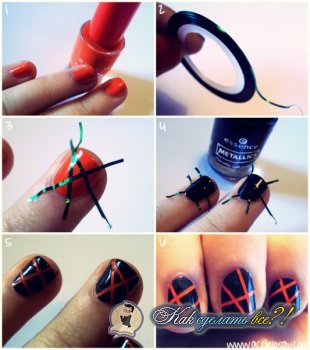
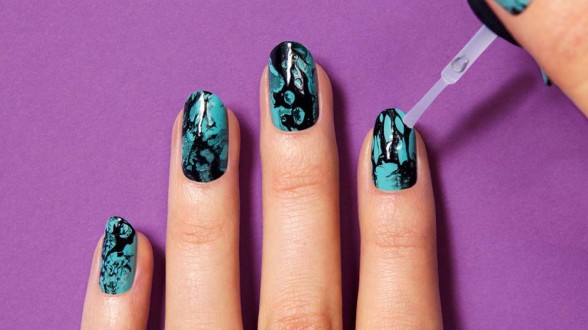
Girls who are wondering how to make a beautiful manicure at home can be advised to do a very relevant and sophisticated graphic manicure. It is not only easy to perform, but also interesting. It allows you to create countless options.
Some people like to decorate their nails with different patterns, the absence of strict requirements allows this. At the same time, there is no feeling of bad taste or variegation, because all these drawings are made in the same style and one color scheme.
Let us illustrate what has been said on the example of performing a spectacular chess pattern. We will need a set of varnishes, consisting of black glossy, gold metallic and a top coat.
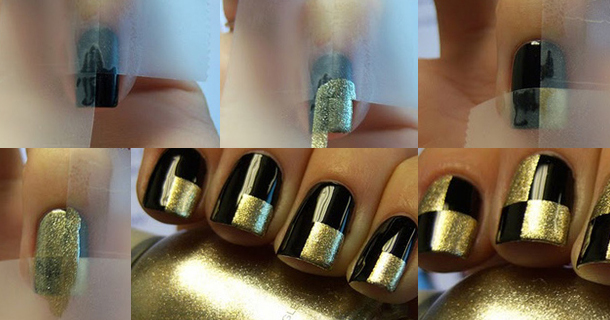
The use of adhesive tape provides great opportunities for creating fresh and original images in the art of nail art. Stencils are cut out of it, its strips are glued in any direction: at different angles, diagonally, across the nail plates and along them.
The use of narrow self-adhesive strips of gold and silver adhesive tape, sold in rolls, gives a special beauty to the manicure. Glued at the junction of lines drawn with different varnishes, they give the manicure a special clarity and accuracy.
Description: War Thunder is a next generation military MMO game dedicated to...

"Titan Siege" is a large-scale online game on the theme of Scandinavian and ancient Greek...

Being an avid lover of German tank looks, I spent a lot of time...