
Description: War Thunder is a next generation military MMO game dedicated to...


In most cases, in kitchens we can find chipboard or MDF countertops, this is not surprising, since this is the most economical option. But such countertops have a significant flaw, and it lies in the fact that MDF or chipboard countertops deform over time (if moisture penetrates under the protective layer). Particularly susceptible to deformation ( swelling) these are the ends of the countertops located near the sink and stove.
Less often you can find countertops made of artificial or natural stone (marble, granite). These are beautiful and graceful countertops that will last for many years without losing their appearance. But, unfortunately, the cost of such countertops is quite high and not everyone can afford it.
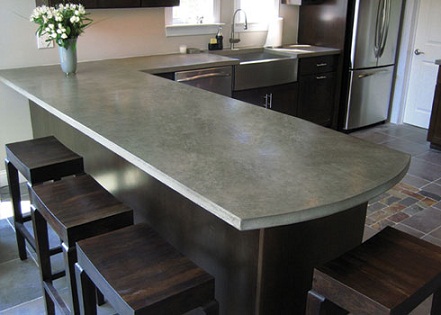
But there is another option that is not so widespread in everyday life, these are concrete countertops. Concrete countertops an order of magnitude better than chipboard and MDF countertops, but slightly inferior to artificial and natural stone, due to the appearance and the fact that they can stain from spilled liquids and absorb odors, although this problem can be solved.
The main advantage of a concrete countertop is that you can make it with your own hands. But, unfortunately, this opportunity is provided only to those who have free space for subsequent drying and grinding (there will be a lot of dust and dirt).
Moreover, it is worth considering that countertop weight it will turn out pretty decent (1 square meter 5cm thick will weigh about 125kg), and you will need a couple of strong helpers to carry it.
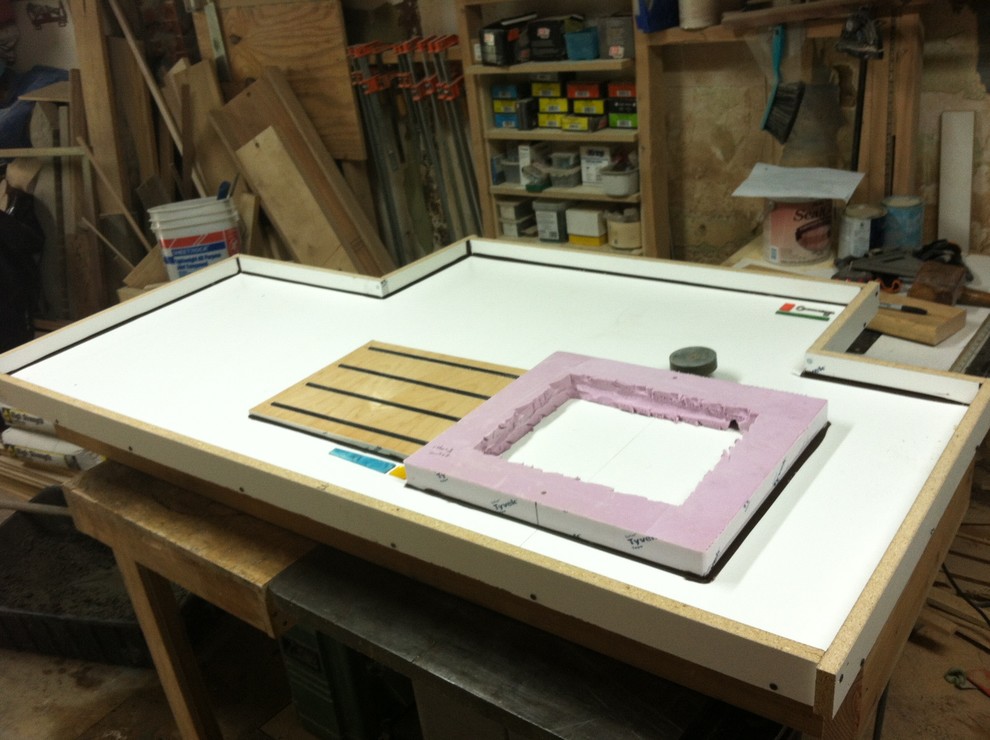
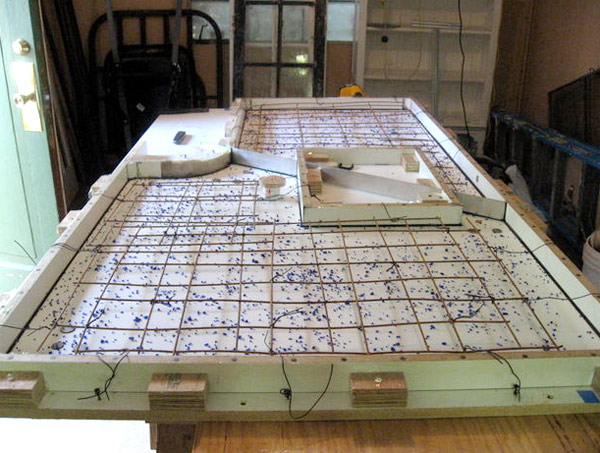
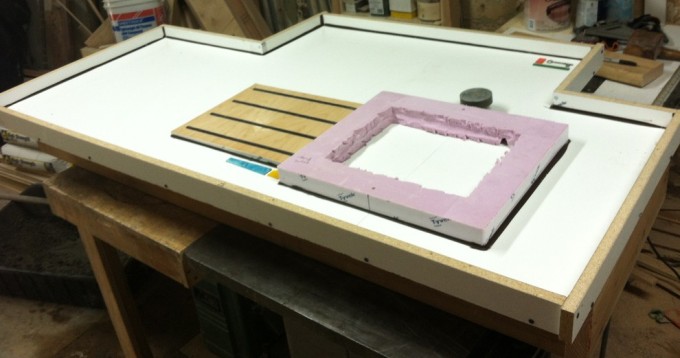
When starting to make a countertop, the first step is to make a template. We make a template from fiberboard or thick cardboard.
Since the front part of the tabletop will be at the bottom, the template must be turned over when making the mold.
The mold is made from laminated chipboard (no texture), although plywood can also be used. But it is worth noting that any roughness will be imprinted on the surface of the countertop and then it will take longer to grind (remove a thicker layer of concrete from the surface).

Chipboard strips will serve as boards and fasten with screws to the base. Without fail, it is necessary to drill through holes for self-tapping screws in the sides, otherwise the chipboard will delaminate. It is advisable to screw in the screws as often as possible so that the cement mortar does not bend the sides.
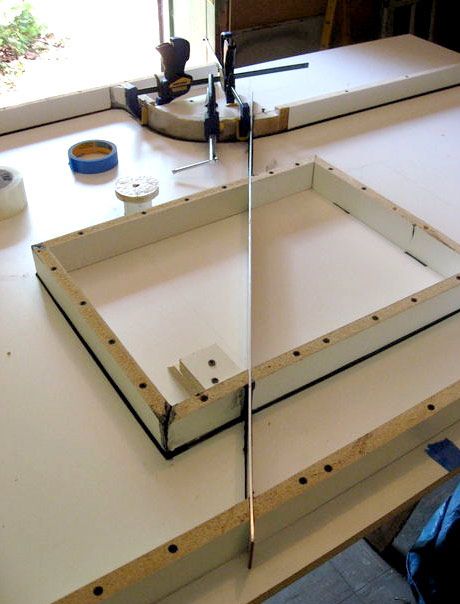
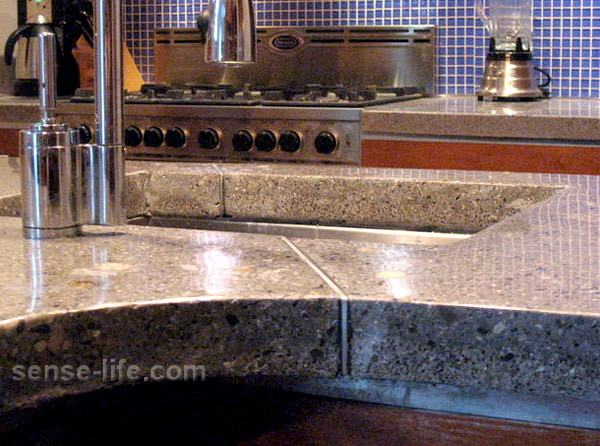
As a decoration, you can install a strip of metal (aluminum or copper). AT this case, the strip will serve as a tabletop divider into two halves.
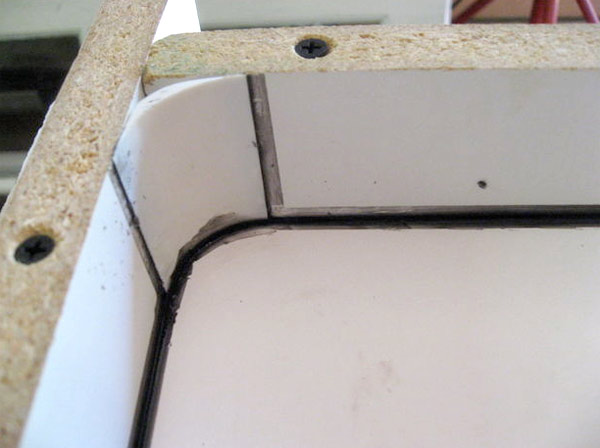
To prevent water from flowing out of the mold, we coat all seams with silicone sealant. An even radius can be given to silicone by smearing it with the corner of a plastic card.
To create a larger radius, you can use curved pieces of plastic as liners (1/4 of the wall of the plastic sewer pipe).
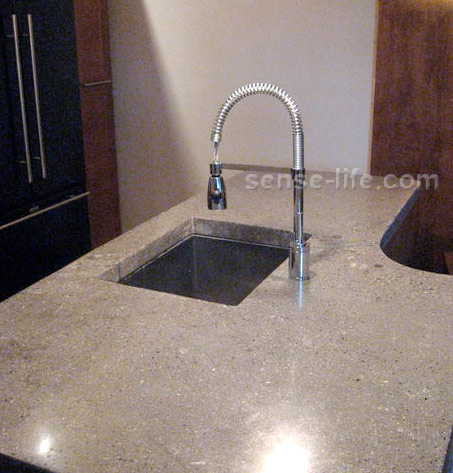
If there is a sink in the countertop, then be sure we provide a place for the output of the crane. To do this, on the form we set a pipe segment in the right place. This will save you from unnecessary work (drilling a hole in concrete).
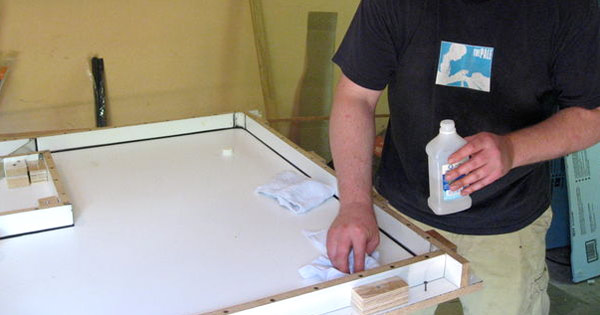
The form is ready, now it needs to be vacuumed so that sawdust and debris are not imprinted on the surface of the countertop, and thoroughly wiped from dust. Then apply a release agent ( wax separator) so that the concrete does not firmly stick to the chipboard. The caps of the self-tapping screws must be covered with plasticine so that cement does not get on them, and disassembly of the mold is not difficult.
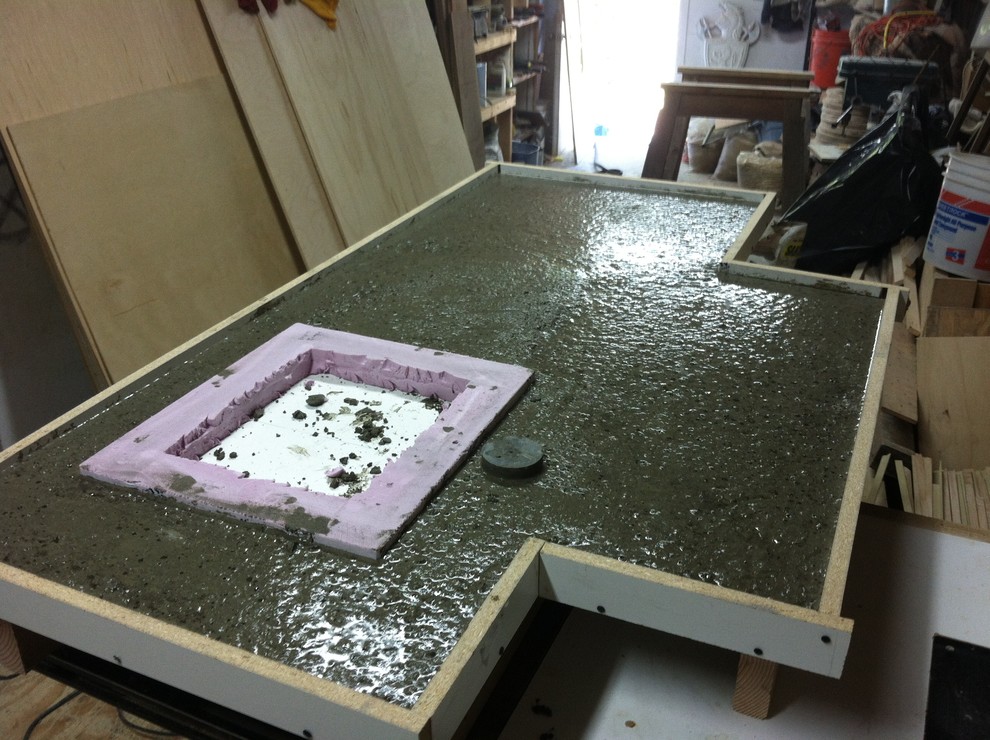
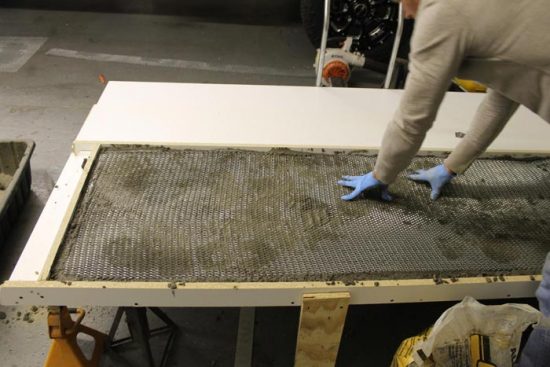
The concrete slab must be reinforced, so we lay it on the bottom reinforcing mesh. The mesh should not come into contact with the bottom of the mold (the bottom in this case will be the surface of the countertop), it is necessary that it be in the thickness of the plate, for this we stretch the mesh with thin wires. As a decor, we place small colored pebbles, glass pieces, etc. on the bottom of the mold.
We proceed to kneading the cement-sand mixture. To do this, we use cement grade 400 (Portland cement) and mix with sand in a ratio of 1:2:1, i.e. for 10 kg of cement, we need 20 kg. sand and 10 kg of fine gravel. into the mix don't forget to add pigment for concrete (black, red, yellow, etc.), at your discretion. As for water, it should not be poured too much, otherwise, after the concrete dries, we will get a lot of small pores.
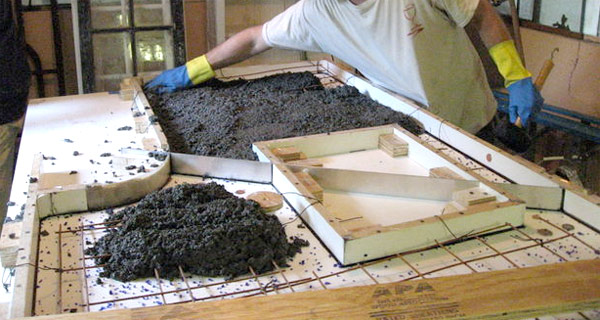
After you turn on the vibrator (deep vibrator or vibrating table), all moisture will come out on the surface. Without a vibrator, you will not be able to make a countertop without sinks.
![]()
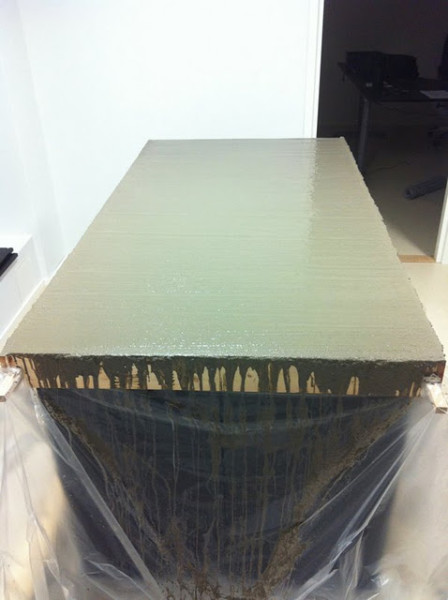
The countertop should dry in the shade so that cracks do not appear. Concrete will gain its strength only after 28 days, but you can start processing no earlier than a week later. To do this, unscrew the sides and remove the countertop from the mold. You need to take it out very carefully, because at this stage the concrete has gained only 60% strength, and you can still get chips. Turn the countertop face up and proceed to grinding and polishing.
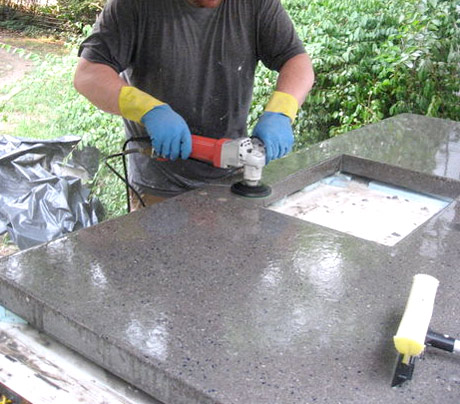
For grinding and polishing concrete, we will use diamond polishing wheels of different grain sizes, from No. in a small circle No. 1500, No. 3000, but in this case we will get a monotonous surface, and those pebbles and glass with which we dotted the bottom for decoration will be sealed in concrete.
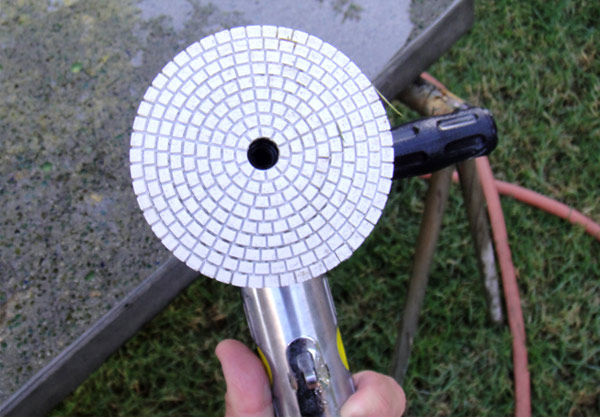
Therefore, to get a beautiful picture, you will need to remove the top layer of concrete with a grinding wheel with a large grit No. 50. It is worth noting that it is necessary to keep the grinder in the same plane, otherwise you can get deep scratches. In the process of grinding, defects (shells) can be opened, then we cover them with cement, wait until it dries and grind again.
When polishing, it is necessary to wear personal protective equipment (goggles, a respirator), as a lot of dirt will fly.
After we have achieved a certain shine, we dry the countertop and treat it with a sealant for concrete ( penetrating waterproofing). This is necessary so that all kinds of liquids are not absorbed into the concrete. And at the final stage we rub the countertop car wax, for shine and additional protection against the absorption of liquids (wine, citrus, etc.).
If you think that this is all complicated, then you can greatly simplify the process and make a countertop (window sill, steps, etc.) using the "marble from concrete" technology.
In this case, you will not need to painstakingly sand the surface, as the product will be glossy and with a pattern similar to marble, granite, etc.
Modern kitchen sets can be equipped with various countertops: from familiar products made of chipboard and MDF to heavy and expensive marble and composite materials.
If none of them satisfies the interests of the owners, then you can do concrete countertops for the kitchen with their own hands, which will meet the main requirements for such structures: high wear resistance, durability and moisture resistance.
In addition, the countertop, despite the fact that the most common building materials are used for its manufacture, can become a truly highly aesthetic object around which you can create an interior space.
No matter how technically equipped the kitchen is, its main element is the countertop. It serves for almost all culinary processes and experiences maximum loads: mechanical, thermal, chemical, as well as constant exposure to steam and moisture.
In addition, this surface must meet high hygienic requirements: fungus or mold must not multiply on it, and the complexity of its care must be minimal.
The use of concrete for the manufacture of countertops is an almost ideal solution: their cost is much lower than products made of natural stone, and in many respects they are not inferior to them. It is also worth noting that such a design, made by hand or to order, can have different sizes and shapes, which are determined by personal preferences, the configuration of the arrangement of furniture in the kitchen and other factors.
It is quite possible for everyone to make a concrete countertop with their own hands, but only if all production cycles are observed and carried out in strict sequence.
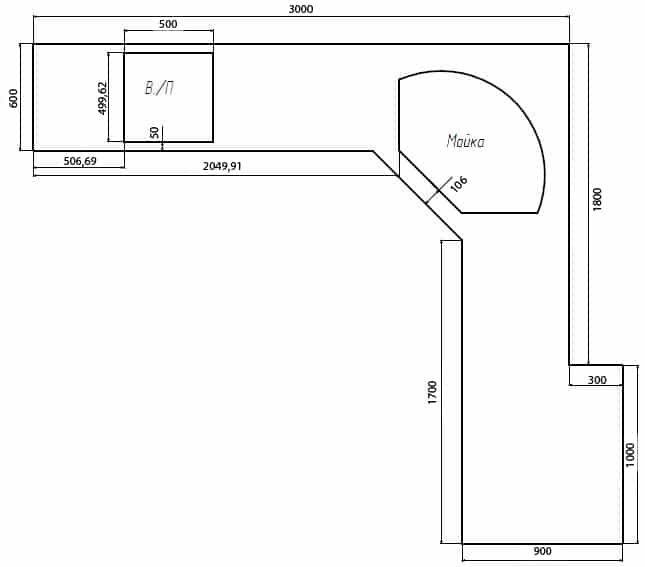
Before starting work, prepare tabletop design or drawing with an indication of all dimensions, while it is important to take into account the possible curvature of the walls, to which it will subsequently adjoin. It is more correct to preliminarily align all surfaces perfectly, especially the corners.
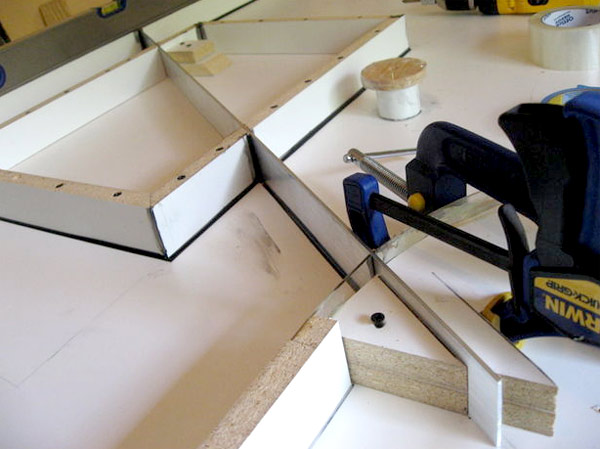
The size of the working area of the kitchen, as a rule, is determined by the area of \u200b\u200bthe room. And if the countertop being designed turns out to be quite large, then it is recommended to divide it into several elements ( this is especially true for corner structures). Directly in the process, you can make one formwork, but divided into sections, or make a fill in separate forms.
Although the process of manufacturing a concrete countertop is simple, it will not work without a special tool to make it qualitatively. Would need:

After the size of the countertop is determined in accordance with the prepared drawing, you can calculate and prepare the required amount of materials for its manufacture:
To fill the countertops, it is quite possible to use ready-made building mixtures, the choice of which on the market is quite large. This option is more expensive, but convenient.
In addition to the fact that the manufacture of the solution in this case is greatly simplified, attention should also be paid to the fact that the drying process will be significantly reduced.
Materials required for the manufacture of formwork:
To fill the countertop, a formwork is first made, which is the frame of the future product:
Be sure to properly prepare the formwork for the sink hole, and the method of its manufacture will be determined by the type of model chosen: built-in or overhead.

The most convenient way to do this work is to put the sink face down on a sheet of plywood in the place where, according to the calculations, the structure should be located. Or use its exact linear dimensions. For a built-in structure, wooden bars are fastened exactly along its edge.
At the same time, it is important that they are located on the side of the hole, otherwise it will be too large and the selected sink model will not work.
For overhead models, it is important to take into account the size along the outer edge and the width of the side, along the perimeter of which bars are installed with a small overlap of 5 mm.
Concrete, of course, is a strong material, but rather fragile. The tabletop during operation can be able to withstand quite large mechanical loads, so the presence of a metal frame will have a positive effect on the strength characteristics of the product.
In its manufacture, it is important to adhere to certain rules: the size of future cells should be on average 25 mm, while the same distance must be observed on all sides of the structure.
The reinforcing frame can be made separately, and then fixed in the formwork or immediately assembled in place. But before this stage, it is necessary to pre-lay neatly and evenly, without the formation of wrinkles on the surface, a plastic film.
In order to create a beautiful edge, you can use a pipe that must be installed in the corner formed by plywood and timber, and the free space that should not be filled is filled with sealant or silicone.
The manufacture of countertops is most often done separately, and not on the spot, that is, directly on the body kitchen set. But the latter, in any case, will need to be further strengthened, taking into account the rather heavy weight designs.
If the furniture was not originally manufactured taking into account the heavy countertop, then all connections between the body elements are additionally connected using wooden beam or other material.
Direct pouring can be done in two ways: layer by layer and a single monolith. If the second method is chosen for the manufacture of countertops, then after preparing the solution, for which the formula is used: 1 part of cement, 2 parts of sand and 4 parts of coarse filler ( crushed stone, marble, granite, gravel chips) and ½ part of water, pouring over the entire height of the mold.
In some cases, in order to facilitate the construction, expanded clay can also be used as a filler.
Layered Fill produced in two stages:
After finishing work on pouring, the countertop must be covered with a film, and after a day with wet rags or burlap. This guarantees a uniform drying process and, accordingly, the strength of the product, the absence of cracks or other defects. Formwork can be removed in 3-5 days.
If it is planned to top surface decoration, then before the start of pouring, shells, pebbles, glass beads, etc. are laid out and glued onto the polyethylene film prepared and laid in the formwork.
The final stage in the manufacture of concrete countertops is its grinding, which is carried out in several stages using circles of different grain sizes. The last grinding is recommended to be carried out with a felt wheel. Although, if surface cladding is planned in the future, for example, with ceramic tiles or mosaics, then careful grinding is not necessary.
The final chord is the installation and fastening of the countertop to the frame.
Will fit even more effectively into the interior decorative concrete countertop, which also has increased strength, resistance to mechanical, chemical and thermal influences, as well as to high humidity.
Differs from conventional concrete products in a wider variety colors, as well as the possibility of applying a corrugated pattern.
Making it with your own hands is somewhat difficult and requires precise adherence to the entire production cycle. It is mandatory to use a concrete grade not lower than M400, as well as fiberglass.
1. After pouring concrete into the formwork leveling and, preferably, vibrocompression is performed. But, if this is technically impossible, when doing the work yourself, it is necessary to compact by vibrating.
Take a look at this stuff -
2. The next step colored pigment powder is applied, which must be smoothed out. At the same time, to obtain an even and deep staining, the process is performed in two layers.
After the concrete begins to harden and reaches the consistency of dense plasticine, you can proceed to corrugation, for which special rubber stampings or pre-prepared stencils are used.
3. At the final stage, which is carried out in a day, excess pigment powder is washed out with water, after which, to achieve a beautiful effect and create external protection, a varnish coating is applied, which, together with concrete, creates a durable top layer by fixing it in the pores of the material opened after the washing process.
In production conditions, in addition to rinsing with water, hydrochloric acid treatment is also used, but for home conditions, this option is not suitable for making countertops.
You need JavaScript enabled to voteDecorative concrete and tile countertops (left photo)
Despite the apparent complexity, it is not difficult to make such a practical detail as a concrete countertop with your own hands. The video in this article will help to cope with this task. As a result, you will get both a durable work surface and an individual design solution.
The main points to consider before making a concrete countertop with your own hands:
This instruction describes how to make a concrete countertop with your own hands in place, or as a separate product.
A well-planned plan is the key to the success of any business.
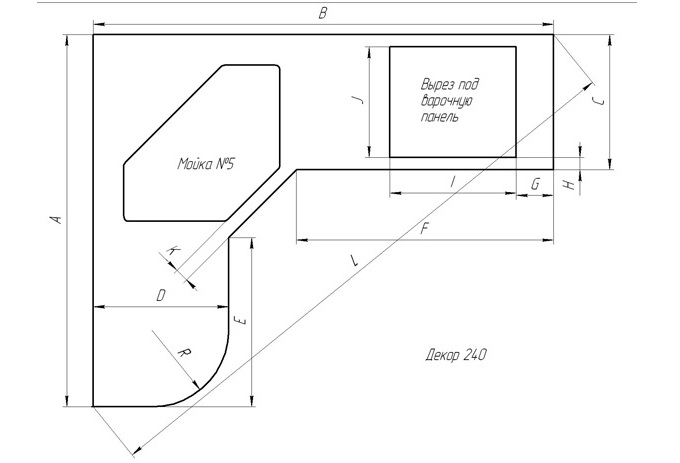
In this case, the main factor is compliance with the dimensions. The most difficult is the transfer of the angle, if it is provided for by the design. This will require a goniometer.
Advice! The most accurate and cheapest protractor - two even strips at the desired height are inserted into the corner, pressed against the walls, and fixed in a convenient way.
The next step is the preparation of the frame.
The best base option would be moisture resistant plywood or OSB board. A contour cut exactly according to the drawing will greatly facilitate the manufacture of concrete countertops with your own hands.

In cases where work is carried out on site, the base remains in the structure, so all openings and seats must be prepared in advance. If the manufacture of concrete countertops is not carried out at the point of operation, then the base is cut out only along the contour, and the cavities in the future work surface are limited to the corresponding frames.
The formwork of rectilinear forms can be made of any molded materials, as in the photo above. Figured products are well suited profile for drywall.
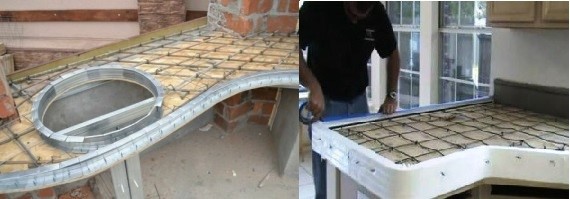
Advice! When arranging the formwork, it is better to lay the inner side with foam plastic strips 20 mm thick. When laying the reinforcing elements, it will be necessary to deepen their edges into the foam. Such a "trick" will allow the decorative layer to grab onto the reinforcement.
A reliable do-it-yourself concrete countertop will only work if it is well reinforced. The best, although not cheap material for this, is stainless steel expanded metal. Since its use is rarely seen in such councils, it is worth considering the PVL in detail.
Such sheets are made by cutting slits in a normal steel sheet and stretching it. In this case, the jumpers between the slots are rotated perpendicular to the plane of the sheet. Thus, it is not the thickness, usually 2-3 mm, but the width of the jumper that becomes the carrier. For these purposes, sheet 308 with a total thickness of 16 mm is suitable.
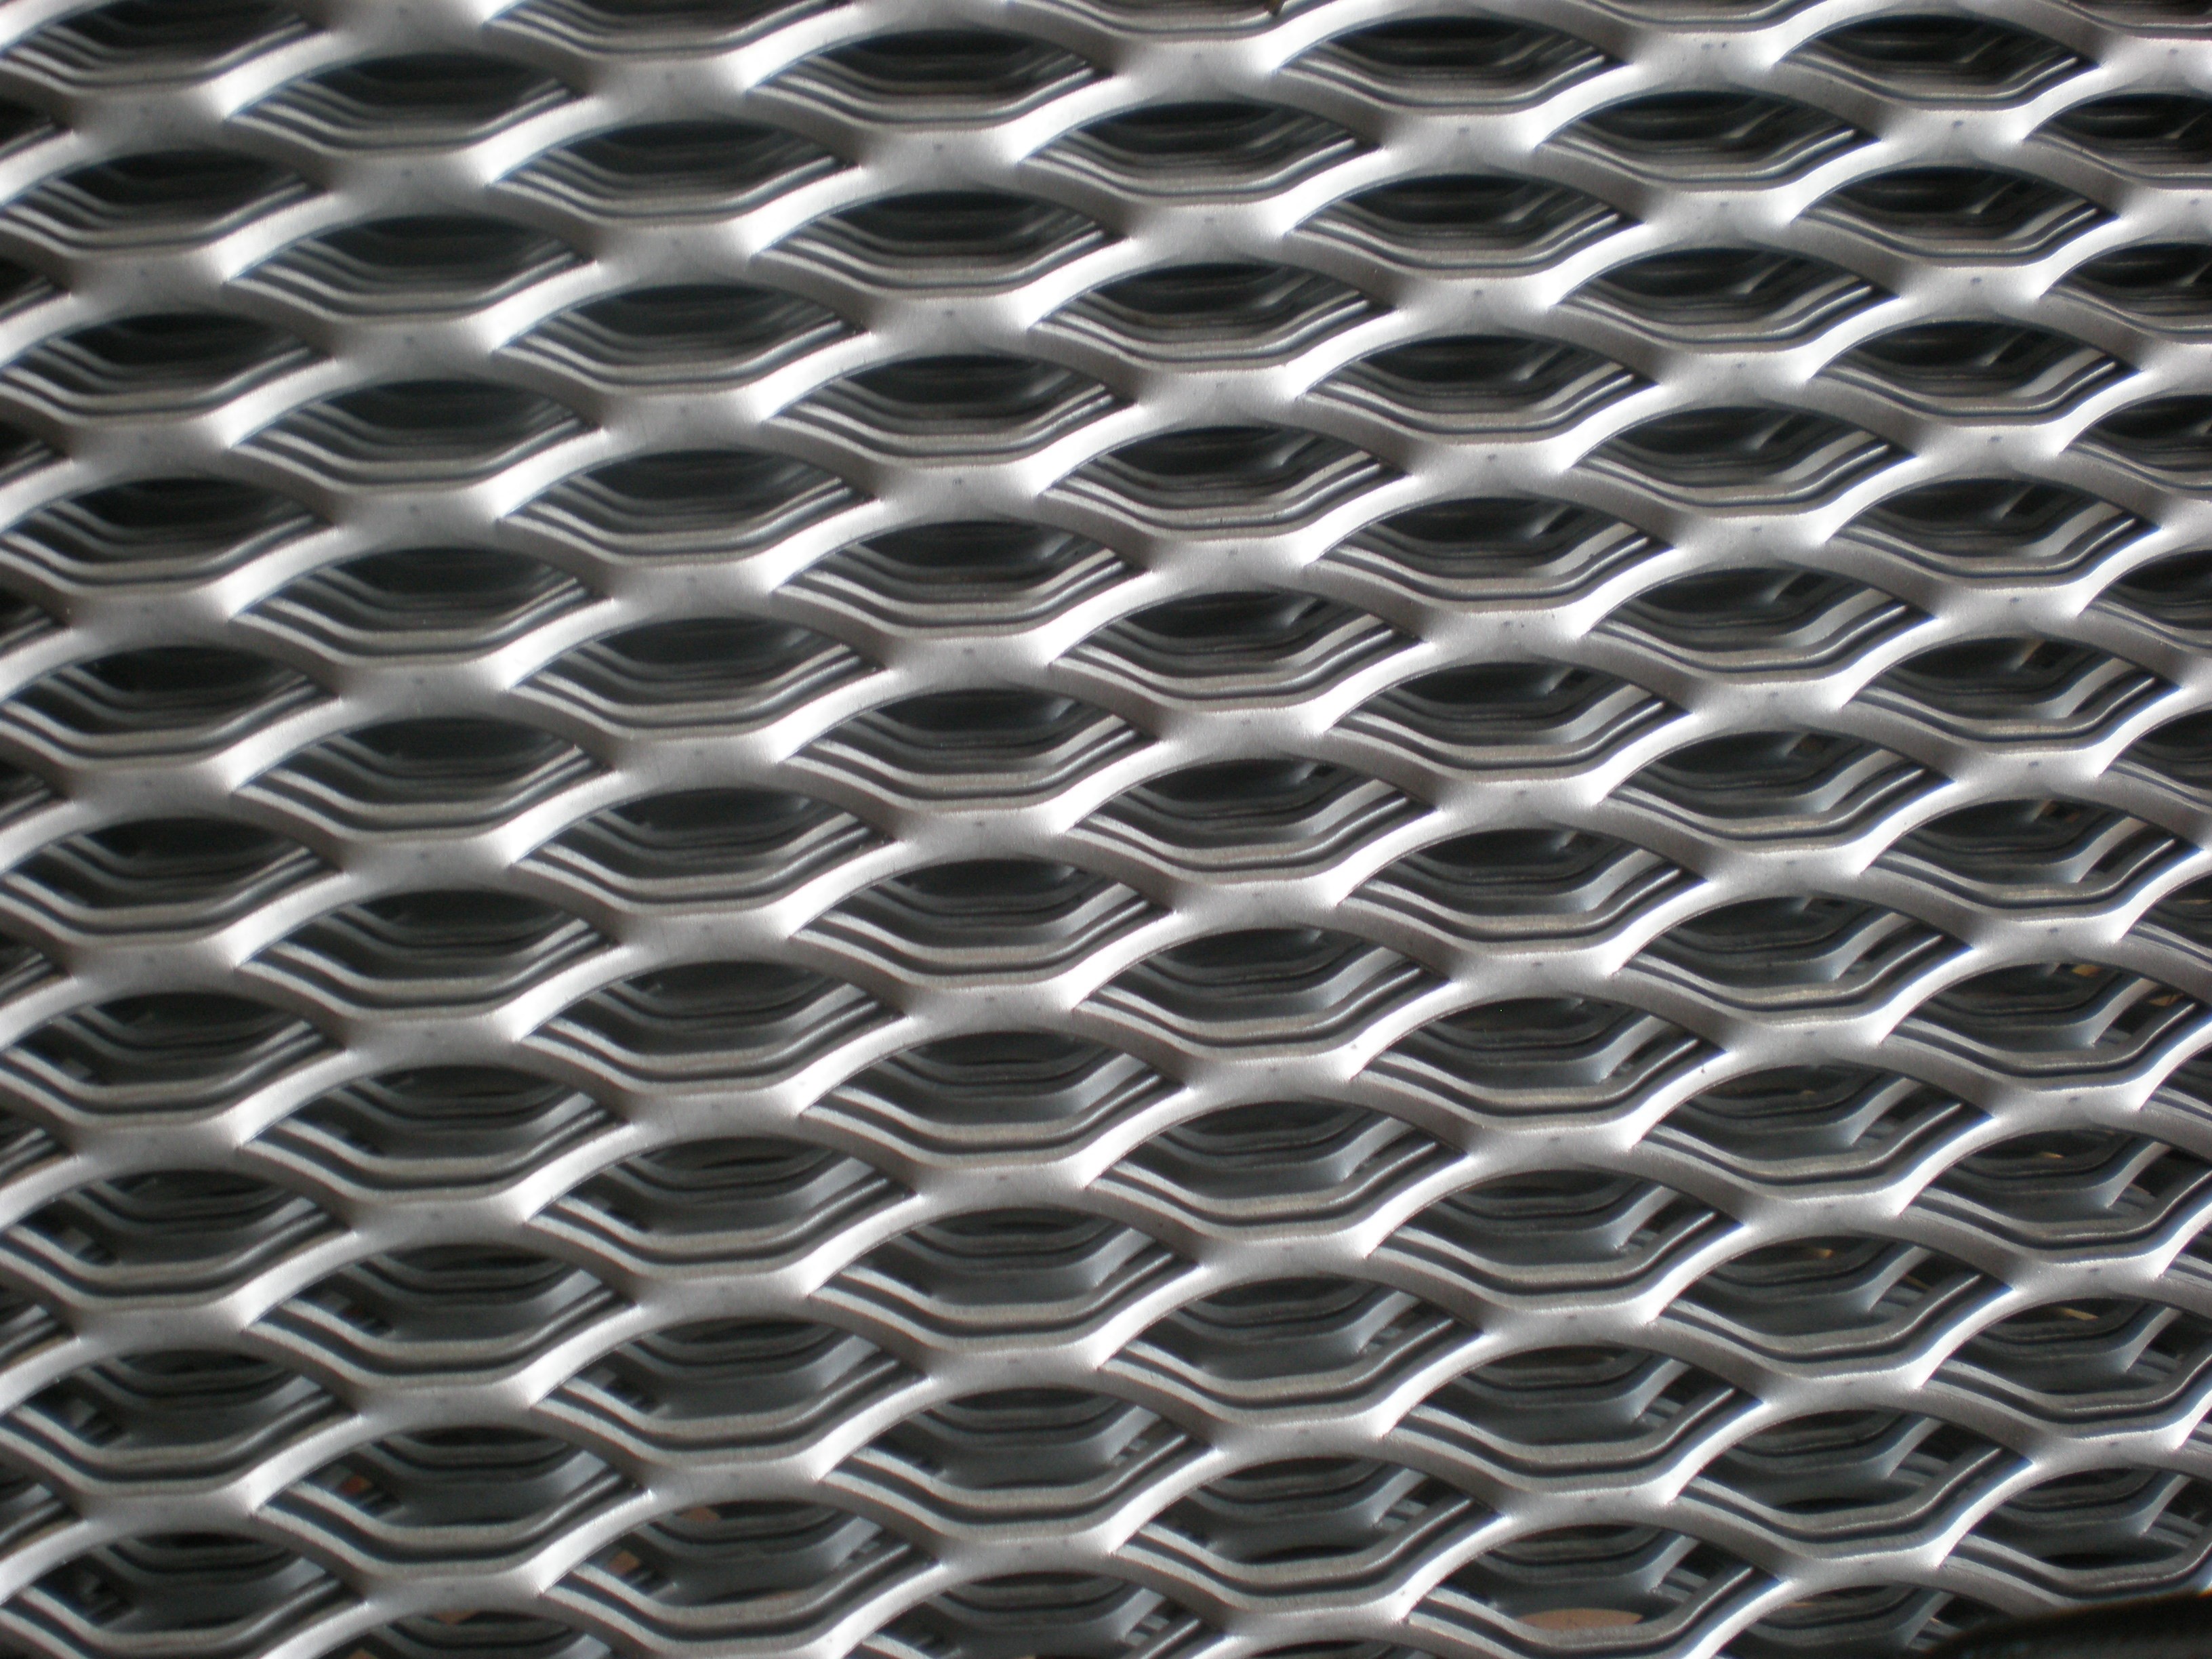
In view of the high strength of PVL, it is used for the manufacture of stairs and ceilings.
The parameters that PVL must comply with are regulated by GOST 21014:
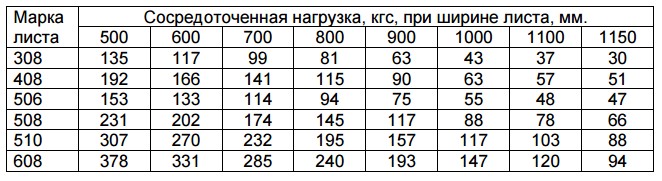
Concrete countertops are usually at least 50 mm thick. The ability of PVL to withstand such loads makes it possible to reduce this figure to 25-30 mm.
This means that the material consumption, weight and requirements for the frame on which the concrete kitchen worktop will stand will also decrease. Complex contours for a tie-in can be made with a grinder, or when buying at a metal base.
At the pouring stage, you need to choose the composition of the concrete for the countertop. The presence of PVL makes the presence of crushed stone unnecessary.
The statement that gravel and crushed stone have a higher compressive strength compared to steel is true, but in this case it is useless. Concrete countertops do not compress. Meat is beaten on them and nuts are cracked. Steel withstands shock loads better.
You can use for pouring a mixture of cement and fine granite sand, the so-called granotseva. Having chosen these components, you will need to buy plasticizers that increase bending strength. Their retail price is high, the chemical composition of granotsev is unknown, it is easy to make a mistake. The process of "how to make a concrete countertop" can end with cleaning up its remains.

In order not to take risks, it is better and easier to buy ready-made sand concrete of high strength grades, M400 and higher. This material is intended for pouring reinforced foundations and is designed to work with reinforcement. Just the right situation. All additives are already in it.
It remains to knead the solution to the consistency of sour cream, and pour into the mold. If further processing will consist of varnish or paint, then you need to fill it along the edge of the formwork and immediately level it.
In the case when it is supposed to use decorative concrete for the countertop, or it is required to leave free space under the tile, the height depends on the decorating material.
Advice! When reinforcing PVL, it is better to leave 2-3 mm of the sheet protruding above the fill. They will ensure the connection of two layers into one, or reinforce the adhesive of the tile. If traditional reinforcement was used, a plastic mesh should be placed on the surface of the poured concrete. Such a notch will increase the adhesion of the next layer.
After pouring, you need to cover the form with a film, and leave for 1-2 days. Further processing will depend on the finish coat.
In this case, 2 days after pouring, the film is opened and the concrete countertops are left until completely solidified. Depending on conditions, this may take up to several weeks.
The tabletop is sanded, primed, painted or varnished according to the technology provided for selected materials.
For decorating with tiles or stone, the concrete kitchen worktop is dried in the same way as for paint. After that, the product is removed from the mold, set in its place and covered with decor.
Reinforcement left under the foam and on the surface or a frozen notch will ensure reliable fixation of stone elements or tiles.
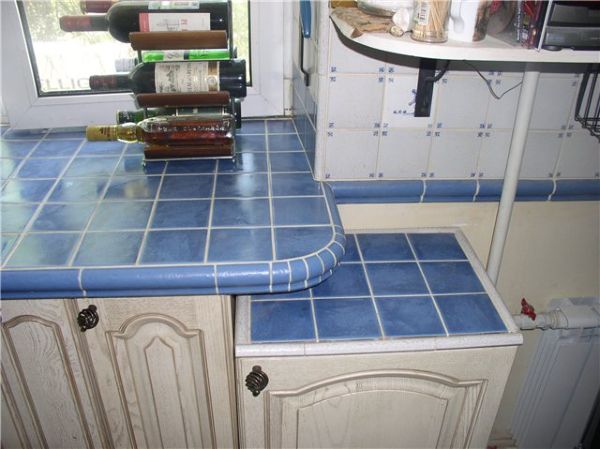
Advice! If preference is given to tiled models, it is better to choose porcelain stoneware for the floor, the most resistant to mechanical stress.
Provides the greatest scope for a flight of fancy in choosing: how to cover a concrete countertop. At the final stage, you can choose a ready-made dry mix from those offered on the market, there are a lot of options.
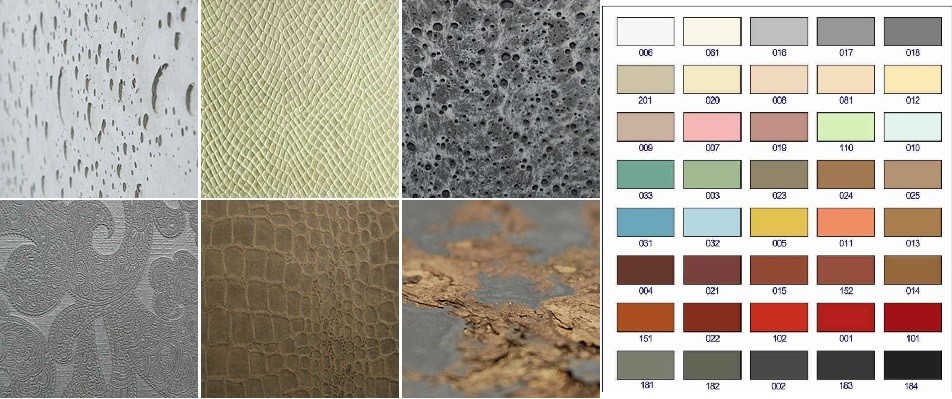
Or make it yourself on the basis of the same sand concrete with the addition of dyes, sea pebbles, quartz, marble chips, any decorative elements. The only thing to consider when choosing inserts is that the decorative concrete countertop must be polished.
Advice! The composition of ready mixes includes additives that increase the hardness of concrete, facilitate grinding work and increase the life of the surface until the next grinding. The best option is to choose the right color and texture from ready-made offers. The range of inserts is best left to your own imagination.
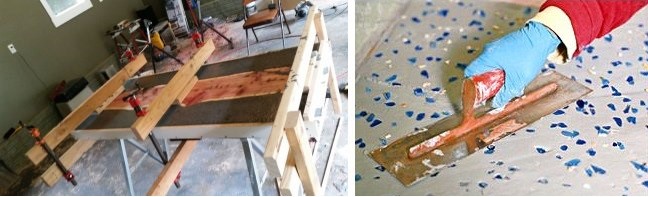
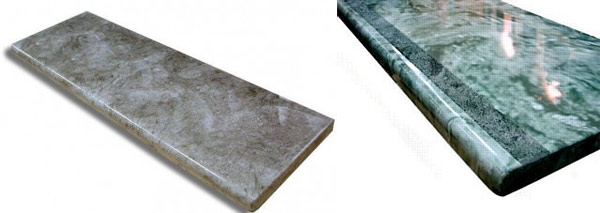
Inserts made of wood and artificial stones (right)
The work on the final filling must be carried out one day after filling with the base layer. The concrete in the mold should stop being liquid, but not yet completely solidified.
Having decided on the composition of the finishing layer, you need to remove the foam from the formwork. Decorative concrete is poured into the space vacated at the edges and up to the upper level of the formwork and the surface is leveled. The form is again closed for two days. After removing the film, allow the product to dry completely.
From this video you will learn how to make a concrete countertop with your own hands.
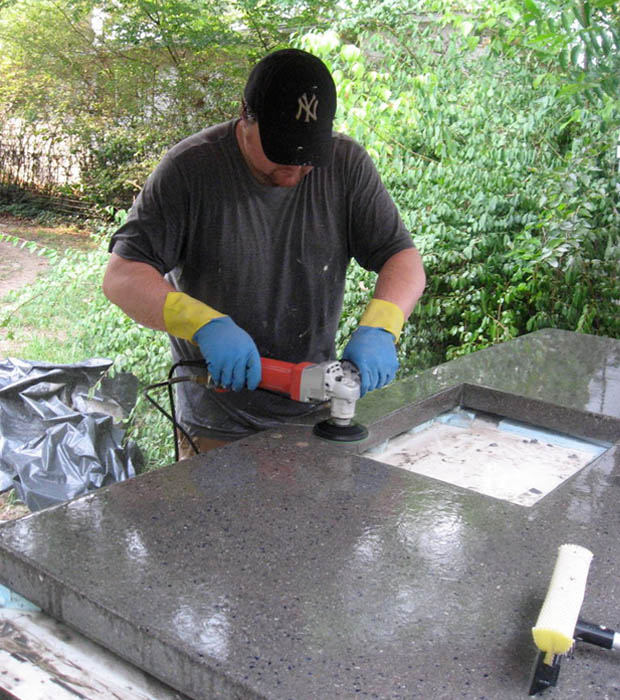
The final stage is the grinding and polishing of concrete countertops. Only an inveterate enthusiast can perform such work manually. The Chinese grinder will die halfway through.
Final tip! A good professional grinder can be rented. During the weekend, the fruit of a long labor will be finished.
Self-production of concrete countertops - although painstaking, but not difficult. The price of the product will be several times lower than that ordered in the workshop, and the moral satisfaction will be as many times higher, and it will also serve the grandchildren.
desire to create unique interior every homeowner has a kitchen. Some try to use ready-made designs, which are available in large numbers in design magazines. Some homeowners who have the opportunity to allocate substantial sums for the decoration of the kitchen turn to eminent designers who are able to develop an original interior design using exclusive materials. In such projects, designers often use marble slabs to decorate the premises, from which they are made various items interior - worktops for the desktop and dining table, bar counters, as well as window sills. However, the cost of such a finish is so high that it is not affordable for a homeowner with an average income. What to do if family budget does not allow you to allocate a significant amount for finishing the kitchen? How to add uniqueness to the room, but at the same time manage minimally possible costs? There is a simple solution to these questions: you can try to finish the kitchen by making interior items with your own hands.
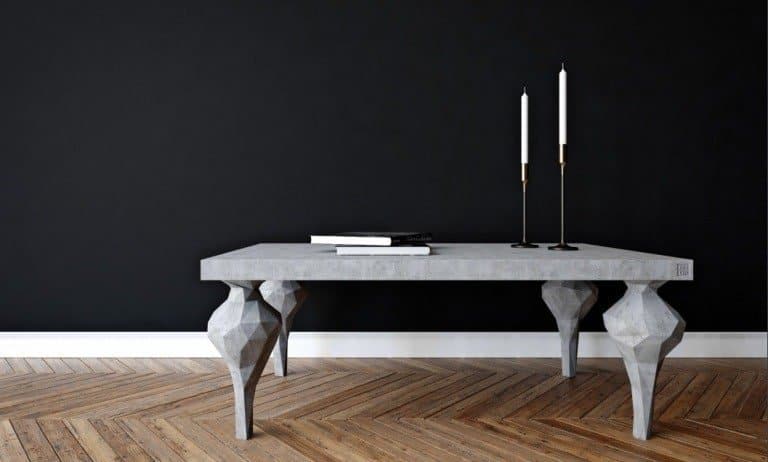
A concrete countertop, at low cost, looks quite expensive and stylish.
The first step towards creating an original kitchen interior will be a concrete countertop, which in its appearance is almost indistinguishable from marble tiles.
Such a do-it-yourself tabletop will become the pride of its creator, and its cost is affordable even with a minimal budget.

First of all, you need to decide how the future table will look like and what its dimensions will be. In the manufacture of countertops for the kitchen, the edges of the surface must necessarily fit exactly against the walls. Since the corner of the room is usually used to install the kitchen table where the sink is located, you should make sure that it has the correct shape, that is, the walls converge at an angle of 90 °. If the angle has other dimensions, then it is necessary to take this into account even at the stage of drawing work.
Creating an accurate tabletop drawing is the most important stage of work, since the quality of the finished product depends on the thoroughness of its development. In the process of developing a drawing, it is necessary to provide for the creation of a countertop from several parts. The weight of the finished product in its entirety is large, so dividing it into parts during manufacture will make it easier to move and process them, and will also prevent cracking.
When making a table frame with your own hands, it is necessary to provide for the strengthening of its central part with transverse boards, as well as joining individual parts of the tabletop on them. For the frame, boards from hard rock tree. If desired, you can use ready-made cabinets with drawers. It all depends on the imagination of the home master.
After completing the drawings according to the sketches prepared in advance, you should take care of purchasing the materials from which the original countertop will be made.
To work, you will need the following materials, the amount of which is determined by the size of the future product:
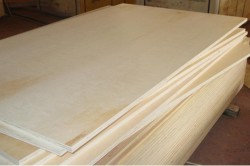
To make concrete countertops, you will need sheets of plywood.
It is impossible to do without the tools necessary to create a tabletop with your own hands. Therefore, care should be taken to prepare the following tools:

A screwdriver makes a mold for casting a countertop and mounting a frame.
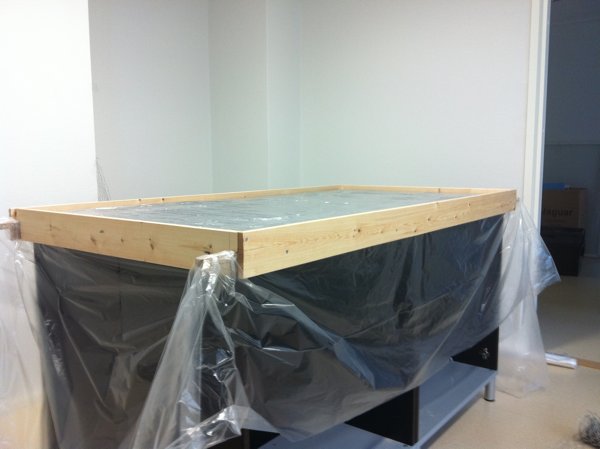
The quality of the cast billet fully depends on the accuracy of this stage of work. Plastic sheets are used for the base of the form, and a side is mounted along their perimeter, the height of which must be at least 50 mm. It is this thickness that a layer of concrete should be in order to provide the necessary strength of the countertop.
All mold joints should be filled with silicone sealant. If the countertop provides for the installation of a sink and a tap, then at this stage it is necessary to take care of the place for their installation. The hole for the pipe is made very simply - for this, a ring from a PVC pipe, pre-wrapped with polyethylene, should be installed in the right place.
After the concrete hardens, the pipe is easily removed from the finished structure. The place intended for the installation of the sink is fenced with sides, it will remain free. If the countertop has rounded corners, then silicone inserts can be used for this.
It's not that hard to make them. Plastic cups or rings are placed in the corners of the mold, and the free space is filled with silicone sealant. After it hardens, the plastic products are removed. Now the inside of the mold should be lubricated with machine oil (you can use drying oil) to prevent the solution from sticking.
If the use of decorative elements is envisaged, then they should be evenly distributed along the bottom of the finished form, fixing them with a spray adhesive. Then, at a height of 25 mm, a wire mesh is attached, giving the product strength. It is used as reinforcement.
After the form is ready, you can start mixing the solution. The main components of the solution: cement M 500 and clean river sand. First of all, 1 part of cement and 3 parts of sand are mixed. It is possible to add a small amount of fine gravel. Then concrete plasticizer and water are added to the resulting mixture. The finished solution should be in the form of a paste or cream.

The concrete mixture is made from M500 cement, sand and water.
If you want to get colored concrete, you should add a special coloring pigment to it. If a uniform color is required, then the pigment is added to the dry mix, and to obtain characteristic “granite” stains, the pigment is diluted with water and added to the finished concrete solution.
Before proceeding with the pouring of the solution, the form is set in a strictly horizontal position with a horizontal level check. Ready, thoroughly mixed solution is carefully poured into the prepared mold in several steps.
The surface of the mold is covered with a film and aged for at least 10 days. Then the film is removed, and the form is disassembled into its component parts. Further processing of the product can be carried out after another week. During this period, the concrete blank, created by oneself, will dry completely.
The grinding process takes place in several stages. Initially, a coarse grinding disc is used, processing all sides of the workpiece with it. However, more attention is paid to the front side, previously located at the bottom of the countertop mold.

To give the countertop a smooth surface, it is polished with a hard disk.
With the help of rough processing, irregularities are removed, pores close to the surface are opened, and decorative elements (if used) become visible on the surface. After rough grinding, the surface is treated with a prepared mixture consisting of an acrylic sealant and a small amount of cement.
This mixture, with its consistency resembling sour cream, is evenly applied to the surface. At the same time, the revealed voids are filled. After some time, the mixture shrinks, so it is applied again, and the excess is removed.
After drying, the surface is sanded again, but the disc is now used with at least 50 abrasive units. If necessary, another treatment with an acrylic mixture is carried out, and then the final grinding is performed using a 100 abrasive disc.
The last step in making a tabletop with your own hands is polishing the product. When polishing, grinding discs are used alternately, having abrasiveness from 400 to 1500 units. The surface is polished slowly and thoroughly, while working it is necessary to constantly moisten the polishing wheels.
After the end of the polishing process, the surface of the tabletop created by oneself looks smooth and shiny. At first glance, it is difficult to distinguish it from natural stone. The final stage of work is surface treatment to protect it from contamination with a special sealant and installation of the finished countertop in the place intended for it.
A do-it-yourself countertop can be supplemented with window sills made in the same way, which will give originality to the interior of the kitchen. If the area of \u200b\u200bthe room allows, then you can create a flower container that imitates natural stone.
To purchase a finished countertop for the kitchen that will fully meet your needs in terms of aesthetics, reliability and functionality, you need to prepare a considerable amount of money. It is much cheaper to make it yourself, especially since it is quite possible to do it at home. This idea can be implemented using wood, chipboard, liquid stone or concrete. Among these options, perhaps the most interesting is the concrete countertop, due to the availability of the material and the relative ease of working with it. Knowing the basics of concreting, you can not only make a new work surface in the kitchen, but also restore the old one, which will make it possible to save even more.
Concrete by its structure is a hard and durable material that can withstand high temperature. In this regard, it is practically not inferior to granite, although it costs an order of magnitude cheaper. However, the concrete surface has one feature that must be taken into account when making a kitchen worktop. The fact is that concrete consists of pores that can become clogged with various organic substances, which complicates the care of the kitchen. In addition, this material must be protected from acid-containing agents, since they can destroy calcium, which is the main binding element in concrete.
Note! Negative impact even a drop of lemon juice can leave a stain on a concrete surface.
This disadvantage is easily eliminated with the help of a protective polymer layer, which is applied to the concrete after it hardens. A concrete countertop with such protection is easy to clean and retains its appearance over a long period. However, it is not recommended to use such a surface as a cutting board or put a hot frying pan on it, because, unlike concrete, the polymer coating is less resistant to such loads.
Uncoated concrete countertop can be used in a living room, bedroom or office where there are no stringent performance requirements
The basis for the manufacture of concrete furniture is a standard technology that is used in construction. To make a concrete countertop with your own hands, you need to complete several steps, each of which is important in its own way.
Since the kitchen countertop in our case is made of concrete, you need to prepare the main components for its production:
Advice! To make the countertop look like marble, granite, or have any other shade other than gray, a special pigment (color) is added to the mixture, which can be purchased at any hardware store.
For the manufacture of formwork, you will need a wooden beam 50x30 mm and moisture-resistant plywood 12 mm thick. As a base, instead of plywood, you can use a sheet of laminated chipboard of the appropriate thickness. The main thing is that the base is perfectly flat and does not succumb to deformation under the load of the plate.
Considering that the manufacture of the countertop will be done by hand, we will need the following set of tools:
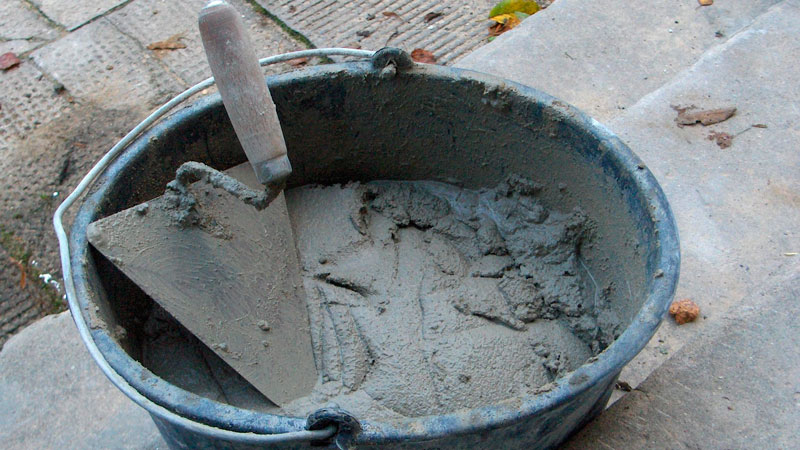
- shovel;
- bucket or other container;
- construction mixer or concrete mixer;
- Master OK;
- jigsaw;
- screwdriver;
- grinder;
- tape measure, level, pencil.
Product drawing
The value of a quality sketch is difficult to overestimate. The correct drawing greatly simplifies the work, and the wrong one adds headaches during the installation of the countertop. It is very important to accurately measure the parameters of the kitchen, the location of cabinets and plumbing fixtures. If it is necessary to place a sink or hob, then the place for their installation must be calculated down to the millimeter.
An example of a drawing of a concrete countertop
Advice! If the overall structure has significant dimensions, then it is better to divide it into several parts in order to simplify the process of installing the plate.
Formwork creation
We lay a sheet of plywood or chipboard on a flat surface, after which we transfer the previously prepared drawing with a ruler and a pencil. On each line we install a wooden beam 50x30 mm, so that in the end the thickness of our countertop is 50 mm. Exactly given parameter considered optimal for a concrete product: reducing the thickness will make the structure fragile, increasing it will make it too heavy.
The fastening of the formwork walls must be strong enough to withstand the load created by the concrete during its curing. It is better to connect the joints of two walls using corners or long screws (from 60 mm).
The place under the sink is located depending on the type and dimensions of the plumbing fixture. There are two types of sinks: built-in and overhead. The second option has a horizontal side about 30 mm wide, which must be taken into account when drawing up the drawing.
Advice! If you decide to make a concrete countertop for the kitchen, then it is better to use an overhead sink. Firstly, embedded models have a landing chamfer, which is not so easy to make. Secondly, the presence of a side allows you to make a small error when creating a hole for the sink.
It is also necessary to provide a hole for the mixer. For this you can use plastic pipe diameter 35 mm ( standard size mixer mounting pipe).
Formwork for pouring concrete countertops
Installation of the reinforcing frame
The frame is a steel mesh with a mesh size of 25x25 mm. This structure must be placed inside the formwork so that it is at a distance of 25 mm from plywood and walls.
Before mounting the reinforcing frame, a polyethylene film is laid on the base. Its edges must be brought to the side boards. At the same time, it is very important that the film lies without wrinkles, if you do not want to observe their imprint on the concrete slab.
Increasing the load-bearing capacity with a steel frame
Pouring concrete
Do-it-yourself concrete for making countertops is done according to classic recipe:
- 1 share of cement;
- 2 shares of sand;
- 4 shares of filler;
- 0.5 parts of water.
At the first stage, cement is mixed with water until a homogeneous mass is obtained, after which the remaining ingredients are added to the mixture. The process of concrete preparation itself must be carried out at low speeds, thoroughly mixing the solution.
Important! Do not increase the amount of water in order to fast food mixtures. Excessive moisture content in the solution will cause many pores to appear after it dries.
After pouring and uniform distribution of concrete over the entire area of the formwork, it is covered with a film and left in this state for a day. After 24 hours, the film is removed and a wet cloth is placed in its place to prevent cracking. Formwork can be dismantled after 48 hours.
Surface treatment
The countertop for the kitchen should be perfectly smooth, so the front side is sanded. For such purposes, it is better to use a grinder, since manual surface treatment with sandpaper will take a lot of time and effort.
First, the slab is ground with a coarse-grained wheel. After obtaining a smooth surface, processing is carried out with fine-grained emery. Even though a polished concrete countertop already looks great, it still needs to be opened with a water-repellent polymer impregnation.
The last stage is grinding with a felt wheel using a special paste, after which the plate acquires “marble” characteristics.
Grinding a concrete slab for the kitchen
Restoring an old countertop with concrete
Concrete can be used not only for the manufacture of a monolithic slab. With its help, it is quite possible to restore the old surface. In this case, the costs in this case will be much less. Below we will consider how the restoration of the old countertop for the kitchen with our own hands is carried out.
Necessary materials
Since a too thick layer is not required in this case, we will use a concrete mixture for floor screed instead of the usual solution. For work we need the following materials:
- concrete mix for screed (finish);
- acrylic sealant;
- varnish for concrete;
- a container for preparing the mixture;
- 2 spatulas (20 mm and 10 mm);
- sandpaper;
- industrial mixer;
- Sander.
Note! The amount of concrete mix must be determined based on the coverage area. Usually, the material consumption is indicated on the packaging and averages 1.2-1.5 kg per 1 m² with a layer thickness of 1 mm.
Cement-based floor leveling mixes
Surface preparation
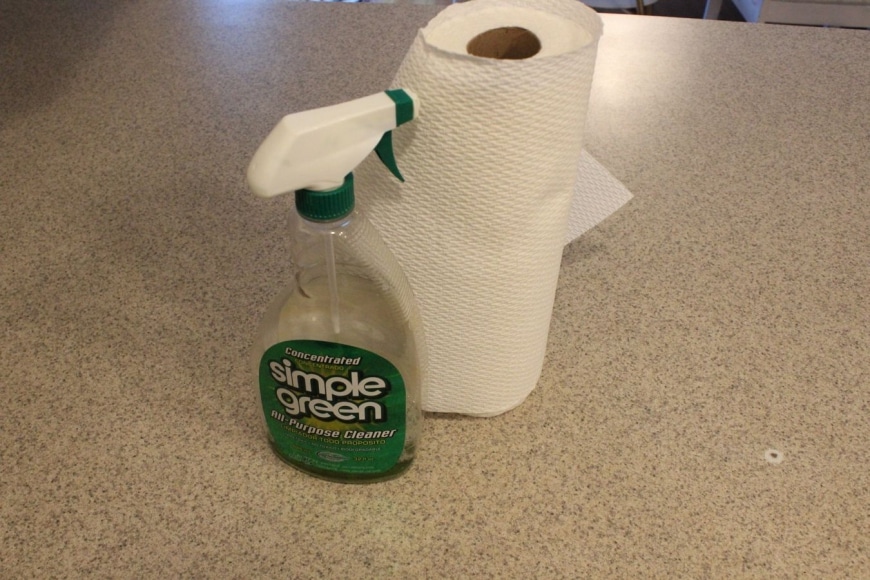
Countertops for the kitchen are often made of MDF, on which scratches, chips, temperature defects and grease stains appear during operation. Before applying concrete, the surface must be cleaned of all contaminants. Special attention give the remnants of fat - they can be removed with kitchen detergents. If silicone sealant is present on the surface, then this should also be removed, since concrete has poor adhesion to such materials.
Once the surface is completely clean, it should be abraded with 25-H or 20-H coarse sanding paper. The purpose of this process is to improve the adhesion of the concrete to the old surface by creating many scratches. After processing with sandpaper, the countertop must be washed and allowed to dry well.
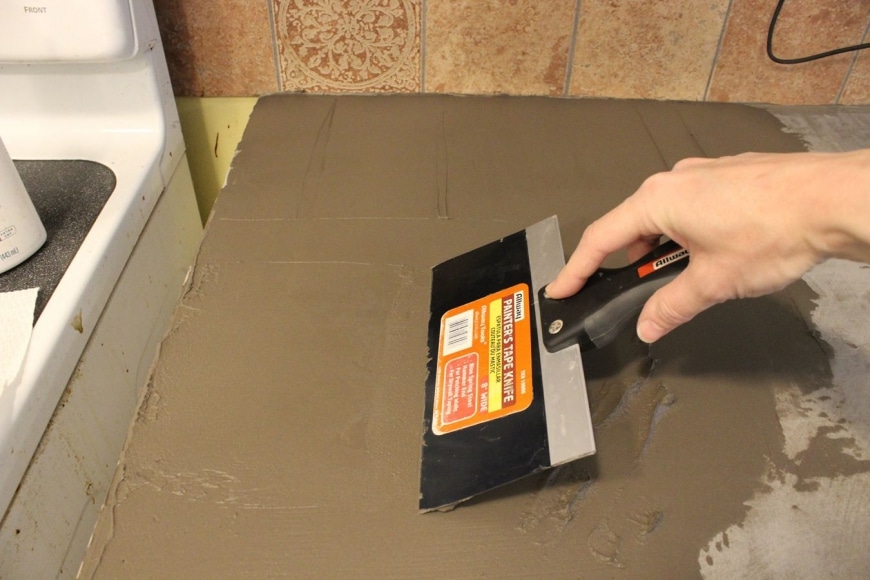
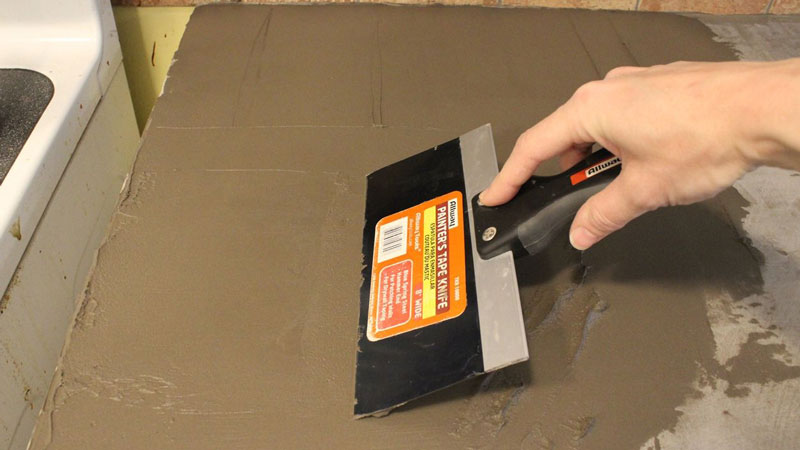
Applying the concrete mixture
The technology for the manufacture of concrete mix can be read on the packaging. Usually it is diluted with water in a ratio of 2 to 1. The main thing is that the consistency is not too liquid or thick, since in this case the process of applying the solution to the plate will become more complicated.
Advice! To begin with, prepare a small portion of the mixture to determine the amount of water to obtain the optimal viscosity. In the future, strictly observe this proportion. Even slight discrepancies can affect the shade of the dried concrete.
The application of concrete on the plane of the countertop is carried out using a wide spatula, while the ends are processed with a narrow spatula. Spread the mixture over the surface using slow and smooth movements to reduce the likelihood of bubbles. The thickness of the applied layer should not be large - 1-2 mm is enough.
Spreading the concrete mix on the countertop
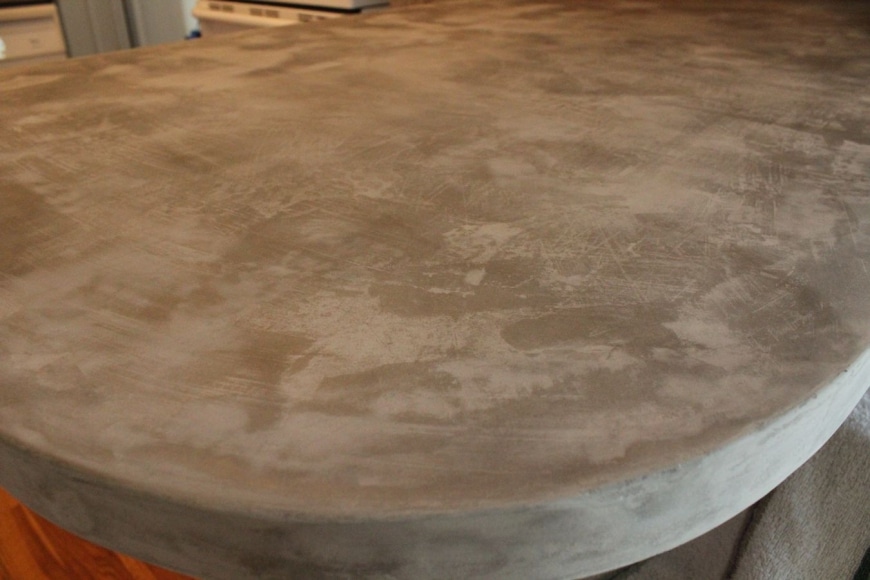
concrete grinding
After the layer has completely dried (about 24 hours), the concrete countertop is sanded, for which coarse-grained emery is used. Pay special attention to the smoothness of the surface - no unevenness should be felt when holding the hand.
Note! Grinding concrete is quite a dirty job. You must be prepared for the fact that the dust in the kitchen will be everywhere. Therefore, it is better not to do such work without a mask.
To make a reliable kitchen worktop with your own hands, you need to apply 3-4 layers of concrete, each of which is sanded after drying. If coarse-grained sandpaper is used to process the first layers, then the last layer, in addition to roughing, is subjected to fine grinding with fine-grained emery.
Sanded concrete countertop
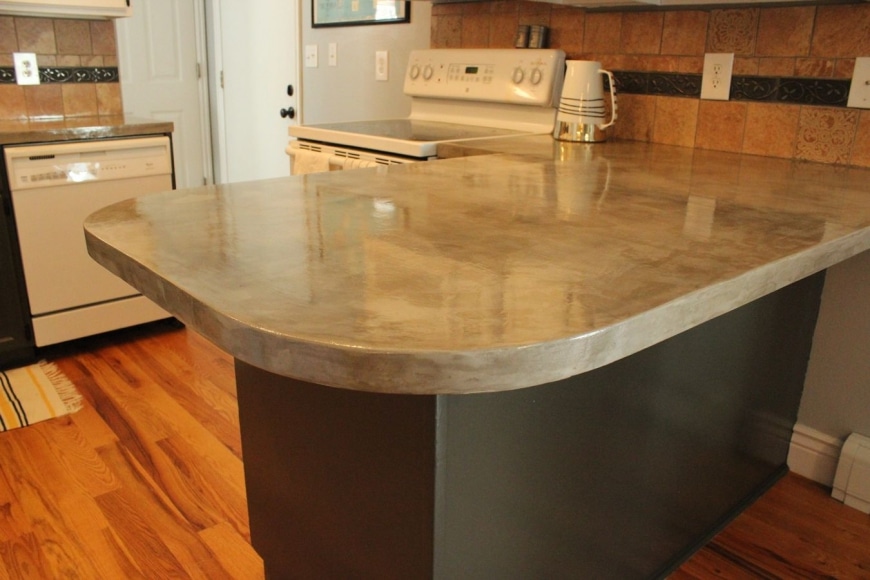
Waterproofing and varnishing
To protect concrete from moisture, a special acrylic-based sealant liquid is used. It is applied with an ordinary paint brush and, after drying, creates a reliable waterproofing layer. This material is very quickly absorbed and dries completely within a day, after which the second and last layer of sealant can be applied.
In order for the tabletop to have a glossy finish, after waterproofing, a layer of concrete varnish is applied, which, depending on the temperature in the room, takes from 4 to 8 hours to dry. After the varnish has dried, the plate is polished, for which fine-grained M14 sandpaper is used.
Do-it-yourself concrete countertop for the kitchen
In conclusion, we add that although the manufacturing technology of such a countertop is not particularly difficult, for its implementation it is necessary to have the skills to work with concrete. Therefore, in the absence of such construction experience, it is better to use professional help.
Video tutorial on making concrete countertops:
Detailed master class from the pros:
Concrete in the kitchen interior - inspired by design:
Description: War Thunder is a next generation military MMO game dedicated to...

"Titan Siege" is a large-scale online game on the theme of Scandinavian and ancient Greek...

Being an avid lover of German tank looks, I spent a lot of time...