Description: War Thunder is a next generation military MMO game dedicated to...

The interior of the room will not be complete if you do not use curtains to decorate the window. However, they must be hung on special structures - cornices. In turn, these elements must be securely fixed to the wall so that they do not fall and look aesthetically pleasing.
Of course, the installation of cornices should be transgressed when all other finishing work has already been completed and it remains only to supplement the room with accessories to complete the picture. Meanwhile, not every owner knows how to hang a curtain rod so that it is securely fixed and looks attractive.
Currently, fastening masses from various manufacturers are available in various shapes, parts and various properties. It is important to read the label information in order to the best way match the product with the size and weight of the item to be hung. Mounting masses are best suited for decoration in the form of small paintings, light canvas, posters or photographs. Many of these masses do not harden or dry out - they are reusable materials. Some masses are in the form of strips formed from an adhesive, in a set we buy, for example, a dozen strips.
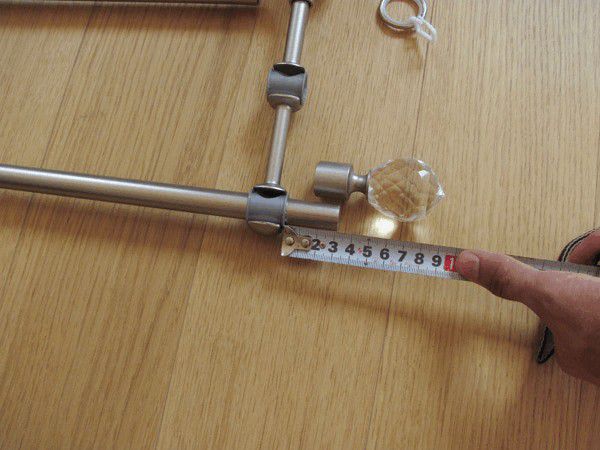
It is necessary to make accurate measurements - the width of the window opening and the wall. It is important to consider that the distance from the side walls to the eaves itself is not always the same and may differ depending on the type of construction.
When determining the place for the future cornice, it should be remembered that it is largely determined by the type of curtain fabric, so light curtains can be hung directly above the window, and voluminous ones will require the cornice to be attached to the wall.
Such strips stick to a clean, dry wall surface, an image or other object is pressed against them. The number and size of the weight strips correspond to the weight of the attached part. Their consistency is similar to chewing gum or plasticine. Tapes and plasters give us the possibility of a permanent fixation without the use of screws or nails, therefore without damaging the wall surface. They are bilateral, they provide strong bonds. Single slices can withstand loads up to 6 kg and are suitable for fixing mostly flat objects up to 10 mm thick.
The cornice should be placed so as not to create inconvenience in the process of opening and closing the window, so it should be fixed 10 cm above the window opening. There are single-row and multi-row cornices, so this design feature should be taken into account when choosing a place for it.
If a multi-row cornice is used, then during its installation it must be taken into account that the removal from the wall, the curtains should not touch the handles installed on the window, should not touch the battery and the protruding part of the window sill, if any.
Note. Installation patches do not like water and sunlight. If we want to attach such tapes to images such as paintings, shelves, rugs or other objects, we first stick the tape to a rougher surface. We insert slices vertically and the entire length of the object needs to be corrected. At the top of the fixation, it is recommended to additionally hold the grip in addition to the shorter vertical bands of tape. Then we apply the straps along the entire length. We apply a fixed object and then press firmly and firmly on the fixed surface for about 5 seconds.
In order to make calculations and measurements accurately, you should focus on the row of multi-row cornice closest to the window sill.
You can fix the cornice on the wall, focusing on its width along with the window opening, making calculations on the side walls. In addition, a lot depends on the type of curtains to be hung, so rolled or Roman ones are placed on the window frame.
Straps, Velcro and self-adhesive hooks. Practical solutions are also lines of strong and durable self-adhesive strips, Velcro and hooks. We can buy various decorations for different purposes, such as: - hanging pictures will receive Velcro and self-adhesive strips in versions adapted to different loads, - for decoration - transparent adhesive tapes. - for general use- hooks various shapes, size and strength.
The belts, Velcro and hooks are also available in a transparent version, making the attachments more discreet and almost invisible. Because there are so-called Additional strips, such fasteners can serve us many times, with a few design changes.
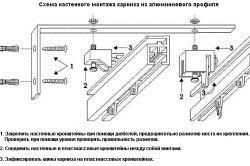
If the cornice is bought in a larger size, then there is nothing to worry about. In order to fix this, you need to cut the cornice pipe to the required length so that it fits perfectly. After that, you will need to try on the cornice again to the place where it is supposed to be fixed, and if everything is normal, then you can safely continue to work. After that, the pre-assembly phase begins. To do this, the bracket is fixed with self-tapping screws, which must be attached as discreetly as possible. It is required to carefully monitor that the heads of the screws remain in the upper part of the bracket, and when installing the eaves, they are directed to the ceiling.
The special elastic structure of the patch allows it to be attached very firmly to the surface, thereby creating an effective fixation. However, when peeling is enough to stretch it out, so it loses grip and comes off easily. Slices are usually double-sided, large ones can contain objects weighing from 1.5 to 2 kg. They are good even in wet conditions. We can attach a mirror to them, pick up hooks, hangers and handles.
Magnets can be easily glued to the wall, and for magnets, we can easily attach metal ornaments to the base. They allow you to mount various elements, including, for example, fashion photos or posters printed on metal sheet. Often they are unique with a hologram and handwritten signature of the designer and craftsman. If we want to admire them on the wall - without compromising our collection and the walls - magnets may be the best option.
Next, you need to take the two rings that come with the kit, and put them on the eaves. Then comes the turn of fixing the bracket. Then the rings are put on again. When fixing, it is necessary to control the moment that the pipe seam is directed towards the window. If it remains below, it will look ugly and attract attention. At the end of the work, it is necessary to use the level, also included in the kit, to track whether all parts of the structure are evenly located. 
The old simple way of attaching images is to place them on properly profiled hooks hung, for example, from doors or other projecting parts of the interior. To accommodate more images, photos or posters in our interiors, we can install special planks that are easy to hang. Changes in exposure will not be embarrassing. This solution gives you the ability to create and frequently update your own original gallery or exhibition. Another option is to use a wide range stickers, wallpaper and wallpapers.
For ease of installation work, cornices in most cases can be purchased complete with fasteners. The first thing to do is to mark on the wall the places where the holes will be made. Using a drill, they can be done in seconds. It is important to remember that the short cornice is mounted on two brackets. If the length of the cornice rod exceeds 2.4 meters, it will be necessary to install an additional bracket for reliability, preferably in the center. If the cornice is made of plastic or metal, then it should also be placed using two brackets. 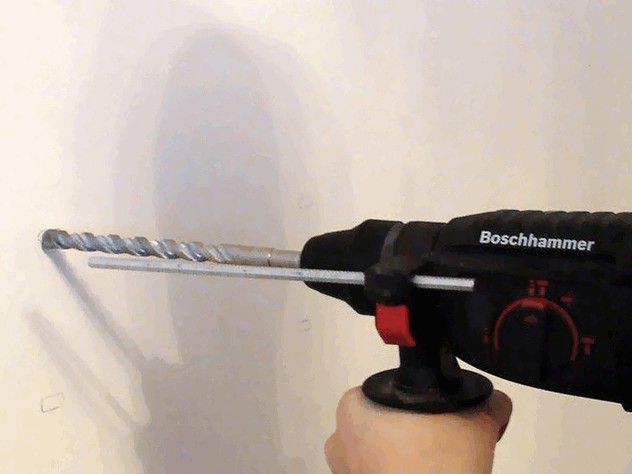
No problem, we can fix them by sticking to the walls. We do not destroy or break the earth. Such is the Polish kingdom - no one is worth standing in a luxurious apartment. Moreover, a little girl, despite her appearance, is quite a challenge. It is true that the problem of large surface cleaning has not been eliminated, but the question arises: how to arrange the interior to turn into a spacious space? Here are a few simple ways increase optical space.
We all know that mirrors in rooms do wonders, and yet we still tend to hang them in the bathroom and in the hall than in the living room. According to Kasia Roskovaska from Decornika, a specialist in small metrology: “A mirror is the easiest way to add space to a surface.”
In order to apply the correct markup and not spoil the wall with unnecessary holes, it is necessary to take the middle of the window opening as the center, and then measure an equal distance to the places where the brackets are supposed to be fixed. It is important to remember that they should not be located close to the window - the recommended distance is 35 cm. Also, do not hang the cornice too high, as this can cause inconvenience, for example, when removing curtains for washing. 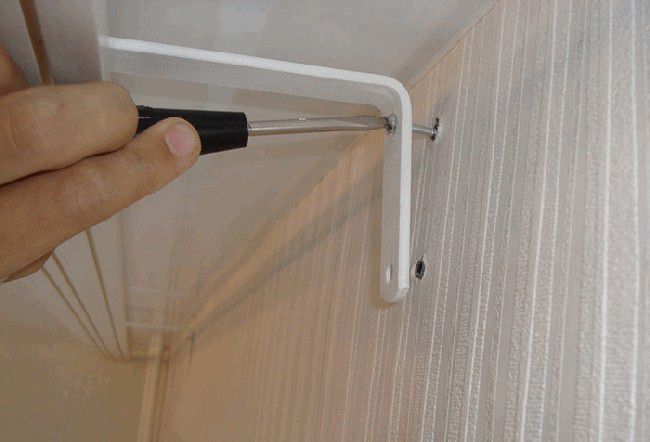
For good reason, this item should hang in every room. Kazia suggests to choose wide and horizontal - to optically expand the room on the wall in the living room or above the dressing table in the bedroom. In the corridor, you should install a wardrobe with mirrored sliding doors or a vertical mirror - to optically enlarge the corridor. Mirrors are very important here: "Don't decide on baroque frames that introduce subtlety," says Rostovska.
For years we have known how straps work in a silhouette when choosing clothing: vertical - widened, horizontal - widened. Exactly the same principle applies to the interior! If a children's room or a microphone - let's choose a wallpaper in a transverse stripe. Optically spacious rooms are getting louder. In turn, a low wardrobe or a veranda is worth "raising" the vertical strings. What to remember when choosing striped wallpaper? As Kasia Rostovskaya advises: “The less contrasting colors, the better.”
When marking the fasteners, it is necessary to focus on the ceiling, since it is not always perfectly even - if you take the window frame or level as a guide, the cornice may seem crooked, which will interfere with installation. For marking, you can use a simple pencil, since there is free space in any eaves, it will not be difficult to mark up.
In addition, as in the case of clothing, here too do not fall into a striped excess. The specialist suggests placing a few vertical "stripes" behind the TV on the wall, or three horizontal strips to increase the room's motion at the knee, both of which will enlarge the room. Lamperia effect, so you have to be careful with this pattern.
Minimalism and preservation in the layout of a small apartment is the key to its optical expansion. In Poland, we are very attached to curtains, curtains and other fabrics in the interior, so if we want them already, remember: the more decorative, the darker the interior. The heavier the material, the more overwhelming the effect, says Rostovska. This also applies to furniture: a sofa covered in ornate material takes up much more space than it actually does. If we have a small apartment, we forget about curtains and other fancy patterns and hang the simplest tulle.
After the initial calculations have been made, it will be necessary to connect the point marked earlier from the middle of the window and the distance at which the cornice will hang. Here you need to take into account the height of the ceilings in the room. The resulting place will become where the brackets will be located.
After the markup is done, you can proceed to the direct fixing of the eaves to the wall. To do this, holes are drilled in pre-marked places, then dowels of suitable diameter are hammered into them. In brick houses, it is best to use not dowels, but pine cork. You will need to drill holes in them, and then screw in the screws.
Instead of dyed, colored curtains in patterns, we opt for those that have a single color, preferably a light pastel. Also, the furniture should be clear and minimalist: according to the expert, there will be perfect underwear. Small interiors do not like dark or too gray colors. Ideally, they work well in pastels, especially in warm colors. Look at glass as well as glass elements and plexiglass. Walls, ceilings, wood, plastic or metal studs are all types of cornices.
Wall-mounted slaughterhouse - as the name suggests, it is mounted directly in the wall above the window opening and is a convenient solution for. Because of this, wall curtain beams are of great interest. Most often they are made in the form of rods with wheels, due to which the curtains move in the window decor.
For walls made of all other materials, you can safely use the set of fixing tools that is offered by the manufacturers of cornices and is included in the kit. Then you should fasten the bracket with screws and then install the eaves. 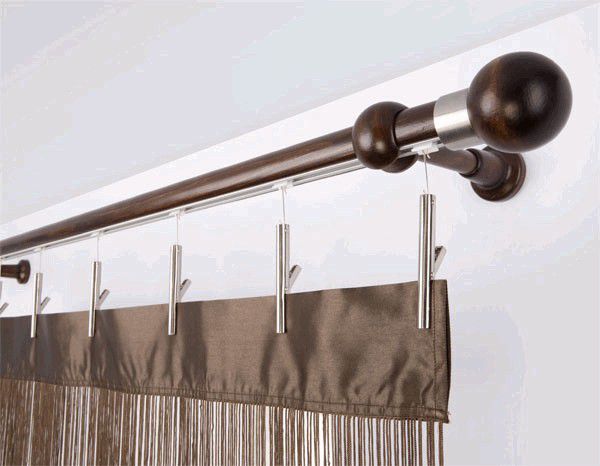
The ceiling carpet did not survive at all, it is fully functional, it allows you to easily curtain or curtain the length of the curtain. Several rails can be obtained depending on the number of brackets used. Designed for curtains and curtains. The ceiling panel can also be installed in the wall as a window decoration.
Due to its natural appearance, wooden curtains make the interior eco-friendly. They are matte, satin, shiny. They go well in country style, Scandinavian, vintage. Plastic curtain rods are designed for modern interiors. They work well in futuristic style furniture or retro interiors. Plastic curtain rods are cheap enough, but they don't mean a sticky solution.
Thus, the work of installing cornices requires attention to detail, since irregularities or an incorrect mark made in a hurry can disrupt the harmony and beauty of the entire interior. In addition, the extra holes made by the drill will not decorate the room, require cosmetic repairs or the search for accessories in order to close them from view. If done correctly, the cornices will last a long time and will be an integral part of the design of the room.
Metal cornices - most often selected. They are very popular due to their utility and aesthetics. Metal curtain rods present a range of possibilities. The metal does not have to be smooth, you can use metal strip solutions. In addition, it is also interesting to combine metal with other materials such as wood.
Rails mounted on the ceiling will work if the lintel is low or when blinds are used instead of blinds. Curtains are a solution that fits into classic and stylish interiors. The cornice should be beautiful and practical, showing both a light curtain and a heavy and thick veil.
If you entered new apartment or just decided to transform your home, then, in most cases, you will certainly install or change curtains (cornices) for curtains. Curtain rods are an excellent device that allows you not only to hang curtains and move them along a horizontal or vertical line, but also to complement your own appearance room interior. Therefore, before hanging a curtain rod, you should:
Rods are inserted into brackets attached to the wall, and curtains are hung on wheels, brackets, or rails made of wood, metal, or both. The ends of the rods are purchased separately as an additional decorative item so that we can match them perfectly with the rest of the room. The rail is a more modern solution. The metal rails are bolted to brackets mounted on the wall, and the hangers on hooks or frogs slide into the rails. Due to the fact that the rail is attached to the base, frogs can move along its entire length, regardless of the number of supports, but due to its structure, there is a risk of frogs being pinched.
The distance from the top of the window to the curtain should be at least 5 cm.
Hanging it for an experienced master is a matter of 15 minutes, but for a person who has never done this, installation can be a problem. If you want to quickly and efficiently hang any cornice, then you have come to the right place.
Curtains are of two types: ceiling and wall. There is no difference in installation, of course, except that the ceiling one needs to be hung on the ceiling, and the wall one - on the wall. Having bought the necessary, you can proceed with its installation. For proper and aesthetic mounting on the ceiling or wall, it is important to remember that it should be 30-50 cm wider than the window opening. You should also observe a sufficient distance from the top of the window to the curtain, so that in the future the curtain that we will hang does not interfere with the free opening of the window. At least it should be 5 cm. In addition, so that the curtain does not touch the window frame and radiators, if any, it is necessary to take into account the distance from the wall to the curtain, which cannot be less than 10 cm.
The height at which the cornice will be located from the ceiling can be varied, but if you look from the side, the closer to the ceiling, the prettier the curtains will look.
Therefore, the best distance from the eaves to the ceiling is 5-10 cm, depending on how and with what the curtains will be attached.
Back to index
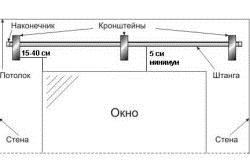
To determine the location of the cornice relative to the window opening, mark the center of the window and measure equal distances from it to the left and right to the brackets (or to the ends of the cornice frame if it is attached directly to the ceiling). It should be noted that the brackets should be placed at some distance from the edges of the window openings (300-400 mm). This is necessary so that when the curtains are assembled, the window opening is completely open.
To properly hang the curtain, you must first mark the place of fasteners.
To properly hang the curtain. you need to start marking the place of fasteners. To do this, we determine the length of the cornice, assemble it on the floor and measure the distance from the center to the consoles. Above the window, we make a mark in the form of a vertical stroke with a pencil on the wall, then measure the distance from the ceiling on which our curtain will be located, and apply a horizontal mark. From the mark, set aside the distance to the eaves in both directions. At a similar distance from the ceiling, in exactly the same way, we find a place and apply 2 horizontal risks. The intersection of the marks gives us the points at which we will need to drill holes.
To properly install and secure the cornice, you must first mark the place of attachment. To do this, having determined the desired length and cut off the excess with a hacksaw, we collect it on the floor and measure the distance from the center of the eaves to the consoles with a tape measure. The consoles, in turn, are spaced from the ends of the cornice at a distance of 15-20 cm. Above the window in its center, we make a mark on the wall with a vertical stroke with a marker, then we measure the distance from the ceiling at which our cornice will be located, and apply a horizontal risk. From the center mark, set aside the desired distance in one direction and the other. At the same distance from the ceiling, we apply two horizontal risks in the same way. The intersection of the marks will give us the points at which it will be necessary to drill holes.
Note that we set aside all points from the ceiling, since it is parallel to the ceiling, and not the horizon line, that the cornice should be located. This is due to the fact that if the ceiling is sloping, the eaves located along the horizon will appear uneven.
Back to index
For fastening to walls made of fragile material, it is usually sufficient to drill a hole of a larger diameter. So, for walls made of foam concrete or gypsum concrete, in most cases, 12 mm is enough. Since the dowels for such holes are designed for screwing thick and long screws, dowels of a smaller diameter are inserted into the holes of large dowels, driving them in with gentle hammer blows. Such fasteners have another advantage: they allow a large error when drilling holes.
For fastening to walls made of fragile material, it is usually sufficient to drill a hole of a larger diameter.
Sometimes it becomes necessary to choose fasteners for fastening yourself, for example, when hanging a cornice from one place to another or if factory fasteners are lost. A good option in this case is to use purchased anchors with internal threads. To attach the anchors, drill holes of the appropriate diameter, insert them into the holes and hit the punch or punch inserted inside the anchors to wedge them into the holes. Because anchors provide a stronger hold than plugged screws, the number of anchors may be less than the design number of screws.
String cornices are most often placed on the ceiling, although they are also suitable for mounting to walls. The installation order for them is as follows: we determine where it will be placed, then, having attached the mounts to the ceiling, we mark the holes for the screws with a thin pencil. We drill, then we hammer plastic dowels into the holes and screw the fasteners with screws. Then we insert the string, fix it and tighten it with the help of a tensioner, which is located on the mount. In the most common case, the tensioner is a simple tube, which, moving along the thread during rotation, is pulled into a string.
It is good to install a string cornice where, from the point of view of decor, it is undesirable to use a large-sized structure baguette cornices. The string is much less noticeable and creates an effect in which only the texture and color solutions of the curtains are visible. But along with grace, string-type cornices have their drawbacks.
Showcase Potolku Body
http://1popotolku.ru
Description: War Thunder is a next generation military MMO game dedicated to...

"Titan Siege" is a large-scale online game on the theme of Scandinavian and ancient Greek...

Being an avid lover of German tank looks, I spent a lot of time...