Description: War Thunder is a next generation military MMO game dedicated to...


Content
Sooner or later, if you have a child (especially a boy), you will be faced with the fact that you will have to make a tank from improvised means. Or do you need to apply theatrical production, arrange a school museum, pack a gift for a military man in an original way. We have already prepared, found valuable information and are ready to share with you the data and experience in creating a tank from cardboard.
A corrugated cardboard tank is a rather interesting and simple option that does not require a template. For such a do-it-yourself cardboard tank, you will need the following materials:
First you need to cut the dark blue material into thin strips, and green into wide strips. Now you need to twist the wheels out of the blue ones, and wrap them in green to make a caterpillar. Use PVA glue to join the pieces. If the wheels are too small, then you need to use several strips. You can also use double-sided tape, which holds small parts together quite well.
The future caterpillar of the combat vehicle will look something like this:
Please note that the wheels are not all the same size. Larger wheels are placed in the center, and smaller diameters on the sides. You need to make two of these tracks.
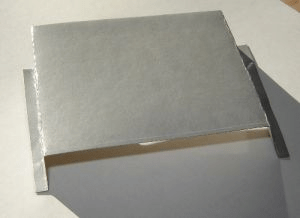
Now you need to prepare a platform from green corrugated material. You need to cut out a rectangle, bend the edges on both sides and glue the tracks, as shown in the photo:

Now you need to cut out two wide strips from blue cardboard, bend them in half and glue them to the base of the product:

Next, you need to do the rest of the details. Make the tower according to the principle of the wheel, only much larger, also twist the fuel tanks, the cannon and other necessary components at your discretion. As a result, you will get a beautiful and bright military vehicle that you can present to a child or make with him.

Making a cardboard tank with your own hands without a template turned out to be not so difficult, but we offer another interesting option.
This is also a fairly easy option and you will need ordinary thin colored cardboard for it. So, first, from a white or any other color of the sheet, you need to cut out two strips of medium width and glue them into a ring. Now you need to take a sheet of a different color and glue the finished rings to it and press them down slightly so that they look like a caterpillar.

From a wide strip of the same color, you need to build a cannon of a war machine.

You can make it triangular, as shown in the photo, or you can simply twist the cardboard into a tube.
At the preliminary stage, your craft will look something like this:

The tank can be decorated with military paraphernalia or left as is. Such crafts can be safely prepared for certain holidays to school. A cardboard tank is quickly assembled and does not require special financial costs.
And now we will tell you how to make a tank out of cardboard using an old box. Suitable packaging from under the TV or refrigerator. The main thing is that the material is dense, without any visible flaws. What else is required:
So, a do-it-yourself tank made of cardboard with a step-by-step description:
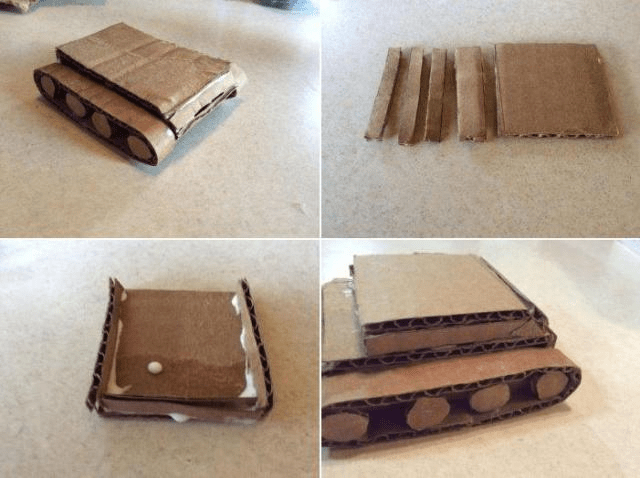
First you need to draw on the base material all the necessary details of the combat vehicle: 8 medium circles, two narrow and long stripes and two short wide stripes.

Now you need to make caterpillars - twist the parts into an oval and glue them together, glue wide stripes on one side. Use tape or glue to hold the pieces together.
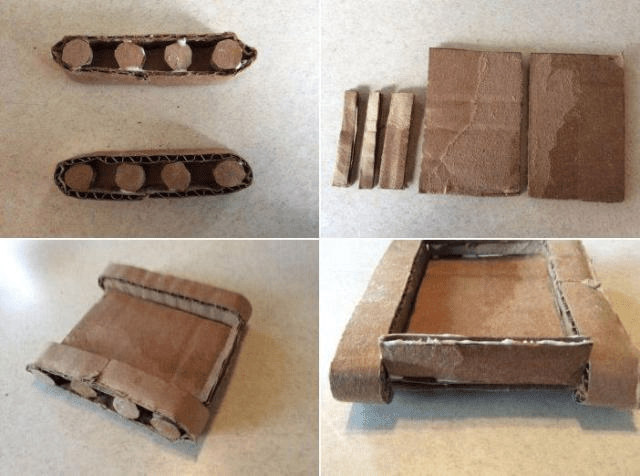
Now, on the side where the caterpillar has an open part, you need to glue your rounds. They will act as wheels in the caterpillar. Therefore, they must be placed at the same distance from each other. AT this case use PVA glue.


We only guide you in the right direction, and you yourself can come up with options for how to make a tower or a cannon. You can also cut out additional decor from cardboard in the form of a shovel, bucket, or some other components.

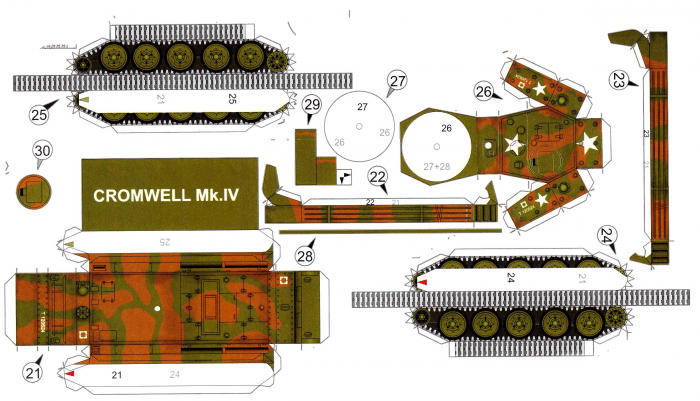
You can come up with a template yourself, draw and print, or you can use a ready-made pattern. Recent times paper crafts have become very fashionable. Not only children, but also adults are fond of this technique. We offer do-it-yourself cardboard tank schemes:
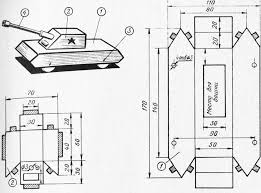
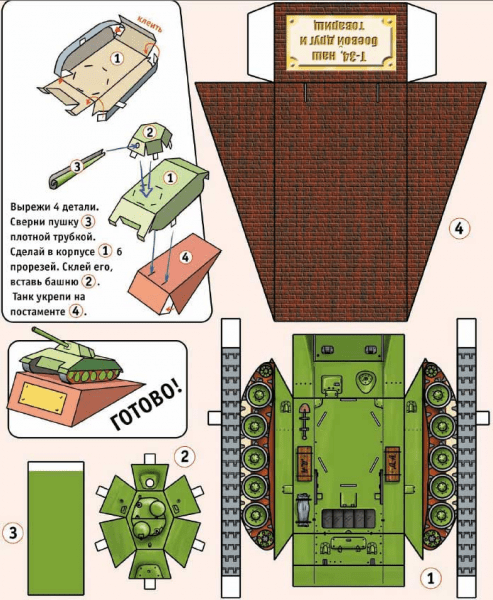
You can transfer the pattern with a pencil to the base material, or you can immediately print the pattern on a thin special cardboard.
Use an old pen or the non-sharp end of scissors to go over the dotted fold lines so that the fabric folds neatly. Use a small amount of PVA glue to assemble the model.
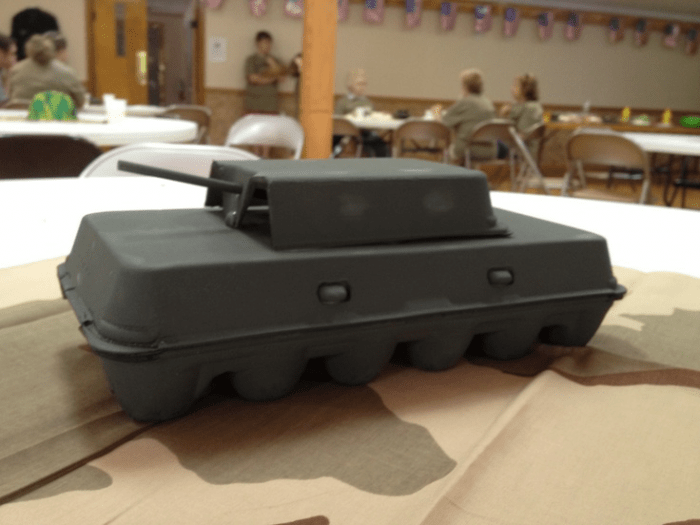
We will assume that a model of a tank made of cardboard can be made not only from this material, but also from a cage for chicken eggs as a base. You will also need black or dark green paint, a brush, a cardboard base for the turret, and a cannon tube. By the way, the tower itself can also be made from part of the cage. The model will look something like this:
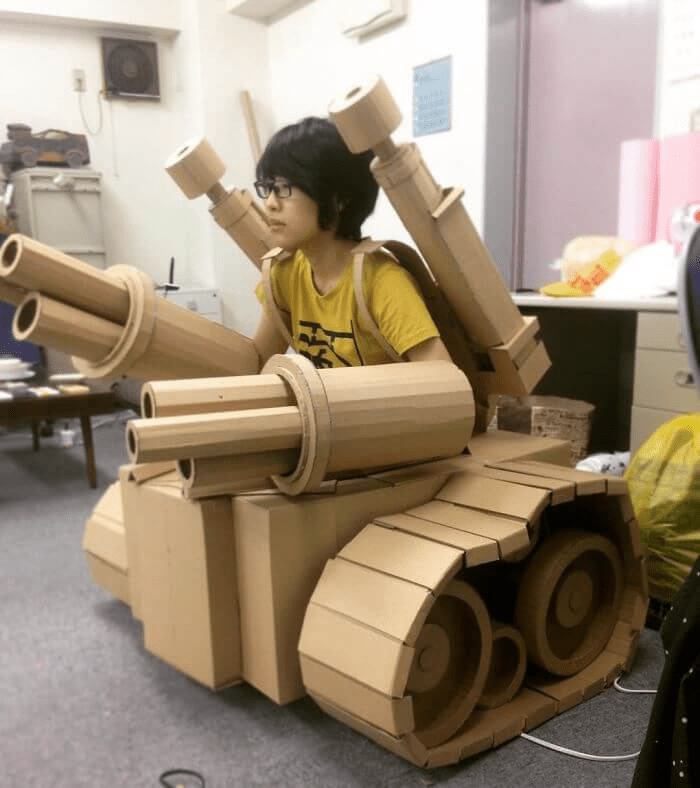
A large do-it-yourself cardboard tank can be made from an ordinary TV or refrigerator box. The principle of its creation is almost the same as in the case of a small model. We want to offer you some photo illustrations that (we are sure) will inspire you to create something really interesting and worthwhile.

In this case, a regular box from under office equipment was used. From above, a circle is not completely cut out, which plays the role of a hatch. BUT plastic pipe acts as a cannon.

It is pleasant to receive gifts, and receiving handmade gifts is doubly pleasant. There is not a single dad, grandfather or older brother who would not be delighted to receive a tank on Defender of the Fatherland Day, albeit from matchboxes. It’s not at all difficult to make a craft tank from matchboxes with your own hands, as you can see by studying our master class.
To create a tank we need:
Manufacturing:
 |
 |
 |
 |
 |
 |
 |
 |
Our matchbox tank is ready to participate in children's battles!
It is pleasant to receive gifts, and receiving handmade gifts is doubly pleasant. There is not a single dad, grandfather or older brother who would not be delighted to receive a tank on Defender of the Fatherland Day, albeit from matchboxes. It’s not at all difficult to make a craft tank from matchboxes with your own hands, as you can see by studying our master class.
To create a tank we need:
Manufacturing:
 |
 |
|
 |
|
 |
 |
 |
 |
Our matchbox tank is ready to participate in children's battles!
Plasticine molding is one of the favorite activities of all children. Modeling is not only very exciting, but also has a positive effect on sensory development, perfectly develops imagination and logic. You can start sculpting from plasticine already in the very early age- in 1 year. Of course, at first the child will simply crush the plasticine, tear off pieces from it. The second stage, which begins at about 1.5 years old, is the modeling of balls, sausages and cakes. And then you can already start to create - to do the simplest plasticine crafts with your child.
One of the amusing crafts that is very popular with boys is a matchbox. It is done quite easily. Any plasticine will do, even the cheapest, but for children under 3 years old it is better to buy soft plasticine. It costs a little more, but it's much easier to work with.
Necessary:
Sequencing:
1. We pinch off small pieces of red plasticine, roll them into balls, then flatten them into cakes and coat them with Matchbox. Gently level the plasticine with your fingers to get a flat surface.

2. Thus, we stick around the entire box.

3. Blind upper part tank. Cut off the third part from the black plasticine.

4. We attach it to the middle of the box.

5. Now let's make the tracks for the tank. Roll up 8 small balls of blue plasticine.

6. Flatten with fingers and make cakes. The resulting cakes need to stick on each side of the box - 3-4 pieces.

7. Let's make a sight out of a match. The match must be inserted into the cabin.

8. Attach a small blue ball to the other end of the match. It turned out to be such a nice tank. Be sure that after such a lesson, the child will definitely be satisfied!

You can play with them both at home and in the sandbox on the street and not be afraid that the child will lose or give these toys. So, let's look at how to make a matchbox tank with your son.
If a child likes to play at the table, then you can make a whole army of small tanks. For the manufacture of one tank you will need:
We begin to make a tank from matchboxes from the hull. Take the box and cover it with green paper. Instead of green, you can use a white sheet, which you color at the end of work with stars and inscriptions. Glue a strip of black paper on each edge to represent the caterpillars.
Next, try on the second box on the first and cut off half to form a cabin. At the same time, measure the length of the gun that you will make from the tube. Now cover the cabin with paper. In front, carefully make a slot and glue the cannon. Now it remains only to decorate the tank: stick round wheels on the sides of the hull, draw a red star on the sides of the cockpit. Use this technology to make enemy tanks.
For larger crafts, you will need more matchboxes. To make a tank 8-10 centimeters high, you need to take about 30 boxes. I'm starting to build combat vehicle from tracks and hull. To do this, put four boxes in a row, put two more rows on them. This will be one caterpillar that needs to be pasted over with green paper.
Glue a black stripe at the bottom, and decorate the sides and top with black paper folded into an accordion. It is irrational to make a caterpillar from all sides as an “accordion”, since the child will tear it anyway during the game. Glue black paper circles or buttons on the side. It is better if the tracks hang over the wheels. Do the same for the second caterpillar.
Your matchbox tank is almost ready. It remains to make the body and cabin. Take three boxes and stack them on top of each other. Cover with paper and glue to the tracks so that the body is in the middle. If this distance between the tracks does not suit you, then take more boxes.

By analogy with the body, you make a cabin out of three boxes. Make a cannon out of paper and glue it to the cockpit. The last step is to cut out the stars and glue them onto the tank.
This technology will make a beautiful tank, but it is more difficult to make it.

A matchbox tank can be extraordinary in size, shape, and design. The more material you use (cardboard, straws, rods from pens, felt-tip pens, buttons, wheels from broken cars, corks, bottle caps, etc.), the more interesting the crafts will turn out. Using the technologies described above, you can make a tank to fit the size of a child, that is, a real vehicle into which children can climb and fight battles.
Description: War Thunder is a next generation military MMO game dedicated to...

"Titan Siege" is a large-scale online game on the theme of Scandinavian and ancient Greek...

Being an avid lover of German tank looks, I spent a lot of time...